Fender Elite Series Owners Manual - Page 10
FreeflyteTM
 |
View all Fender Elite Series manuals
Add to My Manuals
Save this manual to your list of manuals |
Page 10 highlights
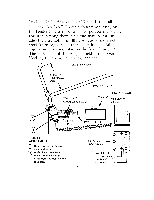
4. Rotate the Top-Just set screw counterclockwise until flush with the top of the bridge plate, and remove bridge from pivot block. 5. Make certain the Tremolo Claw is positioned for the gauge strings that you are using. There are two sets of pre-drilled holes to assure proper location. 6. Replace bridge and refasten the springs to the Tremolo Claw (reverse step 2 procedure). 7. Replace "dummy" coil, bridge pickup and pickguard. 8. Rotate Top-Just set screw clockwise until screw contacts lever plate (an increased resistance will be felt at this point). Note position of hex wrench handle. From this point, rotate set screw clockwise 8 complete revolutions. 9. Tune instrument to standard pitch. The FreeflyteTM Tremolo System may also be set with the bridge slightly raised above the top of the guitar. This allows the player to raise and lower the pitch when raising and lowering the tremolo arm. It also produces small amounts of de-tuning when bending individual strings. If you wish to operate the tremolo in this manner, follow this procedure: 1. With strings installed (using .010 gauge set), but not tuned to pitch and claw set in middle mounting holes, rotate adjustment screw counterclockwise until screw no longer contacts lever plate (at this point screw turns freely) Use middle mounting holes 00 when bridge is floating. 8
-
 1
1 -
2
-
3
-
4
-
 5
5 -
 6
6 -
 7
7 -
 8
8 -
 9
9 -
 10
10 -
 11
11 -
 12
12 -
 13
13 -
 14
14 -
 15
15 -
16
-
17
-
18
-
19
-
20
 |
 |
