Fantec DB-228U3e Manual
Fantec DB-228U3e Manual
 |
View all Fantec DB-228U3e manuals
Add to My Manuals
Save this manual to your list of manuals |
Fantec DB-228U3e manual content summary:
- Fantec DB-228U3e | Manual - Page 1
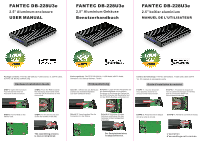
Aluminum enclosure USER MANUAL FANTEC DB-228U3e 2,5" Aluminium Gehäuse Benutzerhandbuch FANTEC DB-228U3e 2.5" boîtier aluminium MANUEL DE L'UTILISATEUR Package contents: FANTEC DB-228U3e, Y-USB Cable 3.0, eSATA Cable, Screws, CD, Backup software, bag Hardware Installation Guide STEP1: Open the - Fantec DB-228U3e | Manual - Page 2
plug from the Y-USB cable. HDD Formatting Guide - New hard disks have to be formatted, before you can use them. - Connect the FANTEC DB-229U3e to your PC's with USB : The "New Partition Wizard" will appear. Please follow the instruction of the wizard to complete. Schritt 3: Die externe HDD wird
-
 1
1 -
 2
2
 |
 |

FANTEC DB-228U3e
2.5” Aluminum enclosure
USER MANUAL
.
FANTEC DB-228U3e
2,5” Aluminium Gehäuse
Benutzerhandbuch
Packungsinhalt:
FANTEC DB-228U3e, Y-USB Kabel, eSATA Kabel,
Schrauben, CD, Backup Software, Tasche
Vis, CD, logiciels de sauvegarde, poche
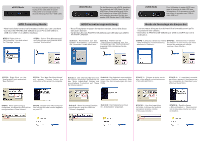
Einbauanleitung
Schritt1:
Öffnen Sie das Gehäuse.
Ziehen Sie die Elektronikplatine
aus dem Gehäuse heraus
Schritt 2:
Legen Sie die Festplatte auf
die Elektronikplatine u nd schieben
Sie diese in Richtung der Platine bis
der SATA-Stecker der Festplatte fest
mit der SATA-Buchse verbunden ist.
Schritt 3:
Verschrauben Sie die
Festplatte mit der Platine.
Schritt 4:
Schließen Sie das
Gehäuse und fixieren Sie das
Gehäuse mit den beiliegenden
schrauben.
Der Festplatteneinbau
ist abgeschlossen.
R
2.5”
boîtier aluminium
FANTEC DB-228U3e
MANUEL DE L'UTILISATEU
Contenu de l'emballage
: FANTEC DB-228U3e, Y-câble USB, câble eSATA
Guide d'installation du matériel
ETAPE 1 :
Ouvrez le boîtier.
Vous pourrez observer la
structure interne du boîtier.
ETAPE 2 :
Poussez le disque dur
vers la carte électronique et vérifiez
que le connecteur SATA est
correctement branché.
ETAPE 3 :
Fixez-les avec le disque
ETAPE 4 :
Fermer le couvercle et vissez.
L'opération
d'assemblage est terminée.
Package contents:
FANTEC DB-228U3e,Y-USB Cable 3.0, eSATA Cable,
Screws, CD, Backup software, bag
Hardware Installation Guide
STEP1:
Open the enclosure.
You will see the internal
tructure of the enclosure.
STEP2:
Push the HDD to
wards
the electronic board and make
sure the SATA connector is well
connected.
STEP3:
Fix
the HDD on the
electric card.
STEP4:
Fix
the enclosure and
screw the screws on the side.
The assembling process
is now accomplished.
s
dur de la carte de circuits.