Epson XP-6000 Start Here - Page 2
Load paper - cartridge
 |
View all Epson XP-6000 manuals
Add to My Manuals
Save this manual to your list of manuals |
Page 2 highlights
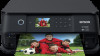
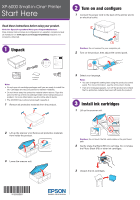
Caution: Do not touch the areas shown below. Doing so may prevent normal operation and printing. 4 Remove the cap from each ink cartridge. Note: Save the caps and use them to recap the ink cartridges after removing them for storage or disposal. 5 Insert the cartridges at an angle in the holder for each color. Press each cartridge down until it clicks. 4 Load paper See the instructions below to load paper. Cassette 1 Output tray Cassette 2/ front cover You can load the following paper sizes: • Cassette 1: 3.5 × 5-, 4 × 6-, or 5 × 7-inch photo paper • Cassette 2: Letter-, A4-, legal-size, or 8 × 10-inch paper See the online User's Guide for information about available paper types and sizes, loading capacities, and printing on CD/DVD/Blu-ray® discs. 1 Lower the front cover and raise the control panel. 6 Lower the scanner unit. 2 Pull out a paper cassette. 7 Select Installed and press the OK button to start charging the ink. Ink charging takes approximately 10 minutes. When you see a completion message on the printer's LCD screen, charging is complete. Caution: Don't turn off the printer or raise the scanner unit while the printer is charging or you'll waste ink. Note: • The printer is designed for use with Epson® cartridges only, not third-party cartridges or ink. • The cartridges included with the printer are designed for printer set up and not for resale. After some ink is used for charging, the rest is available for printing. 8 Follow the on-screen instructions to adjust the print quality of your product. Note: • You need to load paper before you can adjust the print quality. See "Load paper" below for details. • Select Adjust Later on the printer's LCD screen if you want to adjust the print quality later. For more information, see the online User's Guide. Cassette 1 Cassette 2 3 Slide the side edge guides outward. Cassette 1 Cassette 2 4 Insert the paper with the glossy or printable side facedown. Cassette 1 Cassette 2 Note: Make sure the paper is loaded against the back of the cassette and not sticking out from the front of the cassette.
-
 1
1 -
 2
2 -
 3
3 -
 4
4
 |
 |
