Epson TM-T88V UB-P02II Users Manual - Page 4
Precautions, Unpacking, Procedure
 |
View all Epson TM-T88V manuals
Add to My Manuals
Save this manual to your list of manuals |
Page 4 highlights
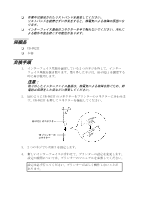
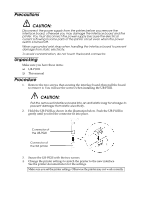
Precautions CAUTION: Disconnect the power supply from the printer before you remove the interface board; otherwise you may damage the interface board and the printer. You must disconnect the power supply because the electrical current is flowing in some parts of the printer circuit even when the power switch is turned off. Wear a grounded wrist strap when handling the interface board to prevent damage from static electricity. To avoid contamination, do not touch the board connector. Unpacking Make sure you have these items: ❏ UB-P02II ❏ This manual Procedure 1. Remove the two screws that securing the interface board; then pull the board to remove it. You will use the screws when installing the UB-P02II. CAUTION: Put the removed interface board into an anti-static bag for storage to prevent damage from static electricity. 2. Hold the UB-P02II as shown in the illustration below. Push the UB-P02II in gently until you feel the connector fit into place. Connector of the UB-P02II Connector of the TM printer 3. Secure the UB-P02II with the two screws. 4. Change the printer settings to match the printer to the new interface. See the printer documentation for the settings. Make sure you set the printer settings. Otherwise the printer may not work correctly.
-
 1
1 -
 2
2 -
 3
3 -
 4
4
 |
 |
