Epson SureColor P20000 Production Edition Best Practices in Borderless Printin - Page 7
pg. 7
 |
View all Epson SureColor P20000 Production Edition manuals
Add to My Manuals
Save this manual to your list of manuals |
Page 7 highlights
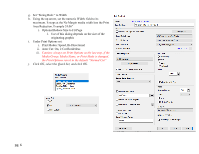
4. ONYX Placement (Upper Right side of Main RIP Screen) not in Quick Set settings a. Set Current Media and Page Size i. Click the Gear Icon for Current Media and Page Size ii. Select your Media Group (e.g. RGB Epson Precision Dot Photo) iii. Select your Media (e.g. Poster Paper Production (210)) iv. Select your Page Size (e.g. 24-inch Roll:NM (24.24" x 1200.00")) 1. Note: 24.24" reflects the paper width plus the default maximum borderless expansion width (0.24") This overprint is cut back in the Quick Set v. Click OK vi. Under the Placement drop down menu, select Print Jobs Individually vii. Click the Gear Icon for Placement 1. On the General tab, check Automatically start printing 2. Under Justification, select the Center radio button. viii. Note: Do not use "Conserve Media" or "Group Jobs Together" when setting up for borderless double-cut posters. pg. 7
-
 1
1 -
 2
2 -
 3
3 -
 4
4 -
 5
5 -
 6
6 -
 7
7 -
 8
8 -
 9
9 -
 10
10 -
 11
11 -
 12
12
 |
 |
