Epson Pro L1505U Users Guide - Page 164
Using Multiple Projectors, Multiple Projector Adjustment Overview
 |
View all Epson Pro L1505U manuals
Add to My Manuals
Save this manual to your list of manuals |
Page 164 highlights
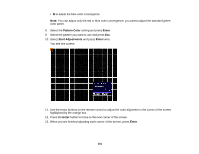
10. Select the area of the screen that you want to adjust and press Enter. 11. Select the color (Red, Green, or Blue) you want to adjust, and use the left arrow button to weaken the color tone and the right arrow button to strengthen the color tone. 12. Press Esc. 13. Repeat steps 10 and 11 for each area you want to adjust. 14. When you are finished, press the Menu button. Parent topic: Using Advanced Image Adjustment Features Using Multiple Projectors You can combine the projected images from two or more projectors to create one large image. Follow the instructions in these sections to setup and project from multiple projectors. Multiple Projector Adjustment Overview Projector Identification System for Multiple Projector Control Tiling Images into One Image Blending the Image Edges Adjusting the Black Level Matching Tint and Brightness (Screen Matching) Scaling an Image Parent topic: Adjusting Projector Features Multiple Projector Adjustment Overview If you are combining images from multiple projectors on a network, you can assign one projector as the "master" and automatically adjust all the images to match the "master" image. If the projectors are not connected to a network, you can match each projector's images manually. Note: Make sure all networked projectors are connected using LAN cables and have been assigned an IP address. Also disable Sleep Mode on each projector so they do not turn off during adjustment. 1. Turn on all the projectors. 2. To select a master projector for automatic adjustment, select Custom for the Light Source Mode setting and set the Brightness Level setting to the maximum value for all projectors. The projector with the darkest projected image is the master projector. 164
-
 1
1 -
2
-
3
-
4
-
5
-
6
-
7
-
8
-
9
-
10
-
11
-
12
-
13
-
14
-
15
-
16
-
17
-
18
-
19
-
20
-
21
-
22
-
23
-
24
-
25
-
26
-
27
-
28
-
29
-
30
-
31
-
32
-
33
-
34
-
35
-
36
-
37
-
38
-
39
-
40
-
41
-
42
-
43
-
44
-
45
-
46
-
47
-
48
-
49
-
50
-
51
-
52
-
53
-
54
-
55
-
56
-
57
-
58
-
59
-
60
-
61
-
62
-
63
-
64
-
65
-
66
-
67
-
68
-
69
-
70
-
71
-
72
-
73
-
74
-
75
-
76
-
77
-
78
-
79
-
80
-
81
-
82
-
83
-
84
-
85
-
86
-
87
-
88
-
89
-
90
-
91
-
92
-
93
-
94
-
95
-
96
-
97
-
98
-
99
-
100
-
101
-
102
-
103
-
104
-
105
-
106
-
107
-
108
-
109
-
110
-
111
-
112
-
113
-
114
-
115
-
116
-
117
-
118
-
119
-
120
-
121
-
122
-
123
-
124
-
125
-
126
-
127
-
128
-
129
-
130
-
131
-
132
-
133
-
134
-
135
-
136
-
137
-
138
-
139
-
140
-
141
-
142
-
143
-
144
-
145
-
146
-
147
-
148
-
149
-
150
-
151
-
152
-
153
-
154
-
155
-
156
-
157
-
158
-
 159
159 -
 160
160 -
 161
161 -
 162
162 -
 163
163 -
 164
164 -
 165
165 -
 166
166 -
 167
167 -
 168
168 -
 169
169 -
170
-
171
-
172
-
173
-
174
-
175
-
176
-
177
-
178
-
179
-
180
-
181
-
182
-
183
-
184
-
185
-
186
-
187
-
188
-
189
-
190
-
191
-
192
-
193
-
194
-
195
-
196
-
197
-
198
-
199
-
200
-
201
-
202
-
203
-
204
-
205
-
206
-
207
-
208
-
209
-
210
-
211
-
212
-
213
-
214
-
215
-
216
-
217
-
218
-
219
-
220
-
221
-
222
-
223
-
224
-
225
-
226
-
227
-
228
-
229
-
230
-
231
-
232
-
233
-
234
-
235
-
236
-
237
-
238
-
239
-
240
-
241
-
242
-
243
-
244
-
245
-
246
-
247
-
248
-
249
-
250
-
251
-
252
-
253
-
254
-
255
-
256
-
257
-
258
-
259
-
260
-
261
-
262
-
263
-
264
-
265
-
266
-
267
-
268
-
269
-
270
-
271
-
272
-
273
-
274
-
275
-
276
-
277
-
278
-
279
-
280
-
281
-
282
-
283
-
284
-
285
-
286
-
287
-
288
-
289
-
290
-
291
-
292
-
293
-
294
-
295
-
296
-
297
-
298
-
299
-
300
-
301
-
302
-
303
-
304
-
305
-
306
-
307
-
308
-
309
-
310
-
311
-
312
-
313
-
314
-
315
-
316
-
317
-
318
-
319
-
320
-
321
-
322
-
323
-
324
-
325
-
326
-
327
-
328
-
329
-
330
-
331
-
332
-
333
-
334
-
335
-
336
 |
 |
