Epson ColorWorks C3500 Wristband Instruction Manual - Page 2

How to Use the Wristband, Notes After Use, Product Materials, Notes on Storage - labels

Page 2 highlights

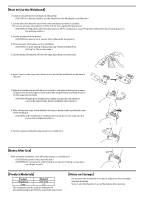
ʲHow to Use the Wristbandʳ 1. Install an attachment for wristband to the printer. 4. Print necessary information on the wristband. 5. Cut the printed wristband o from the edge by pulling it to both sides. 6. Insert 2 pins on the snap into 2 holes (in one end of the wristband) to the base of the pins. 7. Wrap the wristband around where you attach it, and whlie leaving proper space (of about one or two ngers), close and x the snap rmly by inserting the pins on the snap into the holes. 8. After closing the snap, check whether the snap is rmly xed by pulling the end of the wristband. 9. Cut the surplus wristband using scissors or a similar tool. ʲNotes After Useʳ After using the wristband, cut it o using scissors or a similar tool. ʲProduct Materialsʳ Product Wristband Snap Material PET PE PE The wristband and the snap are antibacterial. Dermatologically tested (by the closed skin patch test). ʲNotes on Storageʳ Do not store the wristbands in locations subject to direct sunlight and high humidity. Store in an individual box in a cool dark place after opening.

  • 1
  • 2

The wristband and the snap are antibacterial.
Dermatologically tested (by the closed skin patch test).
How to Use the Wristband
Notes After Use
Product Materials
Notes on Storage
1. Install an attachment for wristband to the printer.
<CAUTION: For how to install it, see the Attachment for Wristband User's Manual.>
5. Cut the printed wristband off from the edge by pulling it to both sides.
6. Insert 2 pins on the snap into 2 holes (in one end of the wristband) to the base of
the pins.
8. After closing the snap, check whether the snap is firmly fixed by pulling the end
of the wristband.
9. Cut the surplus wristband using scissors or a similar tool.
After using the wristband, cut it off using scissors or a similar tool.
Do not store the wristbands in locations subject to direct sunlight
and high humidity.
Store in an individual box in a cool dark place after opening.
7. Wrap the wristband around where you attach it, and whlie leaving proper space
(of about one or two fingers), close and fix the snap firmly by inserting the pins
on the snap into the holes.
<CAUTION: For how to set it, see the User's Manual for the printer.>
<CAUTION: For print setting of the printer, see "Recommended Print
Setting" on the reverse page.>
4. Print necessary information on the wristband.
3. Set the wristband to the printer.
<CAUTION: If the wristband is not fixed, insert each pin on the snap into the
hole in the wristband and fix it.>
<CAUTION: Wrapping the wristband too tightly may get the skin sweaty or
cause a skin abnormality. Ensure vantilation while using it.>
<CAUTION: Be careful not to hurt the skin.>
<CAUTION: Do not open the snap forcibly once you fix it. Doing so may injure
your finger or nail.>
<CAUTION: Peeling off the label forcibly may tear off the wristband or cause the printer malfunction by remaining glue on
the printing surface.>
2. Cut the label that fixes the end of the rolled wristband to make it available.
Do not use an outer circumference of the roll, for it is wrapped for protection.
Product
Material
Wristband
Snap
PET
+
PE
PE