Epson ActionPC 2000 User Manual - Page 77
Attaching Mounting Fames to the Drive, positioned over the holes in the drive. Then secure
 |
View all Epson ActionPC 2000 manuals
Add to My Manuals
Save this manual to your list of manuals |
Page 77 highlights
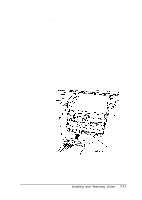
Attaching Mounting Fames to the Drive Follow these steps to attach mounting frames to a drive: 1. Locate the two mounting frames and four screws that came with the drive. 2. As shown below, place a mounting frame on one side of the drive and align it so that the oval holes in the frame are positioned over the holes in the drive. Then secure the mounting frame to the drive with the two screws. 3. Repeat step 2 to attach a mounting frame to the other side of the drive. 4-16 Installing and Removing Drives
-
 1
1 -
2
-
3
-
4
-
5
-
6
-
7
-
8
-
9
-
10
-
11
-
12
-
13
-
14
-
15
-
16
-
17
-
18
-
19
-
20
-
21
-
22
-
23
-
24
-
25
-
26
-
27
-
28
-
29
-
30
-
31
-
32
-
33
-
34
-
35
-
36
-
37
-
38
-
39
-
40
-
41
-
42
-
43
-
44
-
45
-
46
-
47
-
48
-
49
-
50
-
51
-
52
-
53
-
54
-
55
-
56
-
57
-
58
-
59
-
60
-
61
-
62
-
63
-
64
-
65
-
66
-
67
-
68
-
69
-
70
-
71
-
 72
72 -
 73
73 -
 74
74 -
 75
75 -
 76
76 -
 77
77 -
 78
78 -
 79
79 -
 80
80 -
 81
81 -
 82
82 -
83
-
84
-
85
-
86
-
87
-
88
-
89
-
90
-
91
-
92
-
93
-
94
-
95
-
96
-
97
-
98
-
99
-
100
-
101
-
102
-
103
-
104
-
105
-
106
-
107
-
108
-
109
-
110
-
111
-
112
-
113
-
114
-
115
-
116
-
117
-
118
-
119
-
120
-
121
-
122
-
123
-
124
-
125
-
126
-
127
-
128
-
129
 |
 |

Attaching Mounting Fames to the Drive
Follow these steps to attach mounting frames to a drive:
1.
Locate the two mounting frames and four screws that came
with the drive.
2.
As shown below, place a mounting frame on one side of the
drive and align it so that the oval holes in the frame are
positioned over the holes in the drive. Then secure the
mounting frame to the drive with the two screws.
3.
Repeat step 2 to attach a mounting frame to the other side of
the drive.
4-16
Installing and Removing Drives