Dell S2417DG Monitor Users Guide
Dell S2417DG Manual
 |
View all Dell S2417DG manuals
Add to My Manuals
Save this manual to your list of manuals |
Dell S2417DG manual content summary:
- Dell S2417DG | Monitor Users Guide - Page 1
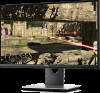
Dell S2417DG Monitor User's Guide Model: S2417DG Regulatory model: S2417DGb - Dell S2417DG | Monitor Users Guide - Page 2
CAUTION: A CAUTION indicates potential damage to hardware or loss of data if instructions are not followed. WARNING: A WARNING indicates a potential for property damage, personal injury, or death. Copyright © 2016 Dell Inc. All rights reserved. This product is protected by U.S. and international - Dell S2417DG | Monitor Users Guide - Page 3
and Pixel Policy 20 Maintenance Guidelines 20 Setting Up the Monitor 21 Attaching the Stand 21 Connecting Your Monitor 23 Organizing Your Cables 24 Removing the Monitor Stand 25 Wall Mounting (Optional 26 Operating the Monitor 27 Power On the Monitor 27 Using the Front-Panel Controls 27 - Dell S2417DG | Monitor Users Guide - Page 4
, and Vertical Extension 36 Rotating the Monitor 37 Adjusting the Rotation Display Settings of Your System 38 Troubleshooting 39 Self-Test 39 Built-in Diagnostics 40 Common Problems 41 Product Specific Problems 43 Universal Serial Bus (USB) Specific Problems 44 Appendix 45 FCC Notices - Dell S2417DG | Monitor Users Guide - Page 5
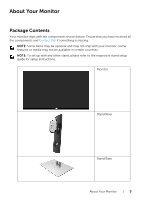
Contact Dell if something is missing. NOTE: Some items may be optional and may not ship with your monitor. Some features or media may not be available in certain countries. NOTE: To set up with any other stand, please refer to the respective stand setup guide for setup instructions. Monitor Stand - Dell S2417DG | Monitor Users Guide - Page 6
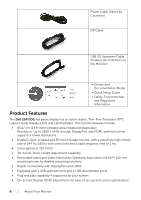
by Countries) DP Cable USB 3.0 Upstream Cable (Enables the USB Ports on the Monitor) • Drivers and Documentation Media • Quick Setup Guide • Safety, Environmental, and Regulatory Information Product Features The Dell S2417DG flat panel display has an active matrix, Thin-Film Transistor (TFT), Liquid - Dell S2417DG | Monitor Users Guide - Page 7
• Software and documentation media includes an Information File (INF), Image Color Matching File (ICM), and product documentation. • Security lock slot. . • Energy Gauge shows the energy level being consumed by the monitor in real time. • Analog backlight dimming control for flicker-free display - Dell S2417DG | Monitor Users Guide - Page 8
slot Use Wall mount monitor using VESA-compatible wall mount kit (100 mm x 100 mm). Lists the regulatory approvals. Releases stand from monitor. Secures monitor with security lock (security lock not included). Refer to this label if you need to contact Dell for technical support. Use to organize - Dell S2417DG | Monitor Users Guide - Page 9
with PowerShare 3 Headphone-out jack Use Connect your USB device. NOTE: To use this port, you must connect the USB cable (shipped with your monitor) from the USBupstream port on the monitor to your computer. Connect your USB device (also supports fast charging). Connect the headphones. About Your - Dell S2417DG | Monitor Users Guide - Page 10
port 7 USB 3.0 ports (2) Use Connect the power cable (shipped with your monitor). To lock the stand to the monitor using a M3 x 6 mm screw (screw not included). Connect your speakers. NOTE: This port does not support headphones. Connect to your computer using the DP cable (shipped with your - Dell S2417DG | Monitor Users Guide - Page 11
Area Pixel pitch Pixel per inch (PPI) Viewing angle Brightness Contrast ratio Display screen coating Backlight Response time (typical) Color depth Color gamut Built-in devices Connectivity Adjustability S2417DG Active matrix - TFT LCD TN 16:9 604.7 mm (23.8 inches) 526.85 mm (20.74 inches) 296.35 - Dell S2417DG | Monitor Users Guide - Page 12
Swivel Pivot Dell Display Manager Compatibility Security 0 to 130 mm -5° to 21° -45° to 45° -90° to 90° No Security lock slot (cable lock sold separately) * Color gamut (typical) is based on CIE1976 (82%) and CIE1931 (72%) test standards. Resolution Specifications Model S2417DG Horizontal scan - Dell S2417DG | Monitor Users Guide - Page 13
Sync Polarity (Horizontal/ Vertical) NOTE: This monitor supports NVIDIA G-Sync and NVIDIA 3D Vision Ready. Please visit http://www.geforce.com to know whether your NVIDIA graphics card supports the G-SYNC feature. Electrical Specifications Model S2417DG Video input signals • HDMI 1.4, 600 - Dell S2417DG | Monitor Users Guide - Page 14
stand assembly and cables Weight without stand assembly (For wall mount or VESA mount considerations - no cables) Weight of stand assembly Front frame gloss S2417DG • Digital: HDMI, 19 pins (cable not included) • 45 lb) 1.93 kg (4.25 lb) Black Frame - 30 gloss unit (max.) 14 | About Your Monitor - Dell S2417DG | Monitor Users Guide - Page 15
Environmental Characteristics Model S2417DG Compliant Standards • RoHS-compliant • Arsenic-Free glass and Mercury typical) Power Management Modes If you have VESA's DPM™ compliance display card or software installed in your PC, the monitor can automatically reduce its power consumption when not - Dell S2417DG | Monitor Users Guide - Page 16
ML3(p) 11 GND 12 ML3(n) 13 GND 14 GND 15 AUX(p) 16 GND 17 AUX(n) 18 GND 19 Re-PWR 20 +3.3 V DP_PWR 16 | About Your Monitor - Dell S2417DG | Monitor Users Guide - Page 17
Channel (DDC) protocols so that the system can configure itself and optimize the monitor settings. Most monitor installations are automatic; you can select different settings if desired. For more information about changing the monitor settings, see Operating the Monitor. About Your Monitor | 17 - Dell S2417DG | Monitor Users Guide - Page 18
Universal Serial Bus (USB) Interface This section gives you information about the USB ports that are available on the monitor. NOTE: This monitor is Super-Speed USB 3.0 compatible. Transfer Speed Super-speed High speed Full speed Data Rate 5 Gbps 480 Mbps 12 Mbps Power Consumption* 4.5 W (Max, - Dell S2417DG | Monitor Users Guide - Page 19
• Power Charging Port- the port with lightning icon; supports fast current charging capability if the device is BC1.2 compatible. NOTE: USB 3.0 functionality requires a USB 3.0-capable computer. NOTE: The monitor's USB interface works only when the monitor is On or in the power save mode. If - Dell S2417DG | Monitor Users Guide - Page 20
on Dell Monitor Quality and Pixel Policy, see Dell Support site at: http://www.dell.com/support/monitors. Maintenance Guidelines Cleaning Your Monitor CAUTION: Read and follow the Safety Instructions before cleaning the monitor. WARNING: Before cleaning the monitor, unplug the monitor power - Dell S2417DG | Monitor Users Guide - Page 21
shipped from the factory. NOTE: This is applicable for a monitor with a stand. When any other stand is bought, please refer to the respective stand setup guide for the set up instructions. To attach the monitor stand: 1 Remove the cover and place the monitor on it. 2 Insert the two tabs on the upper - Dell S2417DG | Monitor Users Guide - Page 22
5 Insert the stand base blocks fully into the stand slot. 6 Lift the screw handle and turn the screw clockwise. 7 After fully tightening the screw, fold the screw handle flat within the recess. 22 | Setting Up the Monitor - Dell S2417DG | Monitor Users Guide - Page 23
Instructions. NOTE: Route the cables through the cable-management slot before connecting them. NOTE: Do not connect all cables to the computer at the same time. To connect your monitor cable. 2 Connect the DP or HDMI cable from your monitor to the computer. Connecting the DisplayPort (DP to DP) - Dell S2417DG | Monitor Users Guide - Page 24
Serial Bus (USB) Specific Problems. 5 Use the cable slot on the monitor stand to organize the cables. Organizing Your Cables After attaching all necessary cables to your monitor and computer, (See Connecting Your Monitor for cable attachment,) organize all cables as shown above. 24 | Setting Up the - Dell S2417DG | Monitor Users Guide - Page 25
placed on a soft, clean surface. NOTE: This is applicable for a monitor with a stand. When any other stand is bought, please refer to the respective stand setup guide for the set-up instructions. .To remove the stand: 1 Place the monitor on a soft cloth or cushion. 2 Press and hold the stand release - Dell S2417DG | Monitor Users Guide - Page 26
4 Attach the mounting bracket from the wall mounting kit to the monitor. 5 Mount the monitor on the wall by following the instructions that comes with the wall mounting kit. NOTE: For use only with UL-listed wall mount bracket with minimum weight/load bearing capacity of 3.84 kg. 26 | Setting Up the - Dell S2417DG | Monitor Users Guide - Page 27
Controls Use the control buttons on the front of the monitor to adjust the characteristics of the image being displayed. As Front-Panel Button Description 1 Use this button to choose from a list of preset color modes. Shortcut key/ Preset Modes NOTE: The function is disabled when you are under - Dell S2417DG | Monitor Users Guide - Page 28
On and fully functional. A blinking white light indicates the power save mode. Front-Panel Button Use the buttons on the front of the monitor to adjust the image settings. Front-Panel Button Description 1 Use the Up button to adjust (increase ranges) items in the OSD menu. Up 2 Use the Down - Dell S2417DG | Monitor Users Guide - Page 29
Display (OSD) Menu Accessing the Menu System NOTE: If you change the settings and then either proceed to another menu or exit the OSD menu, the monitor automatically saves those changes. The changes are also saved if you change the settings and then wait for the OSD menu to disappear. 1 Press the - Dell S2417DG | Monitor Users Guide - Page 30
and press the button to decrease the contrast (min. 0 / max. 100). The Contrast function adjusts the degree of difference between darkness and lightness on the monitor screen. Input Source Use the Input Source menu to select between the different video signals that may be connected to your - Dell S2417DG | Monitor Users Guide - Page 31
with a blue tint. • Custom Color: Allows you to manually adjust the color settings. Reset Color Display Press the and buttons to adjust the three colors (R, G, B) values and create your own preset color mode. Reset your monitor color settings to the factory settings. Use Display to adjust - Dell S2417DG | Monitor Users Guide - Page 32
set the Response Time to Normal or Fast. Time ULMB ULMB (Ultra Low Motion Blur) helps have less of a motion blur effect while you are watching fast-moving images. When the graphics card supports you to operate the monitor at a higher following message appears to guide you through the process - Dell S2417DG | Monitor Users Guide - Page 33
this option to restore default audio settings. Select this option to adjust the settings of the OSD, such as, screen, and so on. Language Language options set the OSD display to one of the eight (min. 0 / max. 100). Timer Reset Menu Sets the length of time the OSD will remain active after - Dell S2417DG | Monitor Users Guide - Page 34
: When you are under 3D mode or ULMB mode, Preset Modes may not be set as a shortcut key. Power Saving The default setting is On, letting the monitor go to sleep as the system sleeps. Selecting Off may prevent the monitor from going into deep sleep and being unable to wake up. NOTE: Pressing - Dell S2417DG | Monitor Users Guide - Page 35
option, you may need to update your graphics driver. Depending on your computer, complete one of the following procedures: If you have a Dell desktop or portable computer: • Go to http://www.dell.com/support, enter your service tag, and download the latest driver for your graphics card. If you are - Dell S2417DG | Monitor Users Guide - Page 36
, please refer to the respective stand setup guide for set up instructions. Tilt, Swivel With the stand attached to the monitor, you can tilt and swivel the monitor for the most comfortable viewing angle. NOTE: The stand is detached when the monitor is shipped from the factory. Vertical Extension - Dell S2417DG | Monitor Users Guide - Page 37
Rotating the Monitor Before you rotate the monitor, your monitor should be fully vertically extended (Vertical Extension) and fully tilted up to avoid hitting the bottom edge of the monitor. Pivot clockwise Operating the Monitor | 37 - Dell S2417DG | Monitor Users Guide - Page 38
the Intel graphics tab, click Graphic Properties, select the Rotation tab, and then set the preferred rotation. NOTE: If you do not see the rotation option or it is not working correctly, go to www.dell.com/support and download the latest driver for your graphics card. 38 | Operating the Monitor - Dell S2417DG | Monitor Users Guide - Page 39
Troubleshooting WARNING: Before you begin any of the procedures in this section, follow the Safety Instructions. Self-Test Your monitor provides a self-test feature that allows you to check whether your monitor is functioning properly. If your monitor and computer are properly connected but the - Dell S2417DG | Monitor Users Guide - Page 40
inherent problem with your monitor, or with your computer and video card. NOTE: You can run the built-in diagnostics only when the video cable is unplugged and the monitor is in the built-in diagnostic tool, the monitor is functioning properly. Check the video card and computer. 40 | Troubleshooting - Dell S2417DG | Monitor Users Guide - Page 41
spots Brightness Problems Geometric Distortion Dell Monitor Quality and Pixel Policy, see Dell Support site at: http://www.dell.com/ support/monitors. • Reset the monitor to factory settings. • Adjust brightness & contrast controls via OSD. • Reset the monitor to factory settings. Troubleshooting - Dell S2417DG | Monitor Users Guide - Page 42
perform any troubleshooting steps. • Contact Dell immediately. • Ensure that the video cable connecting the monitor to the computer is connected properly and is secure. • Reset the monitor to factory settings. • Perform monitor self-test feature check to determine if the intermittent problem occurs - Dell S2417DG | Monitor Users Guide - Page 43
Possible Solutions • Reset the monitor to factory settings. • Turn Off the monitor, unplug the power cord, plug it back, and then turn On the monitor. • Check the signal source (aspect ratio) of DVDs, the monitor may display in full screen. • Run the built-in diagnostics. Troubleshooting | 43 - Dell S2417DG | Monitor Users Guide - Page 44
Serial Bus (USB) Specific Problems Specific Symptoms What You Experience Possible Solutions USB interface is USB peripherals not working are not working • Check that your monitor is turned On. • Reconnect wireless USB receiver as far away as possible from the USB 3.0 port. 44 | Troubleshooting - Dell S2417DG | Monitor Users Guide - Page 45
instructions Dell product catalog. Dell provides several online and telephone-based support and service options. Availability varies by country and product, and some services may not be available in your area. • Online technical assistance - www.dell.com/support/monitors • Contacting Dell - www.dell
-
 1
1 -
 2
2 -
 3
3 -
 4
4 -
 5
5 -
 6
6 -
 7
7 -
8
-
9
-
10
-
11
-
12
-
13
-
14
-
15
-
16
-
17
-
18
-
19
-
20
-
21
-
22
-
23
-
24
-
25
-
26
-
27
-
28
-
29
-
30
-
31
-
32
-
33
-
34
-
35
-
36
-
37
-
38
-
39
-
40
-
41
-
42
-
43
-
44
-
45
 |
 |

Dell S2417DG Monitor
User’s Guide
Model: S2417DG
Regulatory model: S2417DGb