Dell P8624QT Monitor Simplified Service Manual - Page 10
Use a ED holder fixture to fix the ED holders, then
 |
View all Dell P8624QT manuals
Add to My Manuals
Save this manual to your list of manuals |
Page 10 highlights
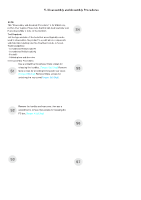
5. Disassembly and Assembly Procedures Turn over the panel module with the bracket for screen faced up. Use a thin film(such as Prism film) S15 to disassemble the O/C with glass carefully, then remove the O/C with glass and put then on a protective cushion. Use a tripper to lift up the unit, then use a screwdriver to remove 17pcs screws for unlocking S16 the ED unit , then use the tripper to put down the unit. (Torque: 3.5±0.3kgf) Use a ED holder fixture to fix the ED holders, then tear off all the tapes and rubbers, then lift up the ED S17 holder unit for removing the ED unit, and then put the unit on a protective cushion. Use a screwdriver to remove 8pcs screws for S18 unlocking the two bracket with the bottom ED holder. (Torque: 3±0.3kgf)
-
 1
1 -
2
-
3
-
4
-
 5
5 -
 6
6 -
 7
7 -
 8
8 -
 9
9 -
 10
10 -
 11
11 -
 12
12 -
 13
13 -
 14
14 -
 15
15 -
16
-
17
-
18
-
19
-
20
-
21
-
22
-
23
-
24
-
25
-
26
-
27
 |
 |
