Dell OptiPlex Tower Plus 7020 Owners Manual - Page 82
Installing the network card
 |
View all Dell OptiPlex Tower Plus 7020 manuals
Add to My Manuals
Save this manual to your list of manuals |
Page 82 highlights
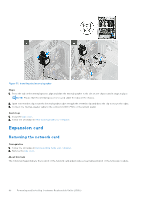
About this task The following images indicate the location of the network card and provide a visual representation of the installation procedure. Figure 53. Installing the network card Steps 1. Lift the pull tab on the PCIe door outwards to open the PCIe door. 2. Remove the PCIe blanking plate from the slot on the chassis. NOTE: Ensure to keep the PCIe blanking plate safe for future use. 3. Align the notch on the network card with the tab on the PCIe card connector (SLOT1) on the system board. 4. Gently press down on the network card till the tab on the PCIe connector locks in place. 5. Close the PCIe door and press it gently until it clicks in place on the chassis, to secure the network card. Next steps 1. Install the side cover. 2. Follow the procedure in After working inside your computer. 82 Removing and installing Customer Replaceable Units (CRUs)
-
 1
1 -
2
-
3
-
4
-
5
-
6
-
7
-
8
-
9
-
10
-
11
-
12
-
13
-
14
-
15
-
16
-
17
-
18
-
19
-
20
-
21
-
22
-
23
-
24
-
25
-
26
-
27
-
28
-
29
-
30
-
31
-
32
-
33
-
34
-
35
-
36
-
37
-
38
-
39
-
40
-
41
-
42
-
43
-
44
-
45
-
46
-
47
-
48
-
49
-
50
-
51
-
52
-
53
-
54
-
55
-
56
-
57
-
58
-
59
-
60
-
61
-
62
-
63
-
64
-
65
-
66
-
67
-
68
-
69
-
70
-
71
-
72
-
73
-
74
-
75
-
76
-
 77
77 -
 78
78 -
 79
79 -
 80
80 -
 81
81 -
 82
82 -
 83
83 -
 84
84 -
 85
85 -
 86
86 -
 87
87 -
88
-
89
-
90
-
91
-
92
-
93
-
94
-
95
-
96
-
97
-
98
-
99
-
100
-
101
-
102
-
103
-
104
-
105
-
106
-
107
-
108
-
109
-
110
-
111
-
112
-
113
-
114
-
115
-
116
-
117
-
118
-
119
-
120
-
121
-
122
-
123
-
124
-
125
-
126
-
127
-
128
-
129
-
130
-
131
-
132
-
133
-
134
-
135
-
136
-
137
-
138
-
139
-
140
-
141
-
142
-
143
-
144
-
145
-
146
-
147
-
148
-
149
-
150
-
151
-
152
-
153
-
154
-
155
-
156
-
157
-
158
-
159
 |
 |
