Dell OptiPlex 7080 Micro Service Manual - Page 31
Table 2. Antenna-cable color scheme, Steps, Connectors on the wireless card, Antenna-cable color
 |
View all Dell OptiPlex 7080 manuals
Add to My Manuals
Save this manual to your list of manuals |
Page 31 highlights
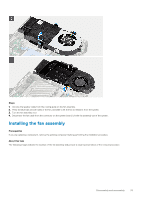
Steps 1. Connect the antenna cables to the WLAN card. The following table provides the antenna-cable color scheme for the WLAN card of your computer. Table 2. Antenna-cable color scheme Connectors on the wireless card Main (white triangle) Antenna-cable color White Auxiliary (black triangle) Black 2. Place the WLAN card bracket to secure the antenna cables. 3. Align the notch on the WLAN card with the tab on the WLAN card slot. Insert the WLAN card into the connector on the system board. 4. Replace the (M2x3.5) screw to secure the WLAN card bracket to the WLAN card. Next steps 1. Install the hard-drive assembly. 2. Install the front bezel. 3. Install the side cover. 4. Follow the procedure in after working inside your computer. Disassembly and reassembly 31
-
 1
1 -
2
-
3
-
4
-
5
-
6
-
7
-
8
-
9
-
10
-
11
-
12
-
13
-
14
-
15
-
16
-
17
-
18
-
19
-
20
-
21
-
22
-
23
-
24
-
25
-
 26
26 -
 27
27 -
 28
28 -
 29
29 -
 30
30 -
 31
31 -
 32
32 -
 33
33 -
 34
34 -
 35
35 -
 36
36 -
37
-
38
-
39
-
40
-
41
-
42
-
43
-
44
-
45
-
46
-
47
-
48
-
49
-
50
-
51
-
52
-
53
-
54
-
55
-
56
-
57
 |
 |
