Dell Latitude 7200 2-in-1 Service Manual - Page 33
Front facing camera, Removing front camera - camera not working
 |
View all Dell Latitude 7200 2-in-1 manuals
Add to My Manuals
Save this manual to your list of manuals |
Page 33 highlights
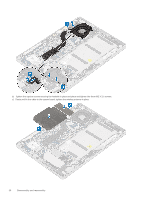
a) Display panel. b) SIM card. c) Docking Connector. 5. Follow the procedure in After working inside your tablet. Front facing camera Removing front camera Steps 1. Follow the procedure in Before working inside your tablet. 2. Remove the: a) SD memory card. b) Display panel 3. To remove the front camera: a) Using a plastic scribe, gently pry open and remove the left shielding cover from the edge marked with an arrow. b) Disconnect the front-facing camera cable from the system board. c) Use a plastic scribe to pry and disconnect the front camera cable [3] NOTE: Ensure to peel off the adhesive tape that secures the front camera to the rear camera. The front camera cable is glued to the rear camera, ensure to gently peel off, to remove the screw that secures the rear camera to the system board. d) Remove the M1.6 x 3 screws securing the front camera module to the system chassis. e) Peel off and lift the front camera module from the tablet. Disassembly and reassembly 33
-
 1
1 -
2
-
3
-
4
-
5
-
6
-
7
-
8
-
9
-
10
-
11
-
12
-
13
-
14
-
15
-
16
-
17
-
18
-
19
-
20
-
21
-
22
-
23
-
24
-
25
-
26
-
27
-
 28
28 -
 29
29 -
 30
30 -
 31
31 -
 32
32 -
 33
33 -
 34
34 -
 35
35 -
 36
36 -
 37
37 -
 38
38 -
39
-
40
-
41
-
42
-
43
-
44
-
45
-
46
-
47
-
48
-
49
-
50
-
51
-
52
-
53
-
54
-
55
-
56
-
57
-
58
-
59
-
60
-
61
-
62
-
63
-
64
-
65
-
66
-
67
-
68
-
69
-
70
-
71
-
72
-
73
-
74
-
75
-
76
-
77
-
78
-
79
-
80
-
81
-
82
-
83
-
84
-
85
 |
 |
