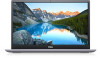
Dell Inspiron 5391 Setup and Specifications - Page 6
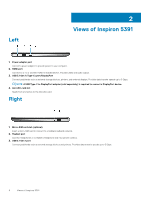
Views of Inspiron 5391, Left, Right
 |
View all Dell Inspiron 5391 manuals
Add to My Manuals
Save this manual to your list of manuals |
Page 6 highlights
2 Views of Inspiron 5391 Left 1. Power-adapter port Connect a power adapter to provide power to your computer. 2. HDMI port Connect to a TV or another HDMI-in enabled device. Provides video and audio output. 3. USB 3.1 Gen 1 (Type-C) port/DisplayPort Connect peripherals such as external storage devices, printers, and external displays. Provides data transfer speeds up to 5 Gbps. NOTE: A USB Type-C to DisplayPort adapter (sold separately) is required to connect a DisplayPort device. 4. microSD-card slot Reads from and writes to the microSD-card. Right 1. Micro-SIM card slot (optional) Insert a micro-SIM card to connect to a mobile broadband network. 2. Headset port Connect headphones or a headset (headphone and microphone combo). 3. USB 3.1 Gen 1 port Connect peripherals such as external storage devices and printers. Provides data transfer speeds up to 5 Gbps. 6 Views of Inspiron 5391
-
 1
1 -
 2
2 -
 3
3 -
 4
4 -
 5
5 -
 6
6 -
 7
7 -
 8
8 -
 9
9 -
 10
10 -
 11
11 -
 12
12 -
13
-
14
-
15
-
16
-
17
-
18
-
19
-
20
 |
 |
