D-Link DWL-8720AP Quick Install Guide - Page 4
Installation, Configuration
 |
View all D-Link DWL-8720AP manuals
Add to My Manuals
Save this manual to your list of manuals |
Page 4 highlights
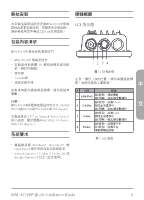
ENGLISH Interface Connectors # Connector Description 1 Wall/Pole Mount to connect to the mounting Mount plate on a wall or a pole 2 Grounding Wire Connect a grounding wire to help prevent device damage due to shorts and lightning strikes 12 3 4 Figure 2: Bottom Connectors # Connector Description 1 Vent Repels liquid and particles while allowing air to pass through 2 LAN (PoE) Gigabit RJ-45 port for data and Port Power over Ethernet (PoE) 3 Reset Press and hold for 10 seconds to factory reset the device 4 Console Port Console port to connect to the DWL-8720AP using a RJ-45 to serial cable Table 2: Interface Description Table 3: Interface Description Installation Using Power over Ethernet (PoE) 1. Use a standard Ethernet cable to connect the LAN1 (PoE) port on the DWL-8720AP to a PoE power source device such as an 802.3af or 802.3at PoE switch or PoE injector. Note: If you require a PoE injector such as D-Link's DPE-311GI, please contact your reseller to order it. Configuration Manual Configuration Label Area Note: D-Link recommends manually configuring the device before mounting it. The management computer, DHCP server and DWL-8720AP must be in the same subnet. Use the following method to access the web user interface: Connecting through Ethernet 1 2 Figure 3: Rear Connectors 1. Use an Ethernet cable to connect the DWL-8720AP to the management computer, or to the switch or router the management computer is connected to. 2. Open a web browser and enter the IP address 10.90.90.91 and press Enter. 2 DWL-8720AP Quick Installation Guide
-
 1
1 -
 2
2 -
 3
3 -
 4
4 -
 5
5 -
 6
6 -
 7
7 -
 8
8 -
 9
9 -
 10
10 -
11
-
12
-
13
-
14
-
15
-
16
-
17
-
18
 |
 |
