D-Link DKVM-4 Product Manual - Page 5
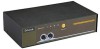
Step 1, your monitor must be inserted into the unit on the rear panel. - kvm switch
 |
UPC - 790069232305
View all D-Link DKVM-4 manuals
Add to My Manuals
Save this manual to your list of manuals |
Page 5 highlights
Note: Please make sure the mouse you are planning to use is a 2 Button or 3 Button mouse, and that it is fully Microsoft Mouse compatible. If your mouse driver is not Microsoft mouse driver compatible, please do not uninstall your mouse driver or the existing driver from the PC and then install the Windows native mouse driver. Please follow the steps below closely and in the order as shown, otherwise, keyboard and/or mouse errors may occur. Step 1. Place the DKVM-2/4 in a convenient location. Its small size makes it easy to place on the desktop. Do take the length of the cables in consideration when placing the KVM switch unit. Step 2. We will now connect the console devices. Connect your monitor to the DKVM-2/4. The 15-pin connector coming from your monitor must be inserted into the unit on the rear panel. Connect it to the 15 pin HDDB connector labeled =MONITOR=. Step 3. Connect your PS/2 keyboard and PS/2 mouse to the front panel of the DKVM-2/4. The connections should be made to the two 6-pin Mini DIN connectors labeled =CONSOLE= as shown below. 3
-
 1
1 -
 2
2 -
 3
3 -
 4
4 -
 5
5 -
 6
6 -
 7
7 -
 8
8 -
 9
9 -
 10
10 -
 11
11 -
12
-
13
-
14
-
15
-
16
-
17
-
18
-
19
-
20
-
21
-
22
 |
 |
