Cobra MR F75-D MRF75D_MANL_ENG - Page 11
Mounting And, Powering The Radio
 |
View all Cobra MR F75-D manuals
Add to My Manuals
Save this manual to your list of manuals |
Page 11 highlights
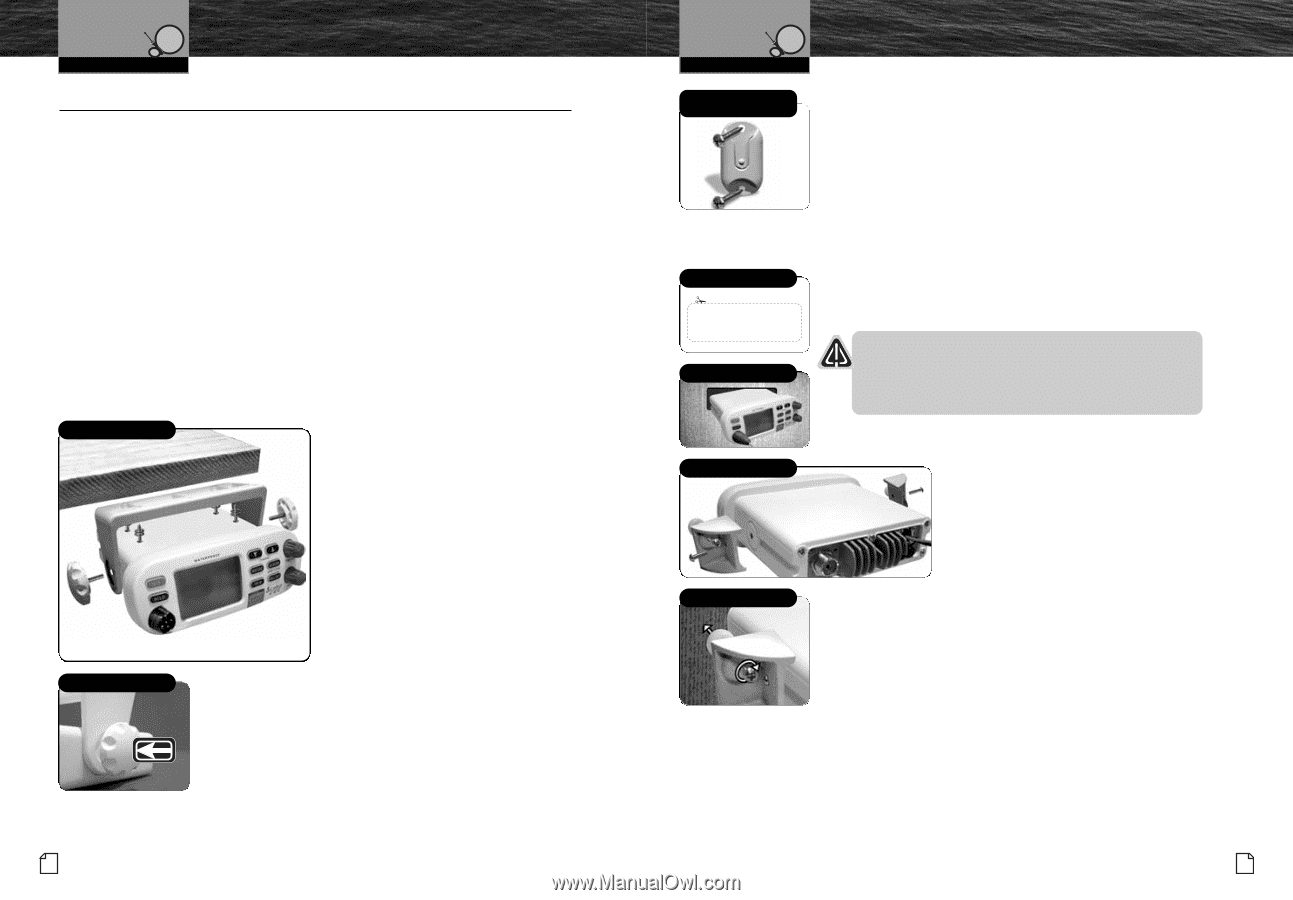
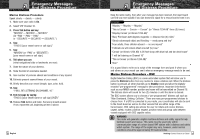
Installation And Start-Up Mounting And Powering The Radio Mounting And Powering The Radio • Before using your CobraMarine VHF radio, it must be installed on your vessel. Installing Your Radio Choose a location for your radio where it will be conveniently accessible with the following factors in mind: I The leads to the battery and the antenna are best kept as short as possible. I The antenna must be mounted at least three (3) feet from the transceiver. I The radio and all speakers need to be far enough from any magnetic compass to avoid deviation due to the speaker magnet. I There needs to be free air flow around the heat-sink fins on the back of the transceiver. Surface Mount A Surface Mounting kit is included with your CobraMarine VHF radio to allow its installation on almost any flat surface. Surface Mounting Kit To Mount The Transceiver On Almost Any Flat Surface: 1. Use the mounting bracket as a template to drill holes for the mounting screws. 2. Attach the mounting bracket to the chosen surface. 3. Attach the transceiver to the mounting bracket with the locking knobs. 4. Tilt the transceiver to a convenient angle and tighten the locking knobs. Tilt Lock Knobs Installation And Start-Up Microphone/Speaker Bracket Use Supplied Template See page 79 for template. Insert Transceiver Attach Mounting Brackets Adjust Screws Mounting And Powering The Radio Microphone/Speaker Bracket To Install The Microphone/Speaker Bracket: 1. Install the microphone/speaker bracket on a vertical surface near the transceiver using the supplied stainless steel screws. Flush Mount A Flush Mounting kit is included with your CobraMarine VHF radio to allow its installation in almost any flat surface. To Mount The Transceiver Flush In Almost Any Flat Surface: 1. Use the supplied template to mark and cut an opening in the flat surface. See page 79 for template. CAUTION Before cutting, be sure the area behind the flat surface is clear of any instruments or wires that might be damaged in the process. 2. Insert the transceiver into the opening. 3. Attach the mounting brackets to the sides of the transceiver with the adjusting screw flanges facing the back of the flat surface. 4. Tighten the adjusting screws against the back of the flat surface until the flange on the front of the transceiver is tight against the flat surface. 16 English Nothing Comes Close to a Cobra® 17
-
 1
1 -
2
-
3
-
4
-
5
-
 6
6 -
 7
7 -
 8
8 -
 9
9 -
 10
10 -
 11
11 -
 12
12 -
 13
13 -
 14
14 -
 15
15 -
 16
16 -
17
-
18
-
19
-
20
-
21
-
22
-
23
-
24
-
25
-
26
-
27
-
28
-
29
-
30
-
31
-
32
-
33
-
34
-
35
-
36
-
37
-
38
-
39
-
40
-
41
-
42
 |
 |