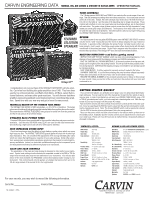
Carvin BELAIR Instruction Manual - Page 2
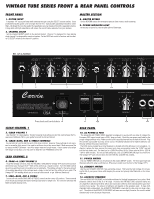
Vintage Tube Series Front & Rear Panel Controls - tube amp
 |
View all Carvin BELAIR manuals
Add to My Manuals
Save this manual to your list of manuals |
Page 2 highlights
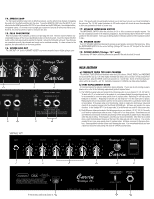
VINTAGE TUBE SERIES FRONT & REAR PANEL CONTROLS FRONT PANEL 1. GUITAR INPUT A standard 1/4" input jack feeds both channels through using the SELECT channel switch. Use a professional quality guitar cord no longer than 25 feet. Typical cable capacitance should be under 50pf-the longer the cord, the greater the capacitance (you can measure this with a capacitance meter). A long cable with high capacitance will reduce the overall treble response from your pickups. 2. CHANNEL SELECT Set the channel SELECT switch to the desired channel. Channel 1 is designed for clean playing while channel 2 is designed for overdrive/sustain. For the FS22 foot switch to function, set the channel 2 SELECT switch to the channel 1 position. MASTER SECTION 8. MASTER REVERB Set the REVERB control for the desired amount (this works in both channels). 9. POWER INDICATOR LIGHT As the amp is turned on, the red pilot light will illuminate. BEL AIR & NOMAD 1 3 4 FUSE 2 5 6 Press firmly until cord clicks in. 10 11 12 13 14 CLEAN CHANNEL 1 3. CLEAN VOLUME 1 Use channel 1 for clean playing. Thanks to special mud-cutting circuits that work between the frequencies of 500 and 700 Hz, your guitar tones will be full and vibrant. 4. CLEAN-BASS, MID & TREBLE CONTROLS You can start at 5 on the dial for each of the tone controls. However, these settings do not represent a normalize (flat) sound. You need to set them where they sound best! Most musicians like to reduce the MID'S between 1 and 4 for deeper bass and crisper highs. If your sound is too bright with single coil pickups, you may want to keep the rear PRESENCE control off. LEAD CHANNEL 2 5. SOAK-6. LEAD VOLUME 2 To get the Vintage overdrive, keep the VOLUME 2 (VOLUME for Vintage 16™) down until you have determined your final gain level-think of this control as a master volume. Turn the SOAK control up until you get the amount of overdrive you're looking for. The setting will vary for the same amount of overdrive depending on the pickups used-single or dual coil and the setting of your guitar. The Vintage 16™ low wattage allows you to turn up both controls to get different distortions. 7. LEAD-BASS, MID & TREBLE To start off with, set the BASS, MID & TREBLE controls at their center (5) position. These controls are to be set according to the type of pickups used (dual or single coil). It's normal to decrease the BASS at higher playing levels. REAR PANEL 10. AC POWER & FUSE The detachable AC POWER CORD supplied is designed to operate with one type of voltage (the European 230V export model uses a CEE-7 plug cord set). Check the rear power cord label for the proper voltage and fuse value. Make sure the cord is securely inserted into the back of the unit. Plug the cord into a grounded "3 prong" power source. No attempt should ever be made to defeat or use the amp without the ground connected. The FUSE (some models have circuit breakers) is located within the AC power cord receptacle. To check or replace the fuse, remove the power cord, place a screwdriver under the "FUSE" cap and pull the fuse holder out. The fuse type is a 250V Slow Blow SB 5 x 20mm rated at 3A for 120V & 1.5A for 230V models. Do not use fast acting fuse, only a SLOW BLOW (SB) type fuse will work. The Vintage 16™ uses 1A slow blow for both 120 VAC and 250 VAC models. 11. POWER SWITCH The rear POWER SWITCH is to be utilized as the master ON/OFF switch. The front panel light will illuminate when the amp is switched on. (The power switch is on the front of the Vintage 16™.) 12. STANDBY SWITCH Use the rear STANDBY SWITCH If you are taking a break. This turns the high voltage off, increasing the life of your power tubes while keeping the power and preamp tube filaments on for immediate use. 13. ACOUSTIC PRESENCE The rear ACOUSTIC PRESENCE control adds a sibilance to the high frequencies of your guitar. Most presence controls work in the 3k to 4k range. However, the VINTAGE TUBE's presence starts at a very high 8k Hz delivering 10 dB at 12k Hz and continues to 20k Hz which extends all the upper harmonics of your guitar. The amount of sibilance will depend on the speakers used. To keep both channels totally independent, the ACOUSTIC PRESENCE is switched by relay only into clean channel 1. The effect of the ACOUSTIC PRESENCE will seem ever so slight, however, the result is added sibilance only to the ultra-high frequencies.
-
 1
1 -
 2
2 -
 3
3 -
 4
4
 |
 |
