Canon 4246B001 PowerShot SX210 IS Camera User Guide - Page 127
Tagging Images as Favorites
 |
View all Canon 4246B001 manuals
Add to My Manuals
Save this manual to your list of manuals |
Page 127 highlights
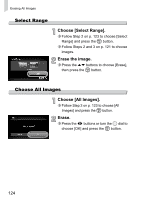
Select Range Tagging Images as Favorites Choose [Select Range]. ∆ Follow Step 2 on p. 126 to choose [Select Range] and press the m button. ∆ Follow Steps 2 and 3 on pp. 121 - 122 to choose images. ∆ Press the op buttons, choose the item and press the qr buttons, or turn the  dial to choose a type. Make the setting. ∆ Press the op buttons to choose [Select] and press the m button. If you choose [Deselect] in Step 2, you can deselect all of the images in the [Select Range] category. Tagging Images as Favorites When you tag images as favorites, you can easily categorize just those images. You can also filter out just those images for viewing, protecting or erasing (p. 111). Choose ∆ Press the m button and choose in the ø menu, then press the m button again. Once set, will appear on the screen. ∆ To untag the image, choose in the ø menu again, then press the m button. If you use Windows 7 or Windows Vista and transfer tagged images to the computer, they will be given a star rating of 3 ( ) (except for movies). 127
-
 1
1 -
2
-
3
-
4
-
5
-
6
-
7
-
8
-
9
-
10
-
11
-
12
-
13
-
14
-
15
-
16
-
17
-
18
-
19
-
20
-
21
-
22
-
23
-
24
-
25
-
26
-
27
-
28
-
29
-
30
-
31
-
32
-
33
-
34
-
35
-
36
-
37
-
38
-
39
-
40
-
41
-
42
-
43
-
44
-
45
-
46
-
47
-
48
-
49
-
50
-
51
-
52
-
53
-
54
-
55
-
56
-
57
-
58
-
59
-
60
-
61
-
62
-
63
-
64
-
65
-
66
-
67
-
68
-
69
-
70
-
71
-
72
-
73
-
74
-
75
-
76
-
77
-
78
-
79
-
80
-
81
-
82
-
83
-
84
-
85
-
86
-
87
-
88
-
89
-
90
-
91
-
92
-
93
-
94
-
95
-
96
-
97
-
98
-
99
-
100
-
101
-
102
-
103
-
104
-
105
-
106
-
107
-
108
-
109
-
110
-
111
-
112
-
113
-
114
-
115
-
116
-
117
-
118
-
119
-
120
-
121
-
 122
122 -
 123
123 -
 124
124 -
 125
125 -
 126
126 -
 127
127 -
 128
128 -
 129
129 -
 130
130 -
 131
131 -
 132
132 -
133
-
134
-
135
-
136
-
137
-
138
-
139
-
140
-
141
-
142
-
143
-
144
-
145
-
146
-
147
-
148
-
149
-
150
-
151
-
152
-
153
-
154
-
155
-
156
-
157
-
158
-
159
-
160
-
161
-
162
-
163
-
164
-
165
-
166
-
167
-
168
-
169
-
170
-
171
-
172
-
173
-
174
-
175
-
176
-
177
-
178
-
179
-
180
 |
 |
