Canon 3633B005 PowerShot SX20 IS Camera User Guide - Page 105
Shooting Stitch Assist Images
 |
View all Canon 3633B005 manuals
Add to My Manuals
Save this manual to your list of manuals |
Page 105 highlights
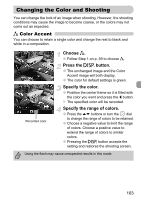
Shooting Stitch Assist Images Specify the range of colors to be swapped. ● Press the op buttons or turn the  dial to adjust the range of colors affected. ● Choose a negative value to limit the range of colors. Choose a positive value to extend the range of colors to similar colors. ● Pressing the l button accepts the setting and restores the shooting screen. • Using the flash may cause unexpected results in this mode. • Under some conditions, the image may appear coarse. Shooting Stitch Assist Images Large subjects can be split into several shots that can later be merged together using the included software on a computer to create a panoramic image. Set the mode dial to L. Choose a shooting direction. ● Turn the  dial. €: Left to right horizontally. ‰: Right to left horizontally. : Bottom to top vertically. ‚: Top to bottom vertically. Shoots 4 images from the upper left in a clockwise direction. Take the first shot. X The exposure and white balance will be set with the first shot. 105
-
 1
1 -
2
-
3
-
4
-
5
-
6
-
7
-
8
-
9
-
10
-
11
-
12
-
13
-
14
-
15
-
16
-
17
-
18
-
19
-
20
-
21
-
22
-
23
-
24
-
25
-
26
-
27
-
28
-
29
-
30
-
31
-
32
-
33
-
34
-
35
-
36
-
37
-
38
-
39
-
40
-
41
-
42
-
43
-
44
-
45
-
46
-
47
-
48
-
49
-
50
-
51
-
52
-
53
-
54
-
55
-
56
-
57
-
58
-
59
-
60
-
61
-
62
-
63
-
64
-
65
-
66
-
67
-
68
-
69
-
70
-
71
-
72
-
73
-
74
-
75
-
76
-
77
-
78
-
79
-
80
-
81
-
82
-
83
-
84
-
85
-
86
-
87
-
88
-
89
-
90
-
91
-
92
-
93
-
94
-
95
-
96
-
97
-
98
-
99
-
 100
100 -
 101
101 -
 102
102 -
 103
103 -
 104
104 -
 105
105 -
 106
106 -
 107
107 -
 108
108 -
 109
109 -
 110
110 -
111
-
112
-
113
-
114
-
115
-
116
-
117
-
118
-
119
-
120
-
121
-
122
-
123
-
124
-
125
-
126
-
127
-
128
-
129
-
130
-
131
-
132
-
133
-
134
-
135
-
136
-
137
-
138
-
139
-
140
-
141
-
142
-
143
-
144
-
145
-
146
-
147
-
148
-
149
-
150
-
151
-
152
-
153
-
154
-
155
-
156
-
157
-
158
-
159
-
160
-
161
-
162
-
163
-
164
-
165
-
166
-
167
-
168
-
169
-
170
-
171
-
172
-
173
-
174
-
175
-
176
-
177
-
178
-
179
-
180
 |
 |
