Bushnell Voyager Sky Tour Owner's Manual
Bushnell Voyager Sky Tour Manual
 |
View all Bushnell Voyager Sky Tour manuals
Add to My Manuals
Save this manual to your list of manuals |
Bushnell Voyager Sky Tour manual content summary:
- Bushnell Voyager Sky Tour | Owner's Manual - Page 1
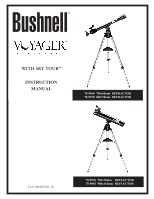
With sky tour™ Instruction Manual 78-9960 700x60mm refractor 78-9970 800x70mm refractor Lit.#: 98-0822/01-10 78-9930 700x76mm refLEctor 78-9945 900x114mm refLEctor - Bushnell Voyager Sky Tour | Owner's Manual - Page 2
Bushnell Voyager Telescope with Sky Tour! This telescope truly is the ultimate first telescope. The Sky Tour handset will actually speak, giving you a personal real-time tour of the night sky each and every night. Each tour enjoy the Sky Tour each and every time that you use the same viewing - Bushnell Voyager Sky Tour | Owner's Manual - Page 3
Sky Tour FOR NIGHTTIME USE. The Constellation Mode Button will allow you to tour many well-known guided tour of the planets. Note: To get the most out of the Sky Tour (for example the Constellation tour once sequentially will advance you to the next tour object in that mode. The handset will power - Bushnell Voyager Sky Tour | Owner's Manual - Page 4
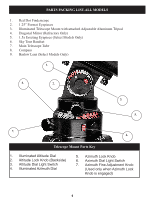
with attached Adjustable Aluminum Tripod 4. Diagonal Mirror (Refractors Only) 5. 1.5x Erecting Eyepiece (Select Models Only) 6. Sky Tour Handset 7. Main Telescope Tube 8. Compass 9. Barlow Lens (Select Models Only) 1. 4. 2. 3. 5. 7. 6. Telescope Mount Parts Key 1. Illuminated Altitude Dial - Bushnell Voyager Sky Tour | Owner's Manual - Page 5
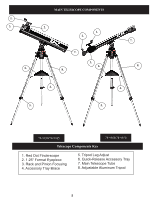
TELESCOPE COMPONENTS 2. 1. 2. 7. 8. 3. 6. 4. 5. 5. 7. 8. 4. 78-9930/78-9945 78-9960/78-9970 Telescope Components Key 1. Red Dot Finderscope 2. 1.25" Format Eyepiece 3. Rack and Pinion Focusing 4. Accessory Tray Brace 5. Tripod Leg Adjust 6. Quick-Release Accessory Tray 7. Main Telescope - Bushnell Voyager Sky Tour | Owner's Manual - Page 6
tube mechanism. b. For Refractor Telescopes, insert eyepiece into the diagonal mirror, then insert the diagonal mirror into the focusing tube mechanism. 5. Tighten all set screws to secure accessories. Lens accessories Barlow Lens (Select Models) Some Voyager with Sky Tour units come with a Barlow - Bushnell Voyager Sky Tour | Owner's Manual - Page 7
also be centered in the field of view of the Main Telescope Tube. MBATTERY INSTALLATION Your Sky Tour Handset is powered by 3 AA batteries (user supplied) and are installed like you would with most remote controllers. Your Illuminated Voyager Mount is powered by two CR1620 watch batteries (included - Bushnell Voyager Sky Tour | Owner's Manual - Page 8
rotate the telescope tube until it is lined up in the same direction as the arrow index mark (and "0" on the compass). On refractor style telescopes, the of your area or log on to the Bushnell website for assistance (www.bushnell.com). b. Once your Sky Tour Handset is set for your location and time, - Bushnell Voyager Sky Tour | Owner's Manual - Page 9
much more you'll see from your local lake or park when compared to a backyard in the city. • Using your telescope out a window is NEVER recommended. • View objects that are high in the sky if possible. Waiting until the object rises well above the horizon will provide a brighter and crisper image - Bushnell Voyager Sky Tour | Owner's Manual - Page 10
in the set-up and basic use of this instrument, it does not cover everything you might like to know about astronomy. For objects other than stars and constellations, a basic guide to astronomy is a must. A list of recommended guides may be found on our website at www.bushnell.com. The website also - Bushnell Voyager Sky Tour | Owner's Manual - Page 11
recurring astronomical theater we call the night sky is an ever-changing billboard. In telescope will move. At higher magnifications especially, you will notice that the moon or Jupiter will "race" right out of the field of view. To compensate, just move the fine adjustment controls on your telescope - Bushnell Voyager Sky Tour | Owner's Manual - Page 12
NOTES 12 - Bushnell Voyager Sky Tour | Owner's Manual - Page 13
/ REPAIR WARRANTY / REPAIR Telescope LIFETIME LIMITED WARRANTY Your Bushnell® telescope is warranted to be free improper handling, installation, or maintenance provided by someone other than a Bushnell Authorized Service Department. Any return made under this warranty must be accompanied by the - Bushnell Voyager Sky Tour | Owner's Manual - Page 14
de votre télescope Bushnell Voyager avec Tour du Ciel. Ce télescope est réellement l'instrument d'initiation suprême. Le combiné Tour du Ciel est « Constellation ») pour allumer le combiné. Ensuite, suivez simplement les instructions parlées. Nous vous souhaitons de nombreuses années de plaisir - Bushnell Voyager Sky Tour | Owner's Manual - Page 15
de ses étoiles, leur dimension ou autres renseignements dignes d'intérêt. Le bouton du mode Planètes offre une visite guidée des planètes. Remarque : Pour profiter au maximum du Tour du Ciel (en mode Constellation, par exemple), il est conseillé d'écouter la totalité des commentaires avant de passer - Bushnell Voyager Sky Tour | Owner's Manual - Page 16
ée sur trépied en aluminium réglable 4. Miroir diagonal (réfracteurs seulement) 5. Oculaire redresseur 1,5x (certains modèles seulement) 6. Combiné Tour du Ciel 7. Tube de télescope principal 8. Boussole 9. Lentille Barlow (certains modèles seulement) 1. 4. 2. 3. 5. 7. 6. Pièces de la monture - Bushnell Voyager Sky Tour | Owner's Manual - Page 17
Principaux éléments du télescope 2. 1. 2. 7. 8. 3. 6. 7. 8. 4. 4. 5. 5. 78-9930/78-9945 78-9960/78-9970 Légende des composants du télescope 1. Chercheur à point rouge 2. Oculaire de format 1,25" (31,7 mm) 3. Mise au point à crémaillère 4. Support de plateau à accessoires 5. Réglage de - Bushnell Voyager Sky Tour | Owner's Manual - Page 18
position maximale. 2. Abaissez les supports de plateau et posez le plateau à accessoires à fixation rapide sur les supports. 3 .Introduisez la vis de ACCESSOIRES Lentille Barlow (certains modèles) Certains modèles Voyager avec Tour du Ciel sont fournis avec une lentille Barlow. Cet accessoire - Bushnell Voyager Sky Tour | Owner's Manual - Page 19
de vision de l'optique principale. MMISE EN PLACE DES PILES Le combiné Tour du Ciel est alimenté par 3 piles AA (non fournies) qui se mettent en place comme dans la majorité des télécommandes. La monture lumineuse Voyager est alimentée par deux piles boutons CR1620 (fournies). Pour mettre ces piles - Bushnell Voyager Sky Tour | Owner's Manual - Page 20
votre latitude et votre longitude, veuillez consulter une carte de votre région ou connectez-vous sur le site Bushnell pour obtenir de l'aide (www.bushnell.com). b. Une fois que le combiné Tour du Ciel est configuré sur le lieu et l'heure locale, il vous indiquera automatiquement l'heure courante et - Bushnell Voyager Sky Tour | Owner's Manual - Page 21
surface plane à même la terre, plutôt que sur le béton d'une allée de garage ou sur une terrasse en bois. Il en résulte un support d'observation plus stable, en particulier lorsque si vous attirez les foules avec votre nouveau télescope. • Autant que possible, observez depuis un endroit présentant - Bushnell Voyager Sky Tour | Owner's Manual - Page 22
ère d'astronomie. Pour les objets autres que les étoiles et les constellations, un guide d'astronomie élémentaire est indispensable. Vous trouverez une liste de guides conseillés sur notre site Web à www.bushnell.com. Notre site affiche également une liste d'événements actuels pouvant être observ - Bushnell Voyager Sky Tour | Owner's Manual - Page 23
COMMENT DÉMARRER AVEC LE TÉLESCOPE 2. Après avoir installé le télescope et choisi un objet à observer, visez l'objet souhaité à l'aide du chercheur. Si vous avez raisonnablement bien aligné le chercheur, un coup d'œil à travers le télescope principal à faible grossissement doit révéler la même vue. - Bushnell Voyager Sky Tour | Owner's Manual - Page 24
NOTES 24 - Bushnell Voyager Sky Tour | Owner's Manual - Page 25
pas les dommages causés par une utilisation abusive, une mauvaise manipulation, l'installation ou un entretien effectué autrement que par une service de réparation agréé par Bushnell. Tout renvoi effectué sous couvert de la présente garantie doit être accompagné des pièces ci-dessous : 1) Chèque - Bushnell Voyager Sky Tour | Owner's Manual - Page 26
Voyager de Bushnell con Sky Tour! Este telescopio verdaderamente es el mejor telescopio básico. El aparato Sky Tour manual y prepararse para su sesión de observación según se describe en estas páginas, puede empezar a disfrutar de Sky Tour disfrutar del Sky Tour todas las veces que use el mismo lugar - Bushnell Voyager Sky Tour | Owner's Manual - Page 27
botón de la modalidad Planetas le permitirá realizar una gira guiada a través de los planetas. Nota: Para aprovechar al máximo el Sky Tour (por ejemplo la gira Constelación), escuche toda la información, y después pase a otra modalidad. Siempre que pase a otra modalidad, oirá más información, pero - Bushnell Voyager Sky Tour | Owner's Manual - Page 28
1,25" 3. Montura de telescopio iluminada con trípode de aluminio ajustable 4. Espejo diagonal (refractores solamente) 5. Ocular inversor de imágenes de 1,5 aumentos (ciertos modelos solamente) 6. Aparato Sky Tour 7. Tubo principal del telescopio 8. Brújula 9. Lente Barlow (ciertos modelos solamente - Bushnell Voyager Sky Tour | Owner's Manual - Page 29
1. 3. 6. Main TELESCOPE COMPONENTS 2. 1. 2. 7. 8. 3. 6. 4. 5. 5. 7. 8. 4. 78-9930/78-9945 78-9960/78-9970 Clave de componentes del telescopio 1. Lente buscadora de punto rojo 2. Ocular de formato de 1,25" 3. Enfoque de cremallera y piñón 4. Tirante de la bandeja de - Bushnell Voyager Sky Tour | Owner's Manual - Page 30
refractores, introduzca el ocular en el espejo diagonal y después introduzca el espejo diagonal en el mecanismo del tubo de enfoque. 5. Apriete todos los tornillos de fijación para fijar los accesorios. ACCESORIOS DE LA LENTE Lente Barlow (ciertos modelos) Algunas unidades Voyager con Sky Tour - Bushnell Voyager Sky Tour | Owner's Manual - Page 31
del tubo principal del telescopio. MINSTALACIÓN DE LAS PILAS Su aparato Sky Tour está alimentado por 3 pilas AA (suministradas por el usuario) y se instalan como se hace en la mayoría de los controladores remotos. La montura Voyager iluminada está alimentada por dos pilas de reloj CR1620 (incluidas - Bushnell Voyager Sky Tour | Owner's Manual - Page 32
flecha (y el "0" en la brújula). En los telescopios de estilo refractor, la lente grande del objetivo debe apuntarse en el mismo sentido que la área o conéctese al sitio web de Bushnell para obtener ayuda (www.bushnell.com). b. Una vez que su aparato Sky Tour esté fijado para su ubicación y hora, - Bushnell Voyager Sky Tour | Owner's Manual - Page 33
CONSEJOS ÚTILES • Su telescopio es un instrumento muy sensible. Para obtener los mejores resultados y menos vibraciones, fije su telescopio sobre un lugar horizontal en el terreno en vez de hacerlo en una vía de acceso de hormigón o en una plataforma de madera. Esto proporcionará una base más - Bushnell Voyager Sky Tour | Owner's Manual - Page 34
de ella y de muchas otras. ¡Y mucho, mucho, más! Aunque este manual tiene como finalidad ayudarle a configurar este instrumento y a darle información básica necesaria una guía básica de astronomía. En nuestro sitio web www.bushnell.com podrá encontrar una lista de guías recomendadas. El sitio web - Bushnell Voyager Sky Tour | Owner's Manual - Page 35
moverán. Para mayores aumentos especialmente, observará que la luna o Júpiter "se desplazará" hacia la derecha fuera del campo de visión. Para compensar, simplemente mueva los controles de ajuste fino en su telescopio para "seguirlo" en la trayectoria necesaria. 35 - Bushnell Voyager Sky Tour | Owner's Manual - Page 36
NOTAS 36 - Bushnell Voyager Sky Tour | Owner's Manual - Page 37
para obtener información de garantía aplicable. En Europa puede ponerse también en contacto con Bushnell en: Bushnell Germany GmbH European Service Centre Mathias-Brüggen-Str. 80 D-50827 Köln GERMANY Tel: +49 221 995568-0 Fax - Bushnell Voyager Sky Tour | Owner's Manual - Page 38
Glückwunsch zum Kauf Ihres Bushnell Voyager-Teleskops mit Sky Tour! Dieses Teleskop ist wirklich das ultimative Einsteigermodell. Das sprechende Sky Tour-Handset führt Sie jede Nacht auf eine persönliche Echtzeit-Tour über den Nachthimmel. Zu jedem Tour-Objekt wird auch die Wegbeschreibung - Bushnell Voyager Sky Tour | Owner's Manual - Page 39
, Größe und andere interessante Angaben. Die Planeten-Modustaste startet eine Planetenführung. Anmerkung: Um das größtmögliche Vergnügen aus Sky Tour (z. B. der Sternbild-Tour) zu ziehen, hören Sie sich die jeweiligen Informationen bitte zunächst vollständig an und wechseln Sie erst dann in einen - Bushnell Voyager Sky Tour | Owner's Manual - Page 40
4. Diagonalspiegel (nur Linsenteleskope) 5. Aufrichtokular 1.5x (nur ausgewählte Modelle) 6. Sky Tour-Handset 7. Teleskop-Hauptrohr 8. Kompass 9. Barlow-Linse (nur ausgewählte Modelle) 1. 4. 2. 3. 5. 7. 6. Teileübersicht Teleskopmontierung 1. Beleuchteter Höhenwähler 5. Azimut-Feststellknopf - Bushnell Voyager Sky Tour | Owner's Manual - Page 41
1. 3. 6. Hauptkomponenten des Teleskops 2. 1. 2. 7. 8. 3. 6. 7. 8. 4. 4. 5. 5. 78-9930/78-9945 78-9960/78-9970 Übersicht Teleskopkomponenten 1. Rotpunktsucher 2. Okular im 1,25-Zoll-Format 3. Zahnstangenfokussierung 4. Zubehörschalenstrebe 5. Stativbein-Verstellung 6. Schnellmontage- - Bushnell Voyager Sky Tour | Owner's Manual - Page 42
des Stativs und der Zubehörschale 1. Stellen Sie die beleuchtete Voyager-Montierung mit den vorinstallierten Stativbeinen auf ebenem Untergrund auf. Spreizen fest. LINSENZUBEHÖR Barlow-Linse (ausgewählte Modelle) Manche Voyager-Geräte mit Sky Tour werden mit einer Barlow-Linse geliefert. Dieses - Bushnell Voyager Sky Tour | Owner's Manual - Page 43
LINSENZUBEHÖR - Fortsetzung Aufrichtlinse 1.5x (nur ausgewählte Modelle) Mit diesem Zubehörteil kann der Nutzer Objekte vom Sky Tour-Handset wird von 3 AA-Batterien (nicht im Lieferumfang enthalten) gespeist. Diese werden so wie bei den meisten Fernbedienungen eingesetzt. Ihre beleuchtete Voyager - Bushnell Voyager Sky Tour | Owner's Manual - Page 44
Ihren Längen- und Breitengrad schla gen Sie bitte auf einer Karte Ihrer Region nach oder konsultieren Sie die Bushnell-Website (www. bushnell.com). b. Nachdem Ihr Sky Tour-Handset auf den entsprechenden Ort und die betreffende Zeit eingestellt wurde, teilt Ihnen das Handset automatisch die Ortszeit - Bushnell Voyager Sky Tour | Owner's Manual - Page 45
NÜTZLICHE HINWEISE Ihr Teleskop ist ein sehr empfindliches Instrument. Um beste Ergebnisse und ein vibrationsfreieres Arbeiten zu erzielen, stellen Sie Ihr Teleskop anstatt auf Ihrer Betoneinfahrt oder auf Ihrer Holzterrasse lieber an einer ebenen Stelle auf der Erde auf. Die Stabilität beim - Bushnell Voyager Sky Tour | Owner's Manual - Page 46
zu Objekten, die keine Sterne oder Sternbilder sind, ist ein Astronomie-Grundleitfaden unverzichtbar. Eine Liste empfohlener Leitfäden finden Sie auf unserer Website unter www.bushnell.com. Die Website bietet auch Beobachtungsvorschläge zu aktuellen Himmelsphänomenen. 46 - Bushnell Voyager Sky Tour | Owner's Manual - Page 47
ERSTE SCHRITTE BEI DER VERWENDUNG IHRES NEUEN TELESKOPS 2. Nachdem Sie das Teleskop eingerichtet und ein geeignetes Ziel ausgewählt haben, peilen Sie das gewünschte Objekt zentriert im Sucher an. Vorausgesetzt, dass Sie den Sucher gut ausgerichtet haben, sollten Sie bei einem kurzen Blick durch das - Bushnell Voyager Sky Tour | Owner's Manual - Page 48
ANMERKUNGEN 48 - Bushnell Voyager Sky Tour | Owner's Manual - Page 49
bitte an Ihren Händler vor Ort. In Europa können Sie sich auch unter der folgenden Adresse an Bushnell wenden: Bushnell Germany GmbH European Service Centre Mathias-Brüggen-Str. 80 D-50827 Köln GERMANY Tel: +49 221 995568-0 Fax: +49 221 - Bushnell Voyager Sky Tour | Owner's Manual - Page 50
pulsanti) fino a quando il ricevitore Sky Tour comincia a parlare chiedendovi di configurarlo. Per trovare la vostra latitudine e longitudine, controllate una mappa della vostra zona, oppure, per aiuto, collegatevi al sito Web della Bushnell (www.bushnell.com). Terminata la configurazione, dopo che - Bushnell Voyager Sky Tour | Owner's Manual - Page 51
interessanti. Il pulsante del modo Pianeti vi offrirà una visita guidata dei pianeti. Nota: per ottenere il massimo piacere dal ricevitore Sky Tour (per esempio, il tour delle costellazioni), ascoltate l'intera serie di informazioni, quindi passate ad un altro modo. Ogni volta che passate da un modo - Bushnell Voyager Sky Tour | Owner's Manual - Page 52
regolabile in alluminio 4. Specchio diagonale (solo rifrattori) 5. Oculare raddrizzatore 1.5x (solo per modelli selezionati) 6. Ricevitore Sky Tour 7. Tubo principale del telescopio 8. Bussola 9. Lente Barlow (solo per modelli selezionati) 1. 4. 2. 3. 5. 7. 6. Identificazione delle parti del - Bushnell Voyager Sky Tour | Owner's Manual - Page 53
1. 3. 6. Parti principali del telescopio 2. 1. 2. 7. 8. 3. 6. 7. 8. 4. 4. 5. 5. 78-9930/78-9945 78-9960/78-9970 Identificazione delle parti del telescopio 1. Cercatore a punto rosso 2. Oculare formato 1.25" 3. Meccanismo a cremagliera per la messa a fuoco 4. Staffa del vassoio per gli - Bushnell Voyager Sky Tour | Owner's Manual - Page 54
del tubo. 5. Stringete tutte le viti di fissaggio per serrare gli accessori. ACCESSORI DELL'OBIETTIVO Lente Barlow (modelli selezionati) Alcune unità Voyager con Sky Tour sono dotate di lente Barlow. Questo accessorio vi permetterà di avere doppio uso di ogni oculare. Mettete la lente Barlow fra il - Bushnell Voyager Sky Tour | Owner's Manual - Page 55
tubo principale del telescopio. MINSTALLAZIONE DELLE PILE Il ricevitore Sky Tour è alimentato da 3 pile AA (non fornite) installabili allo stesso modo in cui si installano le pile in un comune telecomando. Il supporto illuminato del Voyager è alimentato da due pile da orologio CR1620 (incluse). Per - Bushnell Voyager Sky Tour | Owner's Manual - Page 56
. Per trovare la vostra latitudine e longitudine, controllate una mappa della vostra zona oppure aiutatevi visitando il sito Web della Bushnell (www. bushnell.com). b. Dopo che è stato impostato con la vostra ubicazione e l'ora, il ricevitore Sky Tour vi dirà automati camente l'ora locale e quali - Bushnell Voyager Sky Tour | Owner's Manual - Page 57
SUGGERIMENTI UTILI • Il vostro telescopio è uno strumento molto sensibile. Per ottenere risultati migliori e minori vibrazioni, collocate il telescopio su una superficie in piano, a terra, invece che sul vialetto in cemento di accesso alla casa o sul patio di legno. In tal modo, provvederete ad una - Bushnell Voyager Sky Tour | Owner's Manual - Page 58
scopo di aiutarvi nell'allestimento ed uso di questo strumento, questo manuale non copre tutto quello che potreste voler sapere in fatto di una guida generale di astronomia. Un elenco di guide raccomandante è reperibile sul nostro sito www.bushnell.com. Come suggerimento per la vostra visione, - Bushnell Voyager Sky Tour | Owner's Manual - Page 59
COME USARE IL TELESCOPIO 2. Dopo aver approntato il telescopio e aver scelto qualcosa da osservare, centrate l'oggetto desiderato nel cercatore. Se avete allineato bene il cercatore, un rapido sguardo attraverso il tubo principale del telescopio a bassa potenza dovrebbe mostrare la stessa immagine. - Bushnell Voyager Sky Tour | Owner's Manual - Page 60
NOTES 60 - Bushnell Voyager Sky Tour | Owner's Manual - Page 61
Uniti o del Canada, rivolgersi al rivenditore per le clausole pertinenti della garanzia. In Europa si può anche contattare la Bushnell a questo numero: Bushnell Germany GmbH European Service Centre Mathias-Brüggen-Str. 80 D-50827 Köln GERMANY Tel: +49 221 995568-0 Fax: +49 221 995568-20 Questa - Bushnell Voyager Sky Tour | Owner's Manual - Page 62
aquisição do Telescópio Bushnell Voyager com Sky Tour! Esse telescópio é o que há de mais moderno neste tipo de instrumento. O aparelho de mão do Sky Tour faz narrações, fornecendo tours pessoais, em tempo real, do céu noturno - todas as noites! Cada objeto do tour incluirá orientações associadas - Bushnell Voyager Sky Tour | Owner's Manual - Page 63
distância às estrelas, tamanho e outras informações interessantes. O botão do modo Planetas fornece um tour orientado dos planetas. Observação: para tirar máximo proveito do Sky Tour, por exemplo no tour das constelações, escute todo conjunto de informações, passando para outro só depois disso. Toda - Bushnell Voyager Sky Tour | Owner's Manual - Page 64
é ajustável de alumínio 4. Espelho diagonal (refratores somente) 5. Ocular com ampliação de 1,5x (somente em modelos seletos) 6. Aparelho de mão Sky Tour 7. Tubo do telescópio principal 8. Bússola 9. Lente Barlow (somente em modelos seletos) 1. 4. 2. 3. 5. 7. 6. Legenda das peças do suporte do - Bushnell Voyager Sky Tour | Owner's Manual - Page 65
1. 3. 6. Principais componentes do telescópio 2. 1. 2. 7. 8. 3. 6. 7. 8. 4. 4. 5. 5. 78-9930/78-9945 78-9960/78-9970 Legenda de componentes do telescópio 1. Buscadora de ponto vermelho 2. Ocular com formato de 1,25" 3. Mecanismo de foco de cremalheira e pinhão 4. Suporte de bandeja - Bushnell Voyager Sky Tour | Owner's Manual - Page 66
todos os parafusos de ajuste para prender os acessórios. ACESSÓRIOS PARA LENTES Lente Barlow (somente em modelos seletos) Algumas unidades Voyager com Sky Tour vêm com lente Barlow. Este acessório permitirá um uso duplo da ocular. Basta colocar a lente Barlow entre o mecanismo de foco e a ocular - Bushnell Voyager Sky Tour | Owner's Manual - Page 67
tubo do telescópio principal. MINSTALAÇÃO DAS PILHAS O aparelho de mão do Sky Tour é alimentado por 3 pilhas de tamanho AA (fornecidas pelo usuário), instaladas como na maioria dos controladores remotos. O suporte iluminado Voyager é alimentado por duas baterias de relógio CR1620 (incluídas). Essas - Bushnell Voyager Sky Tour | Owner's Manual - Page 68
ções do local. Uma vez definidas, o aparelho de mão do Sky Tour reterá essas informações até que as pilhas sejam trocadas. Para encontrar a latitude e a longitude, veri fique um mapa de sua área ou acesse o website da Bushnell (www.bushnell.com) para obter auxílio. b. Após definidos o local e hora - Bushnell Voyager Sky Tour | Owner's Manual - Page 69
DICAS ÚTEIS • O telescópio é um instrumento extremamente sensível. Para melhores resultados e menos vibrações, coloque o telescópio em um local nivelado sobre o solo em vez de deixá-lo na entrada de concreto da garagem ou sobre um deque de madeira. Isso fornecerá uma base mais estável para a observa - Bushnell Voyager Sky Tour | Owner's Manual - Page 70
Andrômeda. Observe esta e muitas outras. E muito, muito mais! Embora este manual tenha o objetivo de auxiliar na configuração e no uso básico deste instrumento, es recomendadas pode ser encontrada em nosso website: www. bushnell.com O website relaciona também eventos que estão ocorrendo no céu e que - Bushnell Voyager Sky Tour | Owner's Manual - Page 71
telescópio. Principalmente em ampliações maiores, se observará que a lua ou Júpiter "correm" para fora do campo de visão. Para compensar, basta movimentar os controles de ajustes mais precisos no telescópio para "rastrear" o objeto na trajetória necessária. 71 - Bushnell Voyager Sky Tour | Owner's Manual - Page 72
OBSERVAÇÕES 72 - Bushnell Voyager Sky Tour | Owner's Manual - Page 73
e a instalação ou manutenção realizada por qualquer outra empresa ou indivíduo, exceto o Departamento de Serviços Autorizados da Bushnell (Bushnell Authorized Service Department). Toda devolução feita sob esta garantia deverá incluir os itens relacionados abaixo: 1) Um cheque/ordem de pagamento no - Bushnell Voyager Sky Tour | Owner's Manual - Page 74
For further questions or additional information please contact: Bushnell Outdoor Products 9200 Cody, Overland Park, Kansas 66214 (800) 423-3537 • www.bushnell.com 74
-
 1
1 -
 2
2 -
 3
3 -
 4
4 -
 5
5 -
 6
6 -
 7
7 -
8
-
9
-
10
-
11
-
12
-
13
-
14
-
15
-
16
-
17
-
18
-
19
-
20
-
21
-
22
-
23
-
24
-
25
-
26
-
27
-
28
-
29
-
30
-
31
-
32
-
33
-
34
-
35
-
36
-
37
-
38
-
39
-
40
-
41
-
42
-
43
-
44
-
45
-
46
-
47
-
48
-
49
-
50
-
51
-
52
-
53
-
54
-
55
-
56
-
57
-
58
-
59
-
60
-
61
-
62
-
63
-
64
-
65
-
66
-
67
-
68
-
69
-
70
-
71
-
72
-
73
-
74
 |
 |
INSTRUCTION
MANUAL
Lit.#: 98-0822/01-10
WITH SKY TOUR™
78-9960
700x60mm
REFRACTOR
78-9970
800x70mm
REFRACTOR
78-9930
700x76mm
REFLECTOR
78-9945
900x114mm
REFLECTOR