Brother International DS-620 BR-Receipts Users Guide Windows
Brother International DS-620 Manual
 |
View all Brother International DS-620 manuals
Add to My Manuals
Save this manual to your list of manuals |
Brother International DS-620 manual content summary:
- Brother International DS-620 | BR-Receipts Users Guide Windows - Page 1
BR-Receipts User's Guide Version A USENG - Brother International DS-620 | BR-Receipts Users Guide Windows - Page 2
Copyright ©2016 Brother Industries, Ltd. All Rights Reserved. PDFlib (C) 1997-2009, PDFlib GmbH and Thomas Merz. JPEGlib (C) 1998 Independent JPEG Group. QuickBooks SDK 13.0 © 2013. The copyright and - Brother International DS-620 | BR-Receipts Users Guide Windows - Page 3
LIABLE FOR ANY DIRECT, INDIRECT, INCIDENTAL, SPECIAL, EXEMPLARY, OR CONSEQUENTIAL DAMAGES (INCLUDING, BUT NOT LIMITED TO, PROCUREMENT OF SUBSTITUTE GOODS OR SERVICES; LOSS OF USE, DATA, OR PROFITS; OR BUSINESS INTERRUPTION) HOWEVER CAUSED AND ON ANY THEORY OF LIABILITY, WHETHER IN CONTRACT, STRICT - Brother International DS-620 | BR-Receipts Users Guide Windows - Page 4
Up BR-Receipts 12 Collecting Receipts ...14 Scanning Receipts 14 Importing Receipts 17 Creating Receipts Manually 18 Using Receipt Templates 18 Select Vendor ...18 New Template ...19 Manual Input ...21 Modify Template 21 Delete Template 22 Apply Another Template 23 Field Categorizing ...23 - Brother International DS-620 | BR-Receipts Users Guide Windows - Page 5
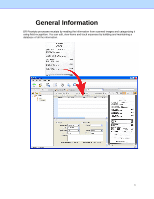
1 General Information BR-Receipts processes receipts by reading the information from scanned images and categorizing it using field recognition. You can edit, view items and track expenses by building and maintaining a database of all the information. 1 - Brother International DS-620 | BR-Receipts Users Guide Windows - Page 6
the relevant Microsoft website. Display SVGA (1024 x 768) or better. CD-ROM Drive. A minimum of 512 MB free hard disk space for installing the program. A USB port for scanner connection. A USB port for computer connection. Receipts must be in reasonably good condition to be readable by the - Brother International DS-620 | BR-Receipts Users Guide Windows - Page 7
The following descriptions and instructions will help you get started: 1. Create a Receipt Box Create a receipt box to build a database of your receipts. You can import, scan, manually create, and paste receipts into the receipt box. 2. Scan Put the receipt in the scanner and begin scanning. The - Brother International DS-620 | BR-Receipts Users Guide Windows - Page 8
in dialog box. Enter an e-mail address and password to connect your Brother Online (BOL) account. appears, indicating that you can now send receipt Create Reports Reports let you see where receipts originated, how goods and services were paid for, and who is responsible for receipts. For more - Brother International DS-620 | BR-Receipts Users Guide Windows - Page 9
NOTE: Quicken supports importing BR-Receipt data into a cash, business or investment based account. Before starting, open Quicken and specify the correct account and select File Export QIF - Brother International DS-620 | BR-Receipts Users Guide Windows - Page 10
6 - Brother International DS-620 | BR-Receipts Users Guide Windows - Page 11
Getting Started From the BR-Receipts screen, you can view file folders, a list of all receipts, an image of the selected receipt, and the recognized data. You can control which receipts are displayed in the list by clicking the All drop-down list and selecting Recently Added (receipts updated in - Brother International DS-620 | BR-Receipts Users Guide Windows - Page 12
from your local computer. NOTE: If you select a receipt box to upload, all the folders in this receipt box will be uploaded. Link to Brother Online Receipts service: Click to open the BOL webpage and view the files you have uploaded, if the account information is not saved in the Settings, you - Brother International DS-620 | BR-Receipts Users Guide Windows - Page 13
folder commands: Scan Receipt... Scan receipts to the currently selected folder. Import Receipt Images... Import receipts to the currently selected folder. Manually Create Create a new receipt and save it as a record. a New Receipt Paste Receipt Paste a copied receipt to a folder. Verify All - Brother International DS-620 | BR-Receipts Users Guide Windows - Page 14
select it, or hold down the Shift key while clicking to choose multiple records. The first selected receipt will be displayed in the image view mouse. • Rotate image: Click to rotate an image clockwise 90 degrees. • Recognize the field: Click and drag a rectangle to select an area, right-click - Brother International DS-620 | BR-Receipts Users Guide Windows - Page 15
Right-click on an empty area to view these commands: Zoom In Zoom Out Fit into Window Rotate image Increase magnification. Reduce magnification. Adjust the image width to match the current window. Rotate an image clockwise 90 degrees. Edit View To edit the receipt, do one of the following: • - Brother International DS-620 | BR-Receipts Users Guide Windows - Page 16
4 Working with BR-Receipts BR- Receipts is designed to help you organize and track your expenses. Once you start scanning and saving your receipts, use these basic functions to keep your database current. Setting Up BR-Receipts Click on the toolbar or click the File menu and select Settings, and - Brother International DS-620 | BR-Receipts Users Guide Windows - Page 17
User Profile: Type your user information to speed up future searches. User Defined Field: Select a receipt box and choose a type of field you want to update. The items under the selected type will be displayed as a list. • Click Add to open a dialog box, type the item name, and click OK to add the - Brother International DS-620 | BR-Receipts Users Guide Windows - Page 18
is recognized during field categorizing, it will be placed under the Display name of Payment Type field. To import a CSV file that contains multiple items the receipt box and choosing Set Location. Collecting Receipts Use your scanner to digitize receipts and store them in a database. Receipts can - Brother International DS-620 | BR-Receipts Users Guide Windows - Page 19
scanning style: Select Scan With TWAIN User Interface if you want to use the scanner's TWAIN interface for scanning. Select Quick scanning black and white receipts. • Carrier Sheet Mode: Select Carrier Sheet Mode when scanning a receipt in a Carrier Sheet, Scan Size, Width, Height and Unit fields - Brother International DS-620 | BR-Receipts Users Guide Windows - Page 20
If you are scanning a long receipt, fold the receipt to fit to the carrier sheet with title and total amount items shown. Do not skew the paper when folding. NOTE: Carrier sheets may differ depending on your scanner model. • Scan Size: The default setting is Auto Detect. Select User Defined from the - Brother International DS-620 | BR-Receipts Users Guide Windows - Page 21
receipts. For more information, see Using Receipt Templates. 7. When the scanner finishes scanning the receipt, you can click in Image View and drag Type, or drag the selected area directly to the desired field to recognize it. Importing Receipts You can import receipts saved as image files. 1. - Brother International DS-620 | BR-Receipts Users Guide Windows - Page 22
database. Creating Receipts Manually If your receipt is not in good condition or is unreadable by the scanner, you can manually add the receipt record receipts share common data such as where the receipts originated, how goods and services were paid for, and who is responsible for them, you can use - Brother International DS-620 | BR-Receipts Users Guide Windows - Page 23
You can also move the orange rectangle or the color window separately to accurately match the correspond units. New Template Create templates to apply to your receipts. Create a different template for each vendor to help organize your receipts. 19 - Brother International DS-620 | BR-Receipts Users Guide Windows - Page 24
1. Click New template the receipt image will be displayed with a red bar. Click and drag the red bar to separate the top and bottom areas of the receipt. Drag to select an area of the receipt, right-click the selected area, and choose a field type from the pop-up menu to verify this area. 2. Set the - Brother International DS-620 | BR-Receipts Users Guide Windows - Page 25
input later to ignore all the templates. You can manually type your receipt's field information in Edit view. Check Apply to all, and all the receipts will be imported or scanned without applying a template. Modify - Brother International DS-620 | BR-Receipts Users Guide Windows - Page 26
Delete Template To delete the template, click the Receipt menu and select Delete template. A dialog box will open. Click Delete to remove the template from your computer. 22 - Brother International DS-620 | BR-Receipts Users Guide Windows - Page 27
select the field type from Receipt Date, Amount, Sales Tax, Vendor, or Payment Type (or drag the selected area directly to the desired field) to recognize it. 23 - Brother International DS-620 | BR-Receipts Users Guide Windows - Page 28
A dialog box will ask if you agree with the OCR results, click OK to put the results into the desired field or click Cancel to discard it. When finished, the receipt and the data will be displayed and you can check and edit the data. This is called the verification process. You can mark a receipt as - Brother International DS-620 | BR-Receipts Users Guide Windows - Page 29
is selected, the report will be summarized by vendor names in the first field. 4. In the Formatting section: • Select Include Cover Page if you want a cover page that includes receipt date, user profile and summary. • Select Include Receipt if you want your report to display groups by spending type - Brother International DS-620 | BR-Receipts Users Guide Windows - Page 30
... Select a driver for your scanner, or a different scanner connected to your computer. Import Receipt Images... Import receipts to the currently selected folder. Import User Defined Import a CSV file with customized items of different types in Field... multiple fields. Export to File Save - Brother International DS-620 | BR-Receipts Users Guide Windows - Page 31
Edit Menu Cut (Ctrl+X) Copy (Ctrl+C) Paste (Ctrl+V) Delete Select All (Ctrl+A) Unselect All Invert Selection Cut the selected receipt. (You can choose more than one.) Copy the selected receipt. (You can choose more than one.) Insert any copied or cut information. Receipt Delete either a - Brother International DS-620 | BR-Receipts Users Guide Windows - Page 32
Receipt Menu Manually Create a New Receipt Modify template Create a receipt in the current folder. program. Choose another template to re-recognize your receipt. Make a report from the data on the selected receipts. Help Menu Using Help Link to Brother Website Check for Latest Version About BR - Brother International DS-620 | BR-Receipts Users Guide Windows - Page 33
21 File Menu, 24 Folder View, 6 G General Information, 1 Getting Started, 5 H Help Menu, 26 I Image View, 8 Importing Receipts, 15 L List View, 8 M Manual Input, 19 Menu Bar, 5 Menu Commands, 24 Modify Template, 19 O Overview, 3 R Receipt Menu, 26 S Scanning Receipts, 12 Searching for Receipts, 22
-
 1
1 -
 2
2 -
 3
3 -
 4
4 -
 5
5 -
 6
6 -
 7
7 -
8
-
9
-
10
-
11
-
12
-
13
-
14
-
15
-
16
-
17
-
18
-
19
-
20
-
21
-
22
-
23
-
24
-
25
-
26
-
27
-
28
-
29
-
30
-
31
-
32
-
33
 |
 |

BR-Receipts
User's Guide
Version A
USENG