Boss Audio MR360UV User Manual in English - Page 12
General Setup, Clock Setup, Audio Setup, Video Setup, Radio Setup
 |
View all Boss Audio MR360UV manuals
Add to My Manuals
Save this manual to your list of manuals |
Page 12 highlights
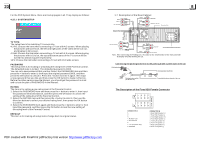
9. Return control When media playing, press the button to up to the previous menu, press menu to up to the previous menu till to the main menu.(When playing Video, please press stop button first) 10. To reset the unit when the display is incorrect, or the function buttons are not effective or sound is distorted, press the REL button to detach the front panel from the unit and remove it, then use the sharp end of a thing to press the RESET button, which will reset to factory default, and re-instate the correct functions. 11.To adjust sound modes To adjust the sound modes, briefly and repeatedly press the SEL button on the front panel to select one of the sound modes such as : VOL, BAS(without preset EQ), TRE (without preset EQ), BAL, FAD. 12. To do setup In setup mode, select the GENERAL, CLOCK, AUDIO, VIDEO, RADIO (rotate the volume tune or the direction buttons)as follow: GENERAL SETUP Wallpaper: this function allows to choose the display background. Logo: this function allows to choose the starting screen. Beep: choose the buttons' sound on/off GENERAL SETUP CLOCK SETUP Clock mode: select 24 HOUR or 12 HOUR. Clock time: adjust the clock. CLOCK SETUP AUDIO SETUP Loud: choose between Loudness ON/OFF. EQ: choose between the different types of EQ. VIDEO SETUP Standard Video: After setting brightness, contrast, saturation, hue, tap it to turn to the preset mode. Brightness Contrast Saturation Hue AUDIO SETUP RADIO SETUP Radio region: choose the radio zone. RDS setting: ON/OFF VIDEO SETUP Note: Press and hold the BAND to turn on SHIFT to do select all the functionby the rotate VOL, after selecting, press the SEL to confirm, or you can also use the direction buttons to do selecting. RADIO SETUP PDF created with FinePrint pdfFactory trial version http://www.pdffactory.com ZOOMx2,ZOOMx3,ZOOMx4,ZOOMx1/2,ZOOMx1/3,ZOOMx1/4,ZOOM OFF. Press one of the ^/v/>/< buttons to select the area you want to enlarge. 4.17 Change the Caption Language In the state of DVD disc playing, press the SUBTITLE button repeatedly to select the language of the caption or turn off the caption.(depend on the disc used.) In the state of VCD/MP3/WMA/CD disc playing, the button is not available. 4.18 Change the Audio Language 1. In the state of DVD disc playing, press the AUDIO button repeatedly on the IR remote controller to select the desired language type. (depend on the disc used) 2. In the state of VCD disc playing, press the AUDIO button repeatedly to select the sound mode of the MONO L, MONO R, MIX MONO and Stereo, no language function. 3. In the state of CD/WMA/MP3 disc playing, the AUDIO button is invalid. 4.19 Look over the Playback Status 1. In the state of DVD disc playing, press the OSD button repeatedly on the remote controller to turn on/off the playback status. When it is on, it will display the information such as: the serial number of the playing title, the serial number of the playing chapter, the elapsed time of the playing chapter, the remained time of the playing chapter, the elapsed time of the playing title, the remained time of the playing title, etc. 2. In the state of VCD/CD disc playing, press the OSD button repeatedly on the remote controller to turn on/off the playback status. When it is on, it will display the information such as: the serial number of the playing track, the elapsed time of the playing track, the remained time of the playing track, the elapsted time of the disc, the remained time of the disc. 3. In the state of MP3/WMA disc playing, press the OSD button repeatedly on the remote controller to turn on/off the playback status. When it is on, it will display the information such as: the serial number of the playing track, the elapsed time of the playing track, the remained time of the playing track.
-
 1
1 -
2
-
3
-
4
-
5
-
6
-
 7
7 -
 8
8 -
 9
9 -
 10
10 -
 11
11 -
 12
12 -
 13
13 -
 14
14 -
 15
15 -
 16
16
 |
 |
