Bose 321 GS Owners Manual - Page 25
Checking your system setup
 |
View all Bose 321 GS manuals
Add to My Manuals
Save this manual to your list of manuals |
Page 25 highlights
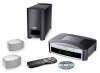
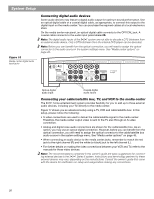
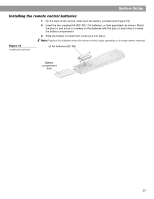
System Setup Checking your system setup 1. Check the following before you continue: • All cables are connected for the setup you chose. • The batteries were installed in the remote control. • The power cord was installed and plugged into a live AC receptacle. 2. Turn on your TV. Use the remote control that came with your TV. 3. Select the right video input on your TV to view the 3•2•1 system video output. • Refer to the name of the TV video input you used during setup. • Use the remote for your TV to select the video input for your 3•2•1 system. The video input button might be labelled "TV Input", "TV/VCR", or "AV". Refer to your TV's owner's guide for help. 4. Turn off the speakers on your TV. • Refer to your TV's owner's guide for help. • If your TV does not have an option to turn off the internal speakers, you may need to adjust both the 3•2•1 system volume and your TV volume until you find a level that produces the desired sound. • In some TVs, when the internal speakers are turned off, you may need to raise the TV's volume level by 75% to 100% in order to hear audio from the 3•2•1 home entertainment system. See your TV owner's guide for help. 5. Turn on your 3•2•1 system. • Point the 3•2•1 remote control at the media center and press On-Off. 6. Play the 3•2•1 setup DVD. • Press Eject on the media center control panel. • Insert the DVD setup disc into the disc tray. • Press Eject again to close the tray. The DVD will automatically begin to play. If it does not, press the play button ( ). Note: Be sure to play the Setup DVD, included in the carton with your system, as soon as all the connections are completed. This will help you verify the connections you have made and confirm proper sound performance. 25
-
 1
1 -
2
-
3
-
4
-
5
-
6
-
7
-
8
-
9
-
10
-
11
-
12
-
13
-
14
-
15
-
16
-
17
-
18
-
19
-
 20
20 -
 21
21 -
 22
22 -
 23
23 -
 24
24 -
 25
25 -
 26
26 -
 27
27 -
 28
28 -
 29
29 -
 30
30 -
31
-
32
-
33
-
34
-
35
-
36
-
37
-
38
-
39
-
40
-
41
-
42
-
43
-
44
-
45
-
46
-
47
-
48
-
49
-
50
-
51
-
52
-
53
-
54
-
55
-
56
-
57
-
58
-
59
-
60
-
61
-
62
-
63
-
64
-
65
-
66
-
67
-
68
 |
 |
