BenQ TH685 User Manual
BenQ TH685 Manual
 |
View all BenQ TH685 manuals
Add to My Manuals
Save this manual to your list of manuals |
BenQ TH685 manual content summary:
- BenQ TH685 | User Manual - Page 1
Digital Projector User Manual Home Entertainment Series I TH685 V 1.00 - BenQ TH685 | User Manual - Page 2
BenQ's written instructions, especially the ambient humidity must be in-between 10% and 90%, temperature in-between 0°C and 35°C, altitude lower than 4920 feet, and avoiding to operate the projector manual or otherwise, without the prior written permission of BenQ Corporation. Disclaimer BenQ - BenQ TH685 | User Manual - Page 3
instructions 4 Introduction ...7 Shipping contents ...7 Projector exterior view ...8 Controls and functions...9 Positioning your projector Maintenance ...40 Care of the projector ...40 Lamp information ...41 Troubleshooting ...47 Specifications ...48 Projector specifications ...48 Dimensions ...49 - BenQ TH685 | User Manual - Page 4
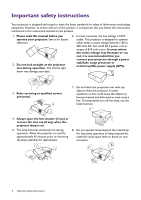
follow the instructions mentioned in this manual and marked on the product. 1. Please read this manual before you operate your projector. Save it your projector through a power stabilizer, surge protector or uninterruptible power supply (UPS). 3. Refer servicing to qualified service personnel. - BenQ TH685 | User Manual - Page 5
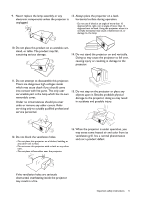
should you ever undo or remove any other covers. Refer servicing only to suitably qualified professional service personnel. 15. Do not step on the projector or place any objects upon it. Besides probable physical damage to the projector, doing so may result in accidents and possible injury. 12 - BenQ TH685 | User Manual - Page 6
projector. Liquids spilled into the projector may cause it to fail. If the projector does become wet, disconnect it from the power supply's power outlet and call BenQ to have the projector serviced Do not place this projector in any of the air around the projector. - Locations the projector's life - BenQ TH685 | User Manual - Page 7
your place of purchase. Standard accessories Projector Remote control with batteries Quick start guide Warranty card* Power cord VGA cable . • Dispose of the used batteries according to the manufacturer's instructions and local environment regulations for your region. • Never throw the - BenQ TH685 | User Manual - Page 8
Projector exterior view 6 1 7 2 8 9 3 4 5 3 19 19 19 10 11 12 13 14 15 16 3 3 17 18 1. Focus ring and Zoom ring 2. Vent (air exhaust) 3. Adjuster feet 4. Projection - BenQ TH685 | User Manual - Page 9
7 11 16 8 12 3 9 4 10 5 8 4 6 10 13 17 14 15 7 1. POWER Toggles the projector between standby mode and on. ON/ Off Toggles the projector between standby mode and on. 2. POWER indicator light/TEMPerature warning light/LIGHT indicator light (See Indicators on page 46.) 3. IR remote - BenQ TH685 | User Manual - Page 10
mode. 7. ECO BLANK 13. Used to hide the screen picture. Toggles projector audio between on and off. Do not block the projection lens from projecting MHL Zone object to become heated and deformed or This model does not support MHL functions. even cause a fire. 8. OK Confirms the selected On-Screen - BenQ TH685 | User Manual - Page 11
suspended upside-down from the ceiling in front of the screen. Purchase the BenQ Projector Ceiling Mount Kit from your dealer to mount your projector on the ceiling. 4. Rear Ceiling Select this location with the projector suspended upside-down from the ceiling behind the screen. Note that a special - BenQ TH685 | User Manual - Page 12
Obtaining a preferred projected image size The distance from the projector lens to the screen, the zoom setting (if available), and the video format each factors in the projected image size. Projection 87 93 100 106 112 118 125 131 137 143 149 156 162 168 174 181 187 12 Positioning your projector - BenQ TH685 | User Manual - Page 13
with a non-BenQ brand projector mounting kit. • Consider the surrounding temperature where the projector is ceiling/wall mounted. If a heater is used, the temperature around the ceiling may be higher than expected. • Read the user manual for the mounting kit about the range of torque. Tightening - BenQ TH685 | User Manual - Page 14
mm) 113.54 60 65.89 40.27 65.89 Adjusting the projected image Adjusting the projection angle If the projector is not placed on a flat surface or the screen and the projector are not perpendicular to each other, the projected image becomes trapezoidal. You can adjust the adjuster feet to fine - BenQ TH685 | User Manual - Page 15
trapezoid due to angled projection. To correct this, you will need to manually correct it following these steps. 1. Do one of the following steps to display the keystone correction page. • Press / on the projector. • Press on the remote control. Press . Press . 2. After the Keystone correction - BenQ TH685 | User Manual - Page 16
key simultaneously. Refer to your notebook's documentation to find your notebook's key combination. • If the selected video image is not displayed after the projector is turned on and the correct video source has been selected, check that the video source device is turned on and operating correctly - BenQ TH685 | User Manual - Page 17
correctly. Also check that the signal cables have been connected correctly. Connecting smart devices The projector can project the content directly from a smart device by using a wireless dongle. HDMI wireless dongle (e.g. BenQ QCast Mirror) Connect the dongle to HDMI and USB TYPE-A ports on the - BenQ TH685 | User Manual - Page 18
necessary) Rotate the focus ring to adjust the image clearness. 3. If this is the first time you turn on the projector, the setup wizard appears to guide you through setting up the projector. If you have already done this, skip this step and move on to step 5. • Use the arrow keys ( / / / ) on the - BenQ TH685 | User Manual - Page 19
input signal on page 23. • Please use the original accessories (e.g. power cord) to avoid possible dangers such as electric shock and fire. • If the projector is still hot from previous activity, it will run the cooling fan for approximately 90 seconds before energizing the lamp. • The Setup Wizard - BenQ TH685 | User Manual - Page 20
you intend to switch from the Basic OSD menu to the Advanced OSD menu, follow the instructions below: 1. Go to Basic Menu - Settings > Menu Type and press OK. 2. Press / to select Advanced and press OK. Your projector will switch to Advanced OSD menu. Below is the overview of the Advanced OSD menu - BenQ TH685 | User Manual - Page 21
, when you wish to switch from the Advanced OSD menu to the Basic OSD menu, follow the instructions below: 1. Go to Advanced Menu - System Setup : Basic > Menu Settings and press OK. 2. Highlight Menu Type and press / to select Basic. Your projector will switch to the Basic OSD menu. Securing the - BenQ TH685 | User Manual - Page 22
XXX XXX XXX XXX Recall Password Please write down the recall code, and contact BenQ Customer Center. Recall code: XXX XXX XXX XXX Exit 2. Write down the number and turn off your projector. 3. Seek help from the local BenQ service center to decode the number. You may be required to provide proof of - BenQ TH685 | User Manual - Page 23
ratio" setting, which may cause some image distortion or loss of picture clarity. See Aspect Ratio on page 36. Shutting down the projector 1. Press on the projector or on the remote control and a confirmation message will appear prompting you. If you don't respond in a few seconds, the message will - BenQ TH685 | User Manual - Page 24
is no equipment connected to the projector or no signal detected, limited menu items are accessible. Menu System Basic Menu Sub-menu Picture Mode Sound Mode Volume Mute Fast Mode 3D Mode 3D Sync Invert Settings Options Bright/Living Room/Cinema/Sports/Game/ User 1/User 2/(3D)/HDR10/HLG Standard - BenQ TH685 | User Manual - Page 25
Sports/ Game/User 1/User 2 Rename User Mode 0~50~100 0~50~100 0~50~100 0~50~100 0~7~15 Gamma Selection 1.6/1.8/2.0/2.1/2.2/2.3/2.4/2.6/2.8/ BenQ HDR On/Off) LumiExpert Level (-2~0~2) Manual Calibration (Manual Calibration Status/Calibrate/ Reset Manual Calibration) Light Mode Normal/ - BenQ TH685 | User Manual - Page 26
Color Image Position Overscan Adjustment PC & Component YPbPr Tuning 3D HDR Digital Lens Shift 3D Mode 3D Sync Invert Auto/Off Options Standard/Cinema/Music/Game/ Sport/User 100Hz/300Hz/1kHz/3kHz/10kHz On/Off 0~10~20 On/Off Reset/Cancel Auto/4:3/16:9/16:10 Off/Light Yellow/Pink/ Light Green - BenQ TH685 | User Manual - Page 27
Main menu Sub-menu Options Language Background Color Black/Blue/Purple Splash Screen BenQ/Black/Blue Projector Position Front/Front Ceiling/Rear Rear Ceiling SYSTEM SETUP: BASIC Auto Off Disable/5 min/10 min/15 min/ 20 min/25 min/30 min Direct - BenQ TH685 | User Manual - Page 28
Main menu INFORMATION Sub-menu Source Picture Mode Resolution Color System Light Usage Time 3D Format Firmware Version Service Code Options 28 Menu operation - BenQ TH685 | User Manual - Page 29
for environments where extra-high brightness is required, such as using the projector in well lit rooms. • Living Room: Being slightly brighter than Cinema The following preset sound modes are provided: Standard, Cinema, Music, Game, Sport, and User. If the Mute function is activated, adjusting - BenQ TH685 | User Manual - Page 30
video devices and contents, such as PlayStation consoles (with 3D game discs), 3D Blu-ray players (with 3D Blu-ray discs), 3D TV (with 3D channel), and so on. After you have connected the 3D video devices to the projector, wear the BenQ 3D glasses and make sure the power is on to - BenQ TH685 | User Manual - Page 31
environments where extra-high brightness is required, such as using the projector in well lit rooms. • Living Room: Being slightly brighter than amount of ambient light, et. your living room. • Game: This mode is best for playing video games in rooms where there is a small amount of ambient light - BenQ TH685 | User Manual - Page 32
User Mode Management Brightness Contrast Color Tint Sharpness There are 2 user-definable modes if the current available picture modes are not suitable for your need. You can use one of the picture modes (except the User 1/User 2) as a starting point and customize the settings. 1. Go to Picture > - BenQ TH685 | User Manual - Page 33
Contrast 1.6 1.8 2.0 2.1 2.2 2.3 2.4 2.6 2.8 BenQ HDR Brightness The projector can automatically adjust the brightness levels of your image according to the input source. You can also manually select a - BenQ TH685 | User Manual - Page 34
in picture. It enables a greater than 50% brightness increase in mid-tone images, which are common in video and natural scenes, so the projector reproduces images in realistic and true colors. Fast Mode Minimizing the response time (one frame) between the source input and the image output, this - BenQ TH685 | User Manual - Page 35
projector actively detects the ambient light conditions and automatically adjusts balanced visual brightness to create an optimum viewing experience. This function is not available when the Picture Mode is Bright or 3D. • LumiExpert Level: Adjusts the gamma offset. • Manual , Music, Game, Sport, - BenQ TH685 | User Manual - Page 36
colors to choose from: Light Yellow, Pink, Light Green, and Blue. Displays the Image Position window. You may use the directional arrow keys on the projector or remote control to adjust the position of the projected picture. The values shown on the lower position of the window change with every key - BenQ TH685 | User Manual - Page 37
within limited degrees. • 3D Sync Invert: When you discover the inversion of the image depth, enable this function to correct the problem. The projector supports HDR imaging sources. It can automatically detect the dynamic range of the source, and optimize settings to reproduce contents under wide - BenQ TH685 | User Manual - Page 38
a baud rate that is identical with your computer's so that you can connect the projector using a suitable RS-232 cable and update or download the projector's firmware. This function is intended for qualified service personnel. Adjusts the image size and focus and check that the projected image is - BenQ TH685 | User Manual - Page 39
on the projector and the splash screen displays. However, if the projector is not working properly, the LED indicators light or flash to remind you that a problem may occur : Shows the firmware version of your projector. • Service Code: Shows the service code of your projector. Menu operation 39 - BenQ TH685 | User Manual - Page 40
wax, alcohol, benzene, thinner or other chemical detergents. These can damage the case. Storing the projector If you need to store the projector for an extended time, please follow the instructions below: • Make sure the temperature and humidity of the storage area are within the recommended range - BenQ TH685 | User Manual - Page 41
of LampSave mode A' is the longest lamp life spec among X, Y, Z, A When you calculate Equivalent Light Usage hour manually, it will probably have deviation from the value shown in OSD menu since projector system calculates time used for each light mode in "Minutes" then rounds down to an integer in - BenQ TH685 | User Manual - Page 42
appears suggesting it is time to replace the lamp, please consult your dealer or go to http://www.BenQ.com before installing a new lamp. An old lamp may cause a malfunction in the projector and in some instances the light may explode. • The apparent brightness of the projected image will vary - BenQ TH685 | User Manual - Page 43
(Refer to user manual) Then reset lamp timer Order a new lamp at www.benq.com OK The lamp MUST be replaced before the projector will operate normally. . Replacing the lamp (FOR SERVICE PERSONNEL ONLY) • To reduce the risk of electrical shock, always turn the projector off and disconnect the power - BenQ TH685 | User Manual - Page 44
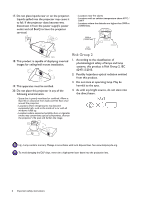
and distortion of the projected images. 8. As shown in the figure, insert the new lamp. Align the lamp connector and 2 sharp points with the projector and push the lamp a bit into the locked position. 9. Insert the lamp connector. 10. Tighten the screw(s) that secures the lamp. 11. Ensure the - BenQ TH685 | User Manual - Page 45
Resetting the light timer 15. After the startup logo, open the On-Screen Display (OSD) menu. Go to Light Settings Menu System Setup : Advanced > Light Settings and press OK. The Light Settings page appears. Highlight Reset Light Timer and press OK. A warning message is displayed asking if you want - BenQ TH685 | User Manual - Page 46
Indicators Light Status & Description Power events Stand-by mode Powering up Normal operation Normal power-down cooling Download CW start fail Light source life exhausted Burn-In events Burn-in ON Burn-in OFF Lamp events Lamp error in normal operation Lamp is not lit up Thermal events Fan 1 error ( - BenQ TH685 | User Manual - Page 47
remote control and the projector. Remove the obstacle. You are too far away from the projector. Stand within 8 meters (26 feet) of the projector. The password is incorrect. Cause You do not remember the password. Remedy See Entering the password recall procedure on page 22. Troubleshooting 47 - BenQ TH685 | User Manual - Page 48
Specifications Projector specifications All specifications are subject to change without notice. Optical Resolution 1920 x 1080 FHD Display system 1-CHIP DMD Lens Please visit below website and choose your country to find your service contact window. http://www.benq.com/welcome 48 Specifications - BenQ TH685 | User Manual - Page 49
Dimensions 312 mm (W) x 225 mm (D) x 110 mm (H) 225 312 110 Unit: mm Specifications 49 - BenQ TH685 | User Manual - Page 50
1152 x 864 1152 x 864_75 1024 x 576 BenQ Notebook_timing 1024 x 600 BenQ Notebook_timing 1280 x 720 1280 x 720_60 1280 x 50.000 49.500 56.250 83.000 65.000 75.000 78.750 94.500 115.5 108 46.966 Supported 3D format Frame Top Side-by-S Sequential Bottom ide V V V V V V V V V V V - BenQ TH685 | User Manual - Page 51
1152 x 864 1152 x 864_75 75 1024 x 576@60Hz BenQ Notebook Timing 60.00 1024 x 600@65Hz BenQ Notebook Timing 64.995 1280 x 720 1280 x 720_60 60 60.241 68.68 67.5 67.158 135.000 74.038 67.5 135 Pixel Supported 3D format Frequency Frame Top Side-by-Si (MHz) Sequential Bottom de 25.175 - BenQ TH685 | User Manual - Page 52
112.5 2160/60P 3840 x 2160 (Only HDMI 2.0) 135 Horizontal Pixel Supported 3D format Frequency Frequency Frame (kHz) (MHz) Sequential Frame Packing Top 148.5 V V 24 297 25 297 30 297 50 594 60 594 Supported timing for Component-YPbPr input Timing 480i 480p 576i 576p 720/50p 720 - BenQ TH685 | User Manual - Page 53
Volume + Volume Volume level for customer Volume Status Bright Living Room Game Cinema Football User1 User2 3D Picture Mode 12345 6789 ASCII *pow vol=?# *appmod=bright# *appmod=livingroom# *appmod=game# *appmod=cine# *appmod=football# *appmod=user1 - BenQ TH685 | User Manual - Page 54
Function Picture Setting Type Write Write Write Read Write Write Write Read Write Write Write Read Write Write Write Read Write Write Write Write Read Write Write Write Write Write Write Read Write Write Read Write Write Read Operation Contrast + Contrast Set Contrast value Contrast value - BenQ TH685 | User Manual - Page 55
Brilliant color on Brilliant color off Brilliant color status Reset picture settings Projector Position-Front Table Projector Position-Rear Table Projector Position-Rear Ceiling Projector Position-Front Ceiling Projector Position Status Quick cooling on Quick cooling off Quick cooling status Quick - BenQ TH685 | User Manual - Page 56
Function Miscellaneous Type Read Read Read Read Read Write Write Read Write Write Read Write Write Write Write Write Write Write Write Read Write Write Write Write Write Write Write Write Read Operation Model Name System F/W Version Scaler F/W Version MCU F/W Version Ballast F/W Version Blank On
-
 1
1 -
 2
2 -
 3
3 -
 4
4 -
 5
5 -
 6
6 -
 7
7 -
8
-
9
-
10
-
11
-
12
-
13
-
14
-
15
-
16
-
17
-
18
-
19
-
20
-
21
-
22
-
23
-
24
-
25
-
26
-
27
-
28
-
29
-
30
-
31
-
32
-
33
-
34
-
35
-
36
-
37
-
38
-
39
-
40
-
41
-
42
-
43
-
44
-
45
-
46
-
47
-
48
-
49
-
50
-
51
-
52
-
53
-
54
-
55
-
56
 |
 |

Digital Projector
User Manual
Home Entertainment Series I TH685
V 1.00