BenQ TH671ST User Manual
BenQ TH671ST Manual
 |
View all BenQ TH671ST manuals
Add to My Manuals
Save this manual to your list of manuals |
BenQ TH671ST manual content summary:
- BenQ TH671ST | User Manual - Page 1
TH671ST Digital Projector User Manual V 1.02 - BenQ TH671ST | User Manual - Page 2
replacement of any defective parts (labor included). To obtain warranty service, immediately notify the dealer from which you purchased the product of any defects. Important: The above warranty shall be void if the customer fails to operate the product in accordance with BenQ's written instructions - BenQ TH671ST | User Manual - Page 3
Contents Warranty and Copyright information 2 Important safety instructions 4 Introduction ...7 Shipping contents ...7 Projector ...30 Maintenance ...38 Care of the projector ...38 Lamp information ...38 Troubleshooting ...44 Specifications ...45 Projector specifications ...45 Dimensions ...46 - BenQ TH671ST | User Manual - Page 4
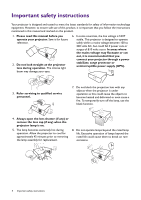
the instructions mentioned in this manual and marked on the product. 1. Please read this manual before supply (UPS). 3. Refer servicing to qualified service personnel. 7. Do not block lamp assembly for replacement. 8. Do not operate lamps beyond the rated lamp life. Excessive operation of lamps - BenQ TH671ST | User Manual - Page 5
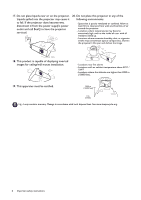
9. Never replace the lamp assembly or any electronic components unless the death if you should come into contact with live parts. The only user serviceable part is the lamp which has its own removable cover. Under no circumstances should you may result in a fire. Important safety instructions 5 - BenQ TH671ST | User Manual - Page 6
, disconnect it from the power supply's power outlet and call BenQ to have the projector serviced. 20. Do not place this projector in any of the be earthed. 3000 m (10000 feet) 0 m (0 feet) Hg - Lamp contains mercury. Manage in accordance with local disposal laws. See www.lamprecycle.org. - BenQ TH671ST | User Manual - Page 7
QDuigiictkalSPtraortjeGctuoidr e Remote control with batteries User manual CD Quick start guide Warranty card* Power cord • The Replace only with the same or equivalent type recommended by the battery manufacturer. • Dispose of the used batteries according to the manufacturer's instructions - BenQ TH671ST | User Manual - Page 8
and Zoom ring 2. Vent (air exhaust) 3. Adjuster feet 4. Projection lens 5. IR remote sensor 6. External control panel (See Controls and functions on page 9.) 7. Lamp cover 8. Ambient Light Sensor (ALS) 9. Vent (air inlet) 10. Audio input jack Audio output jack 11. HDMI 1 input port 12. HDMI 2/MHL - BenQ TH671ST | User Manual - Page 9
Toggles the projector between standby mode and on. ON/ Off Toggles the projector between standby mode and on. 2. POWER indicator light/TEMPerature warning light/LAMP indicator light (See Indicators on page 43.) 3. IR remote sensor 4. BACK Goes back to previous OSD menu, exits and saves menu settings - BenQ TH671ST | User Manual - Page 10
6. SOURCE 15. SOUND MODE Displays the source selection bar. Selects the sound mode. 7. ECO BLANK 16. LUMIEXPERT BOOST Used to hide the screen picture. Displays the LumiExpert Boost menu. 8. OK Do not block the projection lens from projecting as this could cause the blocking 17. Volume keys - BenQ TH671ST | User Manual - Page 11
Controlling your smart device with the AUTO button When the projector projects the content from your MHL compatible smart device, you can use the remote control to control your smart device. To enter the MHL mode, press and hold AUTO on the projector keypad for 3 seconds. The MHL Zone keys on the - BenQ TH671ST | User Manual - Page 12
-down in front of the screen. Purchase the upside-down from behind the screen. Note that a BenQ Projector Ceiling/Wall Mount Kit from your special rear projection screen and the BenQ dealer to mount your projector. Projector Ceiling/Wall Mount Kit are required for this installation location - BenQ TH671ST | User Manual - Page 13
mm. Looking across this row shows that a 140'' (about 3.6 m) screen is required. All measurements are approximate and may vary from the actual sizes. BenQ recommends that if you intend to permanently install the projector, you should physically test the projection size and distance using the actual - BenQ TH671ST | User Manual - Page 14
cover any product damage caused by mounting the projector with a non-BenQ brand projector mounting kit. • Consider the surrounding temperature where the around the ceiling/wall may be higher than expected. • Read the user manual for the mounting kit about the range of torque. Tightening with torque - BenQ TH671ST | User Manual - Page 15
to fine-tune the horizontal angle. To retract the feet, screw the adjuster feet in a reverse direction. Do not look into the lens while the lamp is on. The strong light from the lamp may cause damage to your eyes. Positioning your projector 15 - BenQ TH671ST | User Manual - Page 16
Keystoning refers to the situation where the projected image becomes a trapezoid due to angled projection. To correct this, you will need to manually correct it following these steps. 1. Do one of the following steps to display the keystone correction page. • Press / on the projector. • Press - BenQ TH671ST | User Manual - Page 17
Connection When connecting a signal source to the projector, be sure to: 1. Turn all equipment off before making any connections. 2. Use the correct signal cables for each source. 3. Ensure the cables are firmly inserted. A/V device Monitor Smart device 7 4 5 6 1 2 1 VGA cable 2 VGA to - BenQ TH671ST | User Manual - Page 18
You need only connect the projector to a video source device using just one of the connecting methods, however each provides a different level of video quality. Terminal Picture quality HDMI/MHL Better PC Good Connecting audio The projector has built-in mono speaker(s) which are designed to - BenQ TH671ST | User Manual - Page 19
) Rotate the focus ring to adjust the image clearness. 3. If this is the first time you turn on the projector, the setup wizard appears to guide you through setting up the projector. If you have already done this, skip this step and move on to step 5. • Use the arrow keys ( / / / ) on - BenQ TH671ST | User Manual - Page 20
shock and fire. • If the projector is still hot from previous activity, it will run the cooling fan for approximately 90 seconds before energizing the lamp. • The Setup Wizard screenshots are for reference only and may differ from the actual design. • If the frequency/resolution of the input signal - BenQ TH671ST | User Manual - Page 21
Wall Color Off Auto Source Off Reset Lamp Timer Projector Position Front Menu Type Basic Basic OSD menu to the Advanced OSD menu, follow the instructions below: 1. Go to Basic Menu - Settings > Menu Picture Selection bar Submenu Picture Mode User Mode Management Brightness 50 Contrast 50 - BenQ TH671ST | User Manual - Page 22
Likewise, when you wish to switch from the Advanced OSD menu to the Basic OSD menu, follow the instructions below: 1. Go to Advanced Menu - System Setup : Basic > Menu Settings and press OK. 2. Highlight Menu Type and press / to select Basic. Your projector will switch - BenQ TH671ST | User Manual - Page 23
Securing the projector Using a security cable lock The projector has to be installed in a safe place to prevent theft. Otherwise, purchase a lock, such as the Kensington lock, to secure the projector. You can locate a Kensington lock slot on the rear side of the projector. See item 19 on page 8. A - BenQ TH671ST | User Manual - Page 24
down the number and turn off your projector. 3. Seek help from the local BenQ service center to decode the number. You may be required to provide proof of purchase documentation to verify that you are an authorized user of the projector. Changing the password 1. Go to Advanced Menu - System Setup - BenQ TH671ST | User Manual - Page 25
Switching input signal The projector can be connected to multiple devices at the same time. However, it can only display one full screen at a time. When starting up, the projector automatically searches for the available signals. Source Be sure the Advanced Menu - System Setup : Basic > Auto - BenQ TH671ST | User Manual - Page 26
cooling function. See Quick Cooling on page 36. • Avoid turning on the projector immediately after turning it off as excessive heat may shorten lamp life. • Lamp life results will vary depending on environmental conditions and usage. Direct power off The AC power cord can be pulled out right after - BenQ TH671ST | User Manual - Page 27
treble and provide you with immersive cinematic audio experience. The following preset sound modes are provided: Standard, Cinema, Music, Game, Sport, and User. If the Mute function is activated, adjusting Sound Mode will turn off the Mute function. Volume Mute Fast Mode Adjusts the sound level - BenQ TH671ST | User Manual - Page 28
supports connected the 3D video devices to the projector, wear the BenQ 3D glasses and make sure the power is on to history of oversensitivity to light, heart problems, or have any other existing medical condition projector cannot recognize the 3D format, manually choose a 3D mode according to your - BenQ TH671ST | User Manual - Page 29
the current Picture Mode. • Resolution: Displays the native resolution of the input source. • Color System: Displays input system format. • Lamp Usage Time: Displays the number of hours the lamp has been used. • 3D Format: Displays the current 3D mode. 3D Format is only available when 3D Mode is - BenQ TH671ST | User Manual - Page 30
for your need. You can use one of the picture modes (except the User 1/User 2) as a starting point and customize the settings. 1. Go to Picture > Picture Mode. 2. Press / to select User 1 or User 2. 3. Press to highlight User Mode Management and press OK. 4. Highlight Load Settings From and press OK - BenQ TH671ST | User Manual - Page 31
There are several preset color temperature settings available. The available settings may vary according to the signal type selected. • Lamp Native: With the lamp's original color temperature and higher brightness. This setting is suitable for environments where high brightness is required, such as - BenQ TH671ST | User Manual - Page 32
, SmartEco, and LampSave. LumiExpert This function adjusts the Gamma level automatically based on the ambient light detected through ALS. You can also manually adjust its value to your preference. • LumiExpert: Select to turn On or Off. • Level: With LumiExpert turned On, adjust the Level from - BenQ TH671ST | User Manual - Page 33
preset sound modes are provided: Standard, Cinema, Music, Game, Sport, and User. The User mode allows you to personalize the sound settings. When selecting the Sound Mode User mode, you may make manual adjustments with the User EQ function. If the Mute function is activated, adjusting Sound Mode - BenQ TH671ST | User Manual - Page 34
Display There are several options to set the image's aspect ratio depending on your input signal source. • Auto: Scales an image proportionally to fit the projector's native resolution in its horizontal or vertical width. 15:9 picture • 4:3: Scales the picture so that it is displayed in the - BenQ TH671ST | User Manual - Page 35
inversion of the image depth, enable this function to correct the problem. System Setup : Basic Language Sets the language for the On- is detected after a set period of time to prevent unnecessary waste of lamp life. Direct Power Allows the projector to turn on automatically once the power - BenQ TH671ST | User Manual - Page 36
you can connect the projector using a suitable RS-232 cable and update or download the projector's firmware. This function is intended for qualified service personnel. Adjusts the image size and focus and check that the projected image is free from distortion. Quick Cooling Select On enables the - BenQ TH671ST | User Manual - Page 37
properly, the LED indicators light or flash to remind you that a problem may occur. See also Indicators for more details. Reset All Settings Returns Language, Projector Position, Menu Type, Password, Key Lock, Reset Lamp Timer, and High Altitude Mode. Information Information • Source: Shows - BenQ TH671ST | User Manual - Page 38
store the projector for an extended time, please follow the instructions below: • Make sure the temperature and humidity of the mode) + (hours used in SmartEco mode) + (hours used in LampSave mode) Total (equivalent) lamp hour = 3.75 x (hours used in Normal mode) + 1.5 x (hours used in Economic mode - BenQ TH671ST | User Manual - Page 39
on, please contact your dealer. See Indicators on page 43. The following Lamp warning displays will remind you to change the lamp. Order Replacement Lamp Lamp>XXXX Hours Order a new lamp at www.benq.com OK Install a new lamp for optimal performance. Press OK to dismiss the message. Maintenance 39 - BenQ TH671ST | User Manual - Page 40
Replace Lamp Soon Lamp>XXXX Hours Order a new lamp at www.benq.com OK Replace Lamp Now Lamp>XXXX Hours Order a new lamp at www.benq.com Lamp usage time exceeded OK Out of Lamp Usage Time Replace lamp (Refer to user manual) Then reset lamp timer Order a new lamp at www.benq.com OK It is strongly - BenQ TH671ST | User Manual - Page 41
. 10. Tighten the screw(s) that secures the lamp. 11. Ensure the handle is fully laid flat and locked in place. • Loose screw may cause a bad connection, which could result in malfunction. • Do not over tighten the screw. 12. Replace the lamp cover on the projector. 5 6 4 4 8 9 8 10 11 Maintenance - BenQ TH671ST | User Manual - Page 42
and press OK. The Lamp Settings page appears. Highlight Reset Lamp Timer and press OK. A warning message is displayed asking if you want to reset the lamp timer. Highlight Reset and press OK. The lamp time will be reset to "0". Do not reset if the lamp is not new or replaced as this could cause - BenQ TH671ST | User Manual - Page 43
up Normal operation Normal power-down cooling Download CW start fail Scaler Shutdown Fail Burn-In events Burn-in ON Burn-in OFF Lamp events Lamp error in normal operation Lamp is not lit up Thermal events Fan 1 error (the actual fan speed is outside the desired speed) Fan 2 error (the actual fan - BenQ TH671ST | User Manual - Page 44
Open the lens cover. Remote control does not work. Cause Remedy The batteries are out of power. Replace both of the batteries with new ones. There is an obstacle between the remote control and the projector. . Remedy See Entering the password recall procedure on page 24. 44 Troubleshooting - BenQ TH671ST | User Manual - Page 45
1080 (V) Display system 1-CHIP DMD Lens F = 2.6 ~ 2.78, f = 10.2 ~ 12.24 mm Lamp 240 W lamp Electrical Power supply AC100-240V, 3.5 A, 50-60 Hz (Automatic) Power consumption 320 W (Max); < 0.5 and choose your country to find your service contact window. http://www.benq.com/welcome Specifications 45 - BenQ TH671ST | User Manual - Page 46
Dimensions 296 mm (W) x 120 mm (H) x 224 mm (D) 224 296 120 Unit: mm 46 Specifications - BenQ TH671ST | User Manual - Page 47
1152 x 864 1152 x 864_75 1024 x 576 BenQ Notebook_timing 1024 x 600 BenQ Notebook_timing 1280 x 720 1280 x 720_60 1280 x 50.000 49.500 56.250 83.000 65.000 75.000 78.750 94.500 115.5 108 46.966 Supported 3D format Frame Top Side by Sequential Bottom Side V V V V V V V V V V V - BenQ TH671ST | User Manual - Page 48
1152 x 864 1152 x 864_75 75 1024 x 576@60Hz BenQ Notebook Timing 60.00 1024 x 600@65Hz BenQ Notebook Timing 64.995 1280 x 720 1280 x 720_60 60 65.290 35.000 49.722 60.241 68.68 67.5 74.038 Pixel Supported 3D format Frequency Frame Top Side by (MHz) Sequential Bottom Side 25.175 V - BenQ TH671ST | User Manual - Page 49
27 27 27 74.25 74.25 74.25 74.25 74.25 74.25 74.25 148.5 148.5 Supported 3D format Frame Frame Top Sequential Packing Bottom V V V V V V V V V V V Side by Side V V V V V V V Supported timing for MHL input Timing 480i 480p 576i 576p 720/50p 720/60p 1080/24P 1080/25P 1080/30P 1080
-
 1
1 -
 2
2 -
 3
3 -
 4
4 -
 5
5 -
 6
6 -
 7
7 -
8
-
9
-
10
-
11
-
12
-
13
-
14
-
15
-
16
-
17
-
18
-
19
-
20
-
21
-
22
-
23
-
24
-
25
-
26
-
27
-
28
-
29
-
30
-
31
-
32
-
33
-
34
-
35
-
36
-
37
-
38
-
39
-
40
-
41
-
42
-
43
-
44
-
45
-
46
-
47
-
48
-
49
 |
 |

TH671ST
Digital Projector
User Manual
V 1.02