BenQ RM8601K Installation Handbook - Page 94
Pictures, Color Management, Display Port. - specs
 |
View all BenQ RM8601K manuals
Add to My Manuals
Save this manual to your list of manuals |
Page 94 highlights
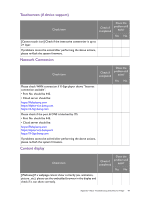
Check item Please use the suggested resolution (1920x1080). Please try with another input source (laptops, desktops...etc). Pictures Check if completed Does the problem still exist? Yes No Check item Check if completed Does the problem still exist? Yes No Use the Windows desktop with full screen picture (could not be black screen), and select the auto-adjustment again. Check if the picture could show correctly after auto adjustment. If using VGA signal, please adjust the screen under OSD setting, and check if the picture could be adjusted as normal picture. Please check the resolution setting of graphic card, and see if the setting is extended to full screen with 1080p output. Check if the Picture Settings in the OSD menu are the same. If the problem could not be solved by the above actions, please record the resolution setting/graphic card information/driver version/detected resolution by display and take a picture for abnormal picture. Color Management Check item Check if completed Does the problem still exist? Yes No Please confirm the input source (VGA or HDMI or DVI or Display Port). The value should be default for R/G/B Gain and Offset. If the color does not match after installing the video wall, please adjust the R/G/B value manually. If it does improve, please check the quality of the cables. Please use X-Rite Sensor to measure the center of the calibration unit and confirm if the abnormal unit is in spec or not (Color temperature deviation over +/- 0.5% & brightness over 15 nits). 94 Appendix 3: Basic Troubleshooting Checklists for
-
 1
1 -
2
-
3
-
4
-
5
-
6
-
7
-
8
-
9
-
10
-
11
-
12
-
13
-
14
-
15
-
16
-
17
-
18
-
19
-
20
-
21
-
22
-
23
-
24
-
25
-
26
-
27
-
28
-
29
-
30
-
31
-
32
-
33
-
34
-
35
-
36
-
37
-
38
-
39
-
40
-
41
-
42
-
43
-
44
-
45
-
46
-
47
-
48
-
49
-
50
-
51
-
52
-
53
-
54
-
55
-
56
-
57
-
58
-
59
-
60
-
61
-
62
-
63
-
64
-
65
-
66
-
67
-
68
-
69
-
70
-
71
-
72
-
73
-
74
-
75
-
76
-
77
-
78
-
79
-
80
-
81
-
82
-
83
-
84
-
85
-
86
-
87
-
88
-
 89
89 -
 90
90 -
 91
91 -
 92
92 -
 93
93 -
 94
94 -
 95
95 -
 96
96 -
 97
97 -
 98
98 -
 99
99 -
100
-
101
-
102
 |
 |
