Beko DIN16X10 Owners Manual
Beko DIN16X10 Manual
 |
View all Beko DIN16X10 manuals
Add to My Manuals
Save this manual to your list of manuals |
Beko DIN16X10 manual content summary:
- Beko DIN16X10 | Owners Manual - Page 1
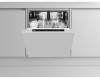
Dishwasher User's Manual DIN16X10 DIN16R10 EN Document Number : 1593640100_AA_BEKO_E10_EN/19-06-18.(11:24) - Beko DIN16X10 | Owners Manual - Page 2
Dishwasher User's Manual DIN16X10 DIN16R10 EN Document Number : 1593640100_AA_BEKO_E10_EN/19-06-18.(11:24) - Beko DIN16X10 | Owners Manual - Page 3
your appliance Thank you for choosing a Beko appliance. Please take some time to read this user manual before using your appliance, to ensure you know how to safely operate the controls and functions. Carefully follow all unpacking and installation instructions to ensure the appliance is correctly - Beko DIN16X10 | Owners Manual - Page 4
your appliance Thank you for choosing a Beko appliance. Please take some time to read this user manual before using your appliance, to ensure you know how to safely operate the controls and functions. Carefully follow all unpacking and installation instructions to ensure the appliance is correctly - Beko DIN16X10 | Owners Manual - Page 5
2 DISHWASHER 7 Overview 7 Fan drying system 8 Technical specifications 8 3 INSTALLATION 9 Appropriate installation location........9 dishwasher 17 Placing the dishes into the dishwasher 18 Cutlery basket 20 Upper basket height adjustable rack 20 Upper basket multipurpose service - Beko DIN16X10 | Owners Manual - Page 6
instructions problems with your product. •• Do not operate the product if the power cable / plug is damaged! Call the Authorised Service installation, maintenance, cleaning and repairing procedures. •• Always have the repair procedures carried out by the Authorised Service Dishwasher / User's Manual - Beko DIN16X10 | Owners Manual - Page 7
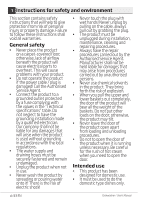
Instructions for safety and envIronment •• This appliance is intended to be used in household and similar applications such as: - Staff kitchen areas in shops, offices and other working environments. •• Only dishwasher remaining water in the product completely. Dishwasher / User's Manual 5/43 EN - Beko DIN16X10 | Owners Manual - Page 8
Instructions for safety and envIronment Compliance with of the waste product with normal domestic and other wastes at the end of its service life. Take it to the collection center for the recycling of electrical and electronic equipment by the local authorities. 6 /43 EN Dishwasher / User's Manual - Beko DIN16X10 | Owners Manual - Page 9
Overview 15 Dishwasher / User's Manual 1. Upper basket 2. Upper impeller 3. Lower impeller 4. Silverware basket 5. Door 6. Rating Label 7. Control panel 8. Detergent dispenser 9. Lower basket 10. Filters 11. Salt reservoir lid 12. Upper - Beko DIN16X10 | Owners Manual - Page 10
for performance tests shall be provided upon request. Requests can be e-mailed to the following address: [email protected] Do not forget to provide the code, stock and serial numbers of the product to type label attached to the side wall of the door. 8 /43 EN Dishwasher / User's Manual - Beko DIN16X10 | Owners Manual - Page 11
Service Agent. If they are not, call a qualified technician and plumber to have any necessary arrangements carried out. C Preparation of the location and electrical, tap water and waste water installations at the place of installation place after installation or cleaning should be installed in between - Beko DIN16X10 | Owners Manual - Page 12
Installation Connection to the drain Water discharge hose can directly be connected to the drain hole or sink's do not replace it yourself. The supply cord or the mains lead must be replaced by a Authorised Service Agent or a similarly qualified person. 10 /43 EN Dishwasher / User's Manual - Beko DIN16X10 | Owners Manual - Page 13
terminal in the plug marked 'L' or coloured red. Dishwasher / User's Manual Green and yellow or green N Blue or black L instructions" and "Installation". •• Before using the product, fill the salt reservoir with 1 litre of water, add salt (see next page) and stir to dissolve. Run the Dishwasher - Beko DIN16X10 | Owners Manual - Page 14
the water softening system Cleaning, rinsing and drying performance of your dishwasher will increase when water softening system is adjusted properly. Adjust the new water hardness level according to the Water hardness level instruction in this booklet. 12 /43 EN Dishwasher / User's Manual - Beko DIN16X10 | Owners Manual - Page 15
hardness level of the supply water is below 13°dF, there is no need to use salt in your dishwasher. If this is the case, "No Salt Warning Indicator" (if any) illuminates continuously on the panel will not be consumed and the Salt indicator will not illuminate. Dishwasher / User's Manual 13/43 EN - Beko DIN16X10 | Owners Manual - Page 16
product operates with the same performance continuously. Dishwasher salt is used for this purpose. C Use only special softening salts produced particularly for the dishwashers in your machine. C It is recommended run your machine empty in the shortest program. 14 /43 EN Dishwasher / User's Manual - Beko DIN16X10 | Owners Manual - Page 17
in the machine. A Only use in the machine the detergents produced particularly for use with dishwashers. We recommend you not use detergents that contain chlorine and phosphate as they are harmful for to close it. A "click" will be heard when the lid is closed. Dishwasher / User's Manual 15/43 EN - Beko DIN16X10 | Owners Manual - Page 18
washing performance in dishwashers is obtained level is above the mentioned level. C Observe the instructions of the detergent manufacturer on the package when using tablet an empty run. 3. After the empty washing cycle, review the user manual and readjust the water hardness level so as to suit the - Beko DIN16X10 | Owners Manual - Page 19
dishwashers and to use rinse aids produced specially for dishwashers only. 1. Open the lid of the dishwasher •• Never wash dishes soiled by cigarette ash, candle remnants, polish, dyestuff, chemicals, etc. in your dishwasher in the dishwasher. C Decorative prints of washing in the dishwasher just as it - Beko DIN16X10 | Owners Manual - Page 20
dishwasher You can use your dishwasher on the dishes before placing them in the dishwasher. •• Place thin, narrow pieces in the middle glasses and pans upside down in the dishwasher. Thus, accumulation of water in deep the sharp and pointed dishes such as service fork, bread knife, etc. upside down - Beko DIN16X10 | Owners Manual - Page 21
Preparation Suggestions for loading the dishwasher Improper Loading Of Dishware Lower basket Upper basket Improper Loading Of Dishware Dishwasher / User's Manual 19/43 EN - Beko DIN16X10 | Owners Manual - Page 22
up space for your dishes of different sizes. Upper basket multipurpose service rack This accessory located at the upper basket of your machine allows basket multipurpose service rack again, you can easily attach it to the side section of your upper basket. 20 /43 EN Dishwasher / User's Manual - Beko DIN16X10 | Owners Manual - Page 23
of arrows (B). To bring the tines back to vertical position, just lift them up. Collapsible tines will click into the latch again (C). Dishwasher / User's Manual C Bringing the tines to the horizontal position by holding them from the tips may cause them to bend. Therefore, it will be appropriate - Beko DIN16X10 | Owners Manual - Page 24
level down. C Make sure that the adjustment mechanism has the same positions on the right and left sides of the upper basket. 22 /43 EN Dishwasher / User's Manual - Beko DIN16X10 | Owners Manual - Page 25
Flashes) 4. Tablet detergent function 5. Half Load function 6. Delayed Start Key 7. Time Delay Countdown Indicator 8. Start / Pause / Cancel Key 9. Salt Indicator 10. Water Cut-off Indicator Dishwasher / User's Manual 23/43 EN - Beko DIN16X10 | Owners Manual - Page 26
if the programme you have selected supports the selected function. To cancel the selected function, press the function key again. Preparing the machine 1. Open the door of the dishwasher. 2. Place the dishes in accordance with the instructions in the user manual. 3. Make sure that the upper and - Beko DIN16X10 | Owners Manual - Page 27
OperatIng the product Dishwasher / User's Manual Programme number Programme name Cleaning temperature Degree of Soiling Programme Table 1 2 3 4 5 6 Eco * Auto Intensive Quick&Shine Mini Prewash 50 ºC 40-65 ºC Most economical washing programme - Beko DIN16X10 | Owners Manual - Page 28
OperatIng the product Auxiliary functions Washing programmes of your dishwasher are designed to obtain the best cleaning effect, considering the type of the soiling, soiling degree the end of the programme. C Floor illumination cannot be cancelled by the user. 26 /43 EN Dishwasher / User's Manual - Beko DIN16X10 | Owners Manual - Page 29
if the 2nd programme LED is on. 4. Press the On/Off key to exit the settings menu. Your setting will be saved automatically. Dishwasher / User's Manual Programming the washing time Time Delay If an economical electricity tariff is applied in your region, you can use the time delay function to wash - Beko DIN16X10 | Owners Manual - Page 30
depending on the ambient temperature where your machine is installed, temperature of the supply water and amount of is adequate amount of softening salt in the dishwasher or not. You need to refill the salt there is adequate amount of rinse aid in the dishwasher or not. You need to refill the rinse - Beko DIN16X10 | Owners Manual - Page 31
machine will not take water in and water off indicator will flash. As long as the problem continues, washing programme is paused and the water inlet is checked regularly by the machine; a permanent fault. In this case the authorised service should be contacted. Dishwasher / User's Manual 29/43 EN - Beko DIN16X10 | Owners Manual - Page 32
6 Maintenance and cleaning Service life of the product extends and frequently faced problems decrease if it is cleaned at regular intervals. A Unplug the product and turn off the on the coarse filter inwards and separate the coarse filter from the assembly. 30 /43 EN Dishwasher / User's Manual - Beko DIN16X10 | Owners Manual - Page 33
that may be caused by impurities coming from the urban supply water or your own water installation (such as sand, dirt, rust, etc.) can be prevented by means of the filter filter back to its seat in the hose. 4. Install the hose to tap. (depends on model) Dishwasher / User's Manual 31/43 EN - Beko DIN16X10 | Owners Manual - Page 34
clogged, remove and clean the impeller. Turn its nut to left to remove the upper impeller. Make sure that the nut is tightened well when installing the upper impeller. 32 /43 EN Dishwasher / User's Manual - Beko DIN16X10 | Owners Manual - Page 35
7 Troubleshooting Machine does not start. • Power cable is unplugged "Cleaning and Care". • Filters are installed incorrectly. >>> Check the filter system and make sure that it is installed correctly. • Baskets are overloaded. >>> water will accumulate in them. Dishwasher / User's Manual 33/43 EN - Beko DIN16X10 | Owners Manual - Page 36
Troubleshooting • Rinse aid is not sufficient. >>> Check the rinse aid indicator and add rinse aid if necessary. Increase the rinse aid setting if lid will dissolve during prewash, causing the lid loosen, check the lid once again at the end of the programme. 34 /43 EN Dishwasher / User's Manual - Beko DIN16X10 | Owners Manual - Page 37
Troubleshooting "Cleaning and Care". • Dirty dishes are kept in dishwasher for 2-3 days. >>> If you are not going to washed without being kept waiting. • Electric installation is not grounded. >>>Check if your in dishwashers. • Kitchen utensils that are already corroded are washed in dishwasher. >>> - Beko DIN16X10 | Owners Manual - Page 38
Troubleshooting not suitable for washing in the dishwasher. Manufacturers of some glassware and made of aluminium should not be washed in dishwasher. • Salt leakage exists. >>> Pay attention not edges or racks of the basket or the glass support tines. Striking of the glasses to each other or - Beko DIN16X10 | Owners Manual - Page 39
Troubleshooting A smear remains on glasses that resembles milk manual. C If you cannot eliminate the problem although you follow the instructions in this section, consult your dealer or the Authorised Service Agent. Never try to repair a nonfunctional product yourself. Dishwasher / User's Manual - Beko DIN16X10 | Owners Manual - Page 40
. An attempted repair of a product by anyone other than a Beko Approved Engineer (the "Engineer"). Installation or use of a product where such installation or use fails to meet the requirements contained in this guarantee or the User Instructions Booklet. 38 /43 EN Dishwasher / User's Manual - Beko DIN16X10 | Owners Manual - Page 41
• Time taken off work. • Damaged food, instructions contained in the User Instructions Booklet provided with your product. 4. Professional installation by a qualified Electrical Domestic Appliance Installer is recommended for all Washing Machines, Dishwashers Dishwasher / User's Manual 39/43 EN - Beko DIN16X10 | Owners Manual - Page 42
your product is covered by this guarantee. • Where a service call has been made and the engineer finds that there is no fault with your product. • That your product has not been installed or operated in accordance with the User Instructions Booklet. • That the fault was caused by something other - Beko DIN16X10 | Owners Manual - Page 43
, or to use our online services. When you call us you may be required to input your serial number into your telephone keypad. For help please visit beko.co.uk/ support/model-finder • The product model number is printed on the Operating Instruction Booklet / User guide • The product model and serial - Beko DIN16X10 | Owners Manual - Page 44
under guarantee or for product advice please call our Contact centre Before requesting service please check the troubleshooting guide in the Operating Instructions booklet, as a charge may be levied where no fault is found, and even though your product may still be under guarantee. After arranging - Beko DIN16X10 | Owners Manual - Page 45
-
 1
1 -
 2
2 -
 3
3 -
 4
4 -
 5
5 -
 6
6 -
 7
7 -
8
-
9
-
10
-
11
-
12
-
13
-
14
-
15
-
16
-
17
-
18
-
19
-
20
-
21
-
22
-
23
-
24
-
25
-
26
-
27
-
28
-
29
-
30
-
31
-
32
-
33
-
34
-
35
-
36
-
37
-
38
-
39
-
40
-
41
-
42
-
43
-
44
-
45
 |
 |
DIN16X10
DIN16R10
EN
Document Number :
15 9364 0100_AA_BEKO_E10_EN/ 19-06-18.(11:24)
Dishwasher
User’s Manual