Beko DCU8230 User Manual - Page 16
Auxiliary function, Warning indicators, Time delay, Starting the programme, Progress of programme,
 |
View all Beko DCU8230 manuals
Add to My Manuals
Save this manual to your list of manuals |
Page 16 highlights
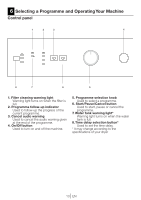
Auxiliary function Cancel audio warning Your dryer will give an audio warning when the programme comes to an end. If you do not want to hear the audio warning, press "Cancel Audio Warning" button. The relevant light will turn on when this button is pressed and an audio warning will not be given when the programme comes to an end. C You can select this function either before or after the programme starts. Warning indicators C Warning indicators may differ according to the model of your dryer. Filter cleaning A warning light will turn on to remind filter cleaning after the programme finishes. C If the filter cleaning warning light lights up continuously, please refer to, "Suggested solutions for problems". Water tank Warning light starts flashing when the tank is filled with water. The dryer stops operating if the warning light turns on when a programme is running. Drain the water in the water tank to restart the dryer. Press "Start/Pause/ Cancel" button to start the programme after you have emptied the water tank. The warning light turns off and the programme resumes operating. Time delay If you wish to dry your clothes at a later time, thanks to the time delay function, you can delay the programme start up to 3 hours, 6 hours or 9 hours. 1. Open the loading door and put the laundry in. C Make sure that all air outlets are open, door filter is cleaned and the water tank is empty. 2. Set the drying programme and, if required, the auxiliary functions. 3. When the time programming button is pressed once, a 3 hour delay is selected and the relevant led lights. When the same button is pressed again, 6 hours; and if pressed once more, 9 hours delay will be selected. If the time programming button is pressed one more time, time delaying function will be cancelled. Set the time delay as you require. 4. Delayed operation of the selected programme is started by pressing the "Start/Pause/Cancel" button after selecting the time delay. C Additional laundry may be loaded / taken out during the time delay period. C During the time delay period, laundry is rotated for 4 seconds in every 10 minutes to prevent creasing. Canceling the time delay If you want to cancel the time delay countdown and start the programme: 1. Press "Start/Pause/Cancel" button for about 3 seconds. 2. Press "Start/Pause/Cancel" button to start the programme right away. Starting the programme 1. Press "Start/Pause/Cancel" button to start the programme. 2. Light of the "Start/Pause/Cancel" button will turn on to indicate that the programme has started. Progress of programme Progress of a running programme is shown through the programme follow-up indicator. At the beginning of every programme step, the relevant indicator LED will light up and light of the completed step will turn off. "Drying": - Drying level will be illuminated during the whole drying process until the drying degree reaches "iron dry". "Iron Dry": - Starts to illuminate when the drying degree reaches "iron dry" step and remains illuminated until the next step. "Cupboard dry": Starts to illuminate when the drying degree reaches "Ready to wear" step and remains illuminated until the next step. "Final / Anti-creasing": - Illuminates when the programme comes to an end and anti-creasing function is activated. C If more than one LED light up or flash concurrently, it means there is malfunctioning or a failure (please see, Solution suggestions for problems). Changing the programme after it has started You can use this feature to dry your clothes under higher or lower temperatures after your dryer has started. For example; 1. Press and hold the "Start/Pause/Cancel" button for about 3 seconds to "Cancel" the programme in order to select "Extra Dry" programme instead of "Iron Dry" programme. 2. Select the "Extra Dry" programme by rotating the programme selection button. 16 EN
-
 1
1 -
2
-
3
-
4
-
5
-
6
-
7
-
8
-
9
-
10
-
 11
11 -
 12
12 -
 13
13 -
 14
14 -
 15
15 -
 16
16 -
 17
17 -
 18
18 -
 19
19 -
 20
20 -
 21
21 -
22
-
23
-
24
 |
 |