Asus PRIME X299-DELUXE II Users Manual English - Page 60
Motherboard rear and audio connections, 2.3.1 Rear I/O connection
 |
View all Asus PRIME X299-DELUXE II manuals
Add to My Manuals
Save this manual to your list of manuals |
Page 60 highlights
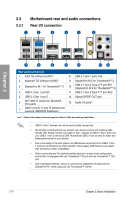
2.3 Motherboard rear and audio connections 2.3.1 Rear I/O connection Chapter 2 Rear panel connectors 1. Intel® Gb LAN port (LAN1)* 8. USB 3.1 Gen 1 ports E34 2. Aquantia® 5G LAN port (LAN2)* 9. DisplayPort IN 2 for Thunderbolt™ 3 3. DisplayPort IN 1 for Thunderbolt™ 3 10. USB 3.1 Gen 2 Type-C™ port EC1 (DisplayPort IN 2 for Thunderbolt™ 3) 4. USB 3.1 Gen 1 port E2 11. USB 3.1 Gen 2 Type-C™ port EC2 5. USB 3.1 Gen 1 port 5 12. Optical S/PDIF OUT port 6. Wi-Fi 802.11 a/b/g/n/ac, Bluetooth V5.0 ports 13. Audio I/O ports** 7. USB 2.0 ports 11 and 12 (bottom port supports USB BIOS Flashback) * and ** : Refer to the tables on the next page for LAN port LEDs, and audio port definitions. • USB 3.1 Gen 1 devices can only be used as data storage only. • We strongly recommend that you connect your devices to ports with matching data transfer rate. Please connect your USB 3.1 Gen 1 devices to USB 3.1 Gen 1 ports and your USB 3.1 Gen 2 devices to USB Thunderbolt (USB 3.1 Gen 2) ports for faster and better performance for your devices. • Due to the design of the Intel chipset, all USB devices connected to the USB 3.1 Gen 1 ports are controlled by the xHCI controller. Some legacy USB devices must update their firmware for better compatibility. • Before connecting any Thunderbolt-enabled devices in a daisy-chain configuration, ensure that it is equipped with one Thunderbolt™ IN port and one Thunderbolt™ OUT port. • Due to hardware limitation, ensure to connect your DisplayPort IN cable into the DisplayPort IN 1 when using only one Thunderbolt™ monitor. 2-18 Chapter 2: Basic Installation
-
 1
1 -
2
-
3
-
4
-
5
-
6
-
7
-
8
-
9
-
10
-
11
-
12
-
13
-
14
-
15
-
16
-
17
-
18
-
19
-
20
-
21
-
22
-
23
-
24
-
25
-
26
-
27
-
28
-
29
-
30
-
31
-
32
-
33
-
34
-
35
-
36
-
37
-
38
-
39
-
40
-
41
-
42
-
43
-
44
-
45
-
46
-
47
-
48
-
49
-
50
-
51
-
52
-
53
-
54
-
 55
55 -
 56
56 -
 57
57 -
 58
58 -
 59
59 -
 60
60 -
 61
61 -
 62
62 -
 63
63 -
 64
64 -
 65
65 -
66
-
67
-
68
-
69
-
70
-
71
-
72
-
73
-
74
-
75
-
76
-
77
-
78
-
79
-
80
-
81
-
82
-
83
-
84
-
85
-
86
-
87
-
88
-
89
-
90
-
91
-
92
-
93
-
94
-
95
-
96
-
97
-
98
-
99
-
100
-
101
-
102
-
103
-
104
-
105
-
106
-
107
-
108
 |
 |
