Amana AER6603SFS Owners Manual - Page 9
Warning
 |
View all Amana AER6603SFS manuals
Add to My Manuals
Save this manual to your list of manuals |
Page 9 highlights
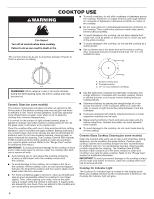
Sabbath Mode (on some models) The Sabbath mode sets the oven to remain ON in a bake setting until turned off. The Oven Control Lockout feature (if present) will be disabled during the Sabbath mode. After the Sabbath mode is set, no tones will sound, the display will not show the temperature, the Kitchen Timer mode will be canceled (if active), and only the following keypads will function: ■■ Temp/Time "up" and "down" arrow keypads ■■ Cancel When the oven door is opened or closed, the oven light will not turn on or off and the heating elements will not turn on or off immediately. When power is restored after a power failure, the oven will return to Sabbath mode and remain Sabbath compliant with the bake elements off until the Cancel keypad is pressed. Pressing the Cancel keypad at any time cancels the cooking cycle and returns the oven to the normal cooking mode (not Sabbath compliant). Before entering the Sabbath mode, it must be decided if the oven light is to be ON or OFF for the entire Sabbath mode period. If the light is ON when entering Sabbath mode, it will remain ON for the entire time Sabbath mode is in use. If the light is OFF when entering Sabbath mode, it will remain OFF for the entire time Sabbath mode is in use. Opening the oven door or pressing the Oven Light keypad will not affect the oven light once Sabbath mode has been entered. On the Holiday, the oven temperature can be changed once the oven is in Sabbath mode by pressing the Temp/Time "up" or "down" arrow keypad. The oven temperature will change 25°F (14°C) each time the Temp/Time "up" and "down" arrow keypads are pressed. Press START to activate the new temperature. The display will not change and there will be no sounds during this adjustment. To Bake Using Sabbath Mode: 1. Press BAKE. 2. To change the temperature, press the Temp/Time "up" or "down" arrow keypad. 3. Press START. 4. Press and hold the TIMER SET/OFF for 5 seconds. "SAb" will flash in the display. 5. Press START while "SAb" is flashing to enter Sabbath mode; otherwise, the entire cycle cancels out. "SAb" will stop flashing and remain on in the display. The oven is now in Sabbath mode and is Sabbath compliant. Pressing the Cancel keypad at any time cancels the cooking cycle and returns the oven to the normal cooking mode (not Sabbath compliant). Warm WARNING Food Poisoning Hazard Do not let food sit in oven more than one hour before or after cooking. Doing so can result in food poisoning or sickness. NOTE: The convection fan will shut off when the oven door is opened. If the oven door remains open for too long, the heating elements will shut off until the oven door is closed. All timers, including any active Cook Time or Timed Cook functions, will continue to count down. IMPORTANT: Food must be at serving temperature before placing it in the warmed oven. Food may be held up to 1 hour; however, breads and casseroles may become too dry if left in the oven during the Warm function. For best results, cover food. The Warm feature allows hot cooked foods to stay at serving temperature. To Use: 1. Press WARM. 2. Press the Temp/Time "up" or "down" arrow keypad until desired temperature is reached. A tone will sound if the minimum or maximum temperature is reached. 3. Press START. 4. Place food in the oven. 5. Press OFF/CANCEL when finished. NOTE: The temperature may be changed at any time by pressing the Temp/Time "up" or "down" arrow keypad to reach the desired temperature and then pressing START. Aluminum Foil IMPORTANT: To avoid permanent damage to the oven bottom finish, do not line the oven bottom with any type of foil or liner. For best cooking results, do not cover the entire oven rack with foil because air must be able to move freely. Positioning Racks and Bakeware IMPORTANT: To avoid permanent damage to the porcelain finish, do not place food or bakeware directly on the oven door or bottom. Bakeware To cook food evenly, hot air must be able to circulate. Allow 2" (5 cm) of space around bakeware and oven walls. Make sure that no bakeware piece is directly over another. Racks ■■ Position racks before turning on the oven. ■■ Do not position racks with bakeware on them. ■■ Make sure racks are level. 9
-
 1
1 -
2
-
3
-
 4
4 -
 5
5 -
 6
6 -
 7
7 -
 8
8 -
 9
9 -
 10
10 -
 11
11 -
 12
12 -
 13
13 -
 14
14 -
15
-
16
 |
 |
