Acer Veriton Vero Mini Service Manual re-assembling guide - Page 22
Thermal Module Removal
 |
View all Acer Veriton Vero Mini manuals
Add to My Manuals
Save this manual to your list of manuals |
Page 22 highlights
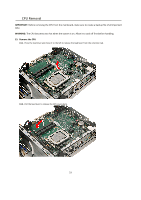
Thermal Module Removal WARNING: The heatsink becomes very hot when the system is on. Wait for the heatsink to cool off before proceeding with below steps. 12. Remove the Thermal Module 12.1. Loosen the three (3) captive screws securing the thermal module to the mainboard. 12.2. Remove the thermal module from the mainboard. 22
-
 1
1 -
2
-
3
-
4
-
5
-
6
-
7
-
8
-
9
-
10
-
11
-
12
-
13
-
14
-
15
-
16
-
 17
17 -
 18
18 -
 19
19 -
 20
20 -
 21
21 -
 22
22 -
 23
23 -
 24
24 -
 25
25 -
 26
26 -
 27
27 -
28
-
29
-
30
-
31
-
32
-
33
-
34
-
35
-
36
-
37
-
38
-
39
-
40
-
41
-
42
-
43
-
44
-
45
-
46
-
47
-
48
-
49
-
50
-
51
-
52
-
53
-
54
-
55
-
56
-
57
-
58
-
59
-
60
-
61
-
62
-
63
-
64
-
65
-
66
-
67
-
68
-
69
-
70
-
71
-
72
-
73
-
74
-
75
-
76
-
77
 |
 |

22
Thermal Module Removal
WARNING:
The heatsink becomes very hot when the system is on. Wait for the heatsink to cool off before
proceeding with below steps.
12.
Remove the Thermal Module
12.1.
Loosen the three (3) captive screws securing the thermal module to the mainboard.
12.2.
Remove the thermal module from the mainboard.