Acer VG220QB Lifecycle Extension Guide - Page 7
VG220Q
 |
View all Acer VG220QB manuals
Add to My Manuals
Save this manual to your list of manuals |
Page 7 highlights
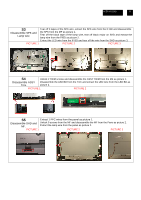
ACER VG220Q 7 4. Disassembly and Assembly SOP VG220Q 4.1 Disassembly Procedures Preparation before disassemble 1.Clean the room for disassemble 2.Identify the area for monitor 3.Check the position that the monitors be placed and the quantity of the monitor ;prepare the area for material flow; according to the actual condition plan the disassemble layout 4.Prepare the implement, equipment, materials as bellow: 1) working table 2) Screw-driver: Philips-head screwdriver, Hex-head screwdriver 3) knife 4) glove 5) cleaning cloth 6) ESD protection After unplugging the power cord, the power board still have power energe. Please pay attention when disassembling/assembling. S1 Before Disassembling & Assembling, monitor need to be put on the sponge and Disassemble the RC, the Insulation glove must be wore during the process. stand and base Disassemble base and stand from the RC(Rear Case) as picture 1. Unlock RC center screw as picture 2. Disassemble RC from monitor and extract the FFC CTRL from the IF BD as picture 3. PICTURE 1 PICTURE 2 PICTURE 3 S2 Disassemble CTRL BD PICTURE 1 Tear off the adhesive tape of the FFC CTRL from the RC as picture 1. Disassemble the CTRL BD from the RC as picture 2. Disassemble the FFC CTRL from the CTRL BD. PICTURE 2 CTRL BD CTRL BD
-
 1
1 -
 2
2 -
 3
3 -
 4
4 -
 5
5 -
 6
6 -
 7
7 -
 8
8 -
 9
9 -
 10
10 -
 11
11 -
 12
12 -
13
-
14
-
15
 |
 |
