Acer SL1320Wn User Manual - Page 51
RS232 by Telnet Function, Quick Start-Guide for RS232 by Telnet, Windows 7, All Programs
 |
View all Acer SL1320Wn manuals
Add to My Manuals
Save this manual to your list of manuals |
Page 51 highlights
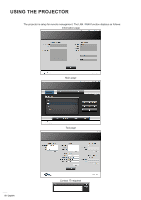
USING THE PROJECTOR RS232 by Telnet Function There is alternative RS232 command control way, in projector so called "RS232 by TELNET" for LAN / RJ45 interface. Quick Start-Guide for "RS232 by Telnet" ‡‡ Check and get the IP address on OSD of the projector. ‡‡ Make sure that the PC / laptop can access the web-page of the projector. ‡‡ Make sure that "Windows Firewall" setting is set disabled in case of "TELNET" function filtering out by PC / laptop. Windows 7 Windows 10 1. Select Start > All Programs.> Accessories > Command Prompt. Windows 7 Windows 10 2. Input the command format as follows: ±± telnet ttt.xxx.yyy.zzz 23 ("Enter" key pressed) ±± (ttt.xxx.yyy.zzz: IP-Address of the projector) 3. If Telnet-Connection ready, and user can have RS232 command input, then "Enter" key pressed, the RS232 command will be workable. How to have TELNET enabled in Windows 7 / 8 /10 By default installation for Windows 7 / 8 / 10, "TELNET" function is not included. But end-user can have it by way of "Turn Windows features On or Off" to be enabled. English 51
-
 1
1 -
2
-
3
-
4
-
5
-
6
-
7
-
8
-
9
-
10
-
11
-
12
-
13
-
14
-
15
-
16
-
17
-
18
-
19
-
20
-
21
-
22
-
23
-
24
-
25
-
26
-
27
-
28
-
29
-
30
-
31
-
32
-
33
-
34
-
35
-
36
-
37
-
38
-
39
-
40
-
41
-
42
-
43
-
44
-
45
-
 46
46 -
 47
47 -
 48
48 -
 49
49 -
 50
50 -
 51
51 -
 52
52 -
 53
53 -
 54
54 -
 55
55 -
 56
56 -
57
-
58
-
59
-
60
-
61
-
62
-
63
-
64
-
65
-
66
-
67
-
68
-
69
-
70
-
71
-
72
-
73
 |
 |
