Acer CP7271KP User Manual - Page 18
Connecting the cables
 |
View all Acer CP7271KP manuals
Add to My Manuals
Save this manual to your list of manuals |
Page 18 highlights
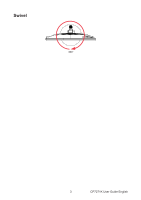
Connecting the cables To install the monitor on your host system, please follow the steps below: 1. Turn off your computer and unplug your computer's power cord. 2. Connect the signal cable to the DP (optional) and/or HDMI (optional) input socket of the monitor, and the DP (optional) and/or HDMI (optional) output socket of the graphics card on the computer. 3. Connect the USB Cable(Optional) Connect the USB 3.0 cable to port for fast charge. Connect the USB 3.0 cable to port. 4. Insert the monitor power cable into the power port at the back of the monitor. 5. Plug the power cords of your computer and your monitor into a nearby electrical outlet. USB USB DP Note: • Audio output is only for audio output model. Please check user manual for more instruction. • Charging USB devices just in DC on mode. 7 CP7271K User Guide English
-
 1
1 -
2
-
3
-
4
-
5
-
6
-
7
-
8
-
9
-
10
-
11
-
12
-
 13
13 -
 14
14 -
 15
15 -
 16
16 -
 17
17 -
 18
18 -
 19
19 -
 20
20 -
 21
21 -
 22
22 -
 23
23 -
24
-
25
-
26
-
27
-
28
-
29
-
30
 |
 |
