Acer Altos R700 Altos R700 Chassis Subassembly - Page 49
Finishing Installation, Installing a Serial A port in the Rear I/O, Install the Cover
 |
View all Acer Altos R700 manuals
Add to My Manuals
Save this manual to your list of manuals |
Page 49 highlights
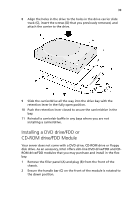
41 Finishing Installation Installing a Serial A port in the Rear I/O Using a standard DH-10 to DB-9 COM cable, you may install a Serial A port in the opening provided in the rear I/O (see "Chassis Back I/O Ports and Features" on page 6). Connect the other end to the COM 1 serial port header on the server board (see the documentation that shipped with your server board). Install the Cover 1 Place the cover over the chassis. 2 Slide it forwards until it latches into place. Installing the Power Cord and Strain Relief Strap Note: If you are placing the server in a rack, wait to install the power cord until after the server is in the rack. 1 Attach the strain relief strap to the chassis (A). 2 Plug the power cord into the power supply but not into the power source. 3 Insert the power cord into the plastic loop (B) of the strain relief. 4 Pull the plastic band (C) until it tightens around the power cord.
-
 1
1 -
2
-
3
-
4
-
5
-
6
-
7
-
8
-
9
-
10
-
11
-
12
-
13
-
14
-
15
-
16
-
17
-
18
-
19
-
20
-
21
-
22
-
23
-
24
-
25
-
26
-
27
-
28
-
29
-
30
-
31
-
32
-
33
-
34
-
35
-
36
-
37
-
38
-
39
-
40
-
41
-
42
-
43
-
 44
44 -
 45
45 -
 46
46 -
 47
47 -
 48
48 -
 49
49 -
 50
50 -
 51
51 -
 52
52 -
 53
53 -
 54
54 -
55
-
56
-
57
-
58
-
59
-
60
-
61
-
62
-
63
-
64
-
65
-
66
-
67
-
68
-
69
-
70
-
71
-
72
-
73
-
74
-
75
-
76
-
77
-
78
-
79
-
80
 |
 |
