2013 Yamaha Motorsports Road Star S Owners Manual - Page 69
2013 Yamaha Motorsports Road Star S Manual

Page 69 highlights
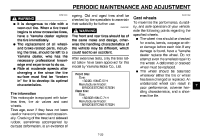
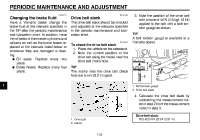
PERIODIC MAINTENANCE AND ADJUSTMENT EAU22093 Adjusting the brake lever free play 3 3. Tighten the locknut. EWA10630 EAU22273 Brake light switches WARNING ● ● 1. Locknut 2. Brake lever free play adjusting screw 3. Brake lever free play The brake lever free play should measure 2.0-5.0 mm (0.08-0.20 in) as shown. Periodically check the brake lever free play and, if necessary, adjust it as follows. 1. Loosen the locknut at the brake lever. 2. To increase the brake lever free play, turn the brake lever free play adjusting screw in direction (a). To decrease the brake lever free play, turn the adjusting screw in direction (b). After adjusting the brake lever free play, check the free play and make sure that the brake is working properly. A soft or spongy feeling in the brake lever can indicate the presence of air in the hydraulic system. If there is air in the hydraulic system, have a Yamaha dealer bleed the system before operating the motorcycle. Air in the hydraulic system will diminish the braking performance, which may result in loss of control and an accident. 1. Rear brake light switch 2. Rear brake light switch adjusting nut The brake light, which is activated by the brake pedal and brake lever, should come on just before braking takes effect. If necessary, adjust the rear brake light switch as follows, but the front brake light switch should be adjusted by a Yamaha dealer. Turn the rear brake light switch adjusting nut while holding the rear brake light switch in place. To make the brake light come on earlier, turn the adjusting nut in direction (a). To make the brake light come on later, turn the adjusting nut in direction (b). 7 7-22
-
 1
1 -
2
-
3
-
4
-
5
-
6
-
7
-
8
-
9
-
10
-
11
-
12
-
13
-
14
-
15
-
16
-
17
-
18
-
19
-
20
-
21
-
22
-
23
-
24
-
25
-
26
-
27
-
28
-
29
-
30
-
31
-
32
-
33
-
34
-
35
-
36
-
37
-
38
-
39
-
40
-
41
-
42
-
43
-
44
-
45
-
46
-
47
-
48
-
49
-
50
-
51
-
52
-
53
-
54
-
55
-
56
-
57
-
58
-
59
-
60
-
61
-
62
-
63
-
 64
64 -
 65
65 -
 66
66 -
 67
67 -
 68
68 -
 69
69 -
 70
70 -
 71
71 -
 72
72 -
 73
73 -
 74
74 -
75
-
76
-
77
-
78
-
79
-
80
-
81
-
82
-
83
-
84
-
85
-
86
-
87
-
88
-
89
-
90
-
91
-
92
-
93
-
94
-
95
-
96
-
97
-
98
-
99
-
100
-
101
-
102
-
103
-
104
-
105
-
106
-
107
-
108
 |
 |
