2012 Yamaha Motorsports Road Star Silverado S Owners Manual - Page 59
2012 Yamaha Motorsports Road Star Silverado S Manual

Page 59 highlights
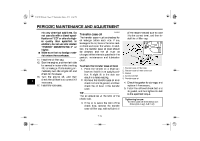
U1BH12E0.book Page 12 Wednesday, July 6, 2011 4:06 PM PERIODIC MAINTENANCE AND ADJUSTMENT EAU3408A Engine oil and oil filter cartridge The engine oil level should be checked before each ride. In addition, the oil must be changed and the oil filter cartridge replaced at the intervals specified in the periodic maintenance and lubrication chart. To check the engine oil level 1. Place the vehicle on a level surface and hold it in an upright position. A slight tilt to the side can result in a false reading. 2. Remove the rider seat. (See page 4-12.) 3. Start the engine, warm it up (see TIP below), and then turn the engine off. TIP G ing light will come on, but this is not a malfunction. Simply turn the main switch to "OFF", and then back to "ON" to restart the engine and reset the engine trouble warning light. 4. Wait a few minutes until the oil settles, remove the engine oil filler cap, wipe the engine oil dipstick clean, insert it back into the oil filler hole (without screwing it in), and then remove it again to check the oil level. TIP The engine oil should be between the minimum and maximum level marks. 1 2 3 1. Engine oil dipstick 2. Maximum level mark 3. Minimum level mark 5. If the engine oil is at or below the minimum level mark, add sufficient oil of the recommended type to raise it to the correct level. TIP When adding oil, be careful not to overfill the engine oil tank; the oil level rises faster starting from the half level portion on the dipstick. 6. Insert the dipstick into the oil filler hole, and then tighten the oil filler cap. 7. Install the rider seat. 7 1 G Warm the engine up for 10 minutes during the summer months, and 20 minutes during the winter months. If the engine is left idling for more than 20 minutes, the engine will stall, and the engine trouble warn- 1. Engine oil filler cap 7-12
-
 1
1 -
2
-
3
-
4
-
5
-
6
-
7
-
8
-
9
-
10
-
11
-
12
-
13
-
14
-
15
-
16
-
17
-
18
-
19
-
20
-
21
-
22
-
23
-
24
-
25
-
26
-
27
-
28
-
29
-
30
-
31
-
32
-
33
-
34
-
35
-
36
-
37
-
38
-
39
-
40
-
41
-
42
-
43
-
44
-
45
-
46
-
47
-
48
-
49
-
50
-
51
-
52
-
53
-
 54
54 -
 55
55 -
 56
56 -
 57
57 -
 58
58 -
 59
59 -
 60
60 -
 61
61 -
 62
62 -
 63
63 -
 64
64 -
65
-
66
-
67
-
68
-
69
-
70
-
71
-
72
-
73
-
74
-
75
-
76
-
77
-
78
-
79
-
80
-
81
-
82
-
83
-
84
-
85
-
86
-
87
-
88
-
89
-
90
-
91
-
92
-
93
-
94
-
95
-
96
-
97
-
98
-
99
-
100
-
101
-
102
-
103
-
104
-
105
-
106
-
107
-
108
 |
 |
