2012 Yamaha Motorsports Rhino 700 FI Auto. 4x4 Sport Edition Owners Manual - Page 157
2012 Yamaha Motorsports Rhino 700 FI Auto. 4x4 Sport Edition Manual

Page 157 highlights
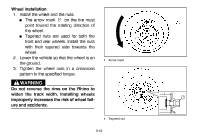
2 1 2 1 3 1. Quick fastener screw (× 2) 2. Battery compartment cover 1. Negative battery lead (black) 2. Positive battery lead (red) 3. Battery band 5. Unhook the battery band. 6. Disconnect the negative battery lead first, then the positive battery lead by removing their bolt. NOTICE: When removing the battery, the main switch must be off, and the negative lead must be disconnected before the positive lead. 7. Pull the battery out of its compartment. 8-48
-
 1
1 -
2
-
3
-
4
-
5
-
6
-
7
-
8
-
9
-
10
-
11
-
12
-
13
-
14
-
15
-
16
-
17
-
18
-
19
-
20
-
21
-
22
-
23
-
24
-
25
-
26
-
27
-
28
-
29
-
30
-
31
-
32
-
33
-
34
-
35
-
36
-
37
-
38
-
39
-
40
-
41
-
42
-
43
-
44
-
45
-
46
-
47
-
48
-
49
-
50
-
51
-
52
-
53
-
54
-
55
-
56
-
57
-
58
-
59
-
60
-
61
-
62
-
63
-
64
-
65
-
66
-
67
-
68
-
69
-
70
-
71
-
72
-
73
-
74
-
75
-
76
-
77
-
78
-
79
-
80
-
81
-
82
-
83
-
84
-
85
-
86
-
87
-
88
-
89
-
90
-
91
-
92
-
93
-
94
-
95
-
96
-
97
-
98
-
99
-
100
-
101
-
102
-
103
-
104
-
105
-
106
-
107
-
108
-
109
-
110
-
111
-
112
-
113
-
114
-
115
-
116
-
117
-
118
-
119
-
120
-
121
-
122
-
123
-
124
-
125
-
126
-
127
-
128
-
129
-
130
-
131
-
132
-
133
-
134
-
135
-
136
-
137
-
138
-
139
-
140
-
141
-
142
-
143
-
144
-
145
-
146
-
147
-
148
-
149
-
150
-
151
-
 152
152 -
 153
153 -
 154
154 -
 155
155 -
 156
156 -
 157
157 -
 158
158 -
 159
159 -
 160
160 -
 161
161 -
 162
162 -
163
-
164
-
165
-
166
-
167
-
168
-
169
-
170
-
171
-
172
-
173
-
174
-
175
-
176
-
177
-
178
-
179
-
180
-
181
-
182
-
183
-
184
-
185
-
186
-
187
-
188
-
189
-
190
 |
 |

8-48
1.
Quick fastener screw (
×
2)
2.
Battery compartment cover
5.
Unhook the battery band.
6.
Disconnect the negative battery lead first,
then the positive battery lead by remov-
ing their bolt.
NOTICE:
When removing
the battery, the main switch must be
off, and the negative lead must be dis-
connected before the positive lead.
1.
Negative battery lead (black)
2.
Positive battery lead (red)
3.
Battery band
7.
Pull the battery out of its compartment.
1
2
2
3
1