2012 Yamaha Motorsports Apex Owners Manual - Page 36
2012 Yamaha Motorsports Apex Manual

Page 36 highlights
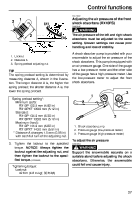
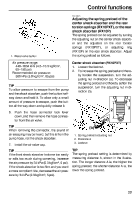
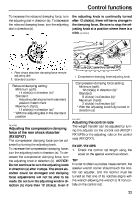
Control functions Spring preload setting*: Minimum (soft): 106.1 mm (4.18 in) Standard: 122.1 mm (4.81 in) Maximum (hard): 132.1 mm (5.20 in) * Distance A changes 1.5 mm (0.06 in) with each full turn of the adjusting nut. 3. Tighten the locknut to the specified torque. NOTICE: Always tighten the locknut against the adjusting nut, and then tighten the locknut to the specified torque. [ECS00860] Tightening torque: Locknut: 42 Nm (4.2 m·kgf, 30 ft·lbf) Rear torsion springs (RX10PXT) EWS00750 Spring preload setting: Minimum (soft): S Standard: M Maximum (hard): H Rear shock absorber (RX10P) To increase the spring preload and thereby harden the suspension, turn the adjusting ring in direction (a). To decrease the spring preload and thereby soften the suspension, turn the adjusting ring in direction (b). (a) (b) WARNING The left and right spring preloads must be adjusted to the same setting. Uneven settings can cause poor handling and loss of stability. To increase the spring preload and thereby harden the suspension, turn the adjuster in direction (a). To decrease the spring preload and thereby soften the suspension, turn the adjuster in direction (b). 1. Spring preload adjusting ring Spring preload setting: Minimum (soft): 1 Standard: 4 Maximum (hard): 7 TIP (a) (b) The spring preload can be further adjusted by changing the position of the spring seat. Have a Yamaha dealer make this adjustment as it requires special tools. 1. Spring preload adjuster 30
-
 1
1 -
2
-
3
-
4
-
5
-
6
-
7
-
8
-
9
-
10
-
11
-
12
-
13
-
14
-
15
-
16
-
17
-
18
-
19
-
20
-
21
-
22
-
23
-
24
-
25
-
26
-
27
-
28
-
29
-
30
-
 31
31 -
 32
32 -
 33
33 -
 34
34 -
 35
35 -
 36
36 -
 37
37 -
 38
38 -
 39
39 -
 40
40 -
 41
41 -
42
-
43
-
44
-
45
-
46
-
47
-
48
-
49
-
50
-
51
-
52
-
53
-
54
-
55
-
56
-
57
-
58
-
59
-
60
-
61
-
62
-
63
-
64
-
65
-
66
-
67
-
68
-
69
-
70
-
71
-
72
-
73
-
74
-
75
-
76
-
77
-
78
-
79
-
80
-
81
-
82
-
83
-
84
-
85
-
86
-
87
-
88
-
89
-
90
-
91
-
92
-
93
-
94
-
95
-
96
-
97
-
98
-
99
-
100
-
101
-
102
-
103
-
104
-
105
-
106
 |
 |
