2011 Yamaha Motorsports V Star 1300 Owners Manual - Page 23
2011 Yamaha Motorsports V Star 1300 Manual

Page 23 highlights
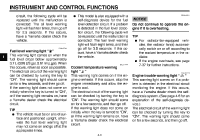
INSTRUMENT AND CONTROL FUNCTIONS tomatically, and the display will return to the prior mode after refueling and traveling 5 km (3 mi). To set the clock 5. Push the " " or " " side of the "SELECT" switch to set the minutes. 6. Push the "RESET" switch and then release it to start the clock. Self-diagnosis device If the odometer/tripmeter/clock display indicates any error codes, note the code number, and then have a Yamaha dealer check the vehicle. ECA11590 NOTICE If the display indicates an error code, the vehicle should be checked as soon as possible in order to avoid engine damage. 4 Brightness control mode 1 1. Clock 1. Push the " " or " " side of the "SELECT" switch to change the display to the clock mode. 2. Push the " " side of the "SELECT" switch and the "RESET" switch together for at least two seconds. 3. When the hour digits start flashing, push the " " or " " side of the "SELECT" switch to set the hours. 4. Push the "RESET" switch, and the minute digits will start flashing. 1. Error code display 1 This model is equipped with a self-diagnosis device for various electrical circuits. If a problem is detected in any of those circuits, the engine trouble warning light will come on and the odometer/tripmeter/clock display will indicate an error code. 2 1. Speedometer panel 2. Brightness level display This function allows you to adjust the brightness of the speedometer panel to suit the outside lighting conditions. 4-6
-
 1
1 -
2
-
3
-
4
-
5
-
6
-
7
-
8
-
9
-
10
-
11
-
12
-
13
-
14
-
15
-
16
-
17
-
 18
18 -
 19
19 -
 20
20 -
 21
21 -
 22
22 -
 23
23 -
 24
24 -
 25
25 -
 26
26 -
 27
27 -
 28
28 -
29
-
30
-
31
-
32
-
33
-
34
-
35
-
36
-
37
-
38
-
39
-
40
-
41
-
42
-
43
-
44
-
45
-
46
-
47
-
48
-
49
-
50
-
51
-
52
-
53
-
54
-
55
-
56
-
57
-
58
-
59
-
60
-
61
-
62
-
63
-
64
-
65
-
66
-
67
-
68
-
69
-
70
-
71
-
72
-
73
-
74
-
75
-
76
-
77
-
78
-
79
-
80
-
81
-
82
-
83
-
84
-
85
-
86
-
87
-
88
-
89
-
90
-
91
-
92
-
93
-
94
-
95
-
96
-
97
-
98
-
99
-
100
 |
 |
