2011 Yamaha Motorsports Raider S Owners Manual - Page 72
2011 Yamaha Motorsports Raider S Manual

Page 72 highlights
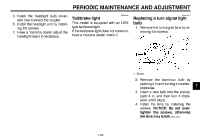
PERIODIC MAINTENANCE AND ADJUSTMENT EAU24324 EAU24350 Replacing a license plate light bulb 1. Remove the license plate light unit by removing the nuts, washers and rubber dampers. Supporting the motorcycle Since this model is not equipped with a centerstand, follow these precautions when removing the front and rear wheel or performing other maintenance requiring the motorcycle to stand upright. Check that the motorcycle is in a stable and level position before starting any maintenance. A strong wooden box can be placed under the engine for added stability. To service the front wheel 1. Stabilize the rear of the motorcycle by using a motorcycle stand or, if an additional motorcycle stand is not available, by placing a jack under the frame in front of the rear wheel. 2. Raise the front wheel off the ground by using a motorcycle stand. To service the rear wheel Raise the rear wheel off the ground by using a motorcycle stand or, if a motorcycle stand is not available, by placing 7-30 1. 2. 3. 4. Nut Washer License plate light bulb License plate light lens 7 1. 2. 3. 4. Nut Washer Rubber damper License plate light unit 2. Remove the license plate light lens by removing the nuts and washers. 3. Remove the burnt-out bulb by pulling it out. 4. Insert a new bulb into the socket. 5. Install the license plate light lens by installing the washers and the nuts. 6. Install the license plate light unit by installing the rubber dampers, washers and the nuts.
-
 1
1 -
2
-
3
-
4
-
5
-
6
-
7
-
8
-
9
-
10
-
11
-
12
-
13
-
14
-
15
-
16
-
17
-
18
-
19
-
20
-
21
-
22
-
23
-
24
-
25
-
26
-
27
-
28
-
29
-
30
-
31
-
32
-
33
-
34
-
35
-
36
-
37
-
38
-
39
-
40
-
41
-
42
-
43
-
44
-
45
-
46
-
47
-
48
-
49
-
50
-
51
-
52
-
53
-
54
-
55
-
56
-
57
-
58
-
59
-
60
-
61
-
62
-
63
-
64
-
65
-
66
-
 67
67 -
 68
68 -
 69
69 -
 70
70 -
 71
71 -
 72
72 -
 73
73 -
 74
74 -
 75
75 -
 76
76 -
 77
77 -
78
-
79
-
80
-
81
-
82
-
83
-
84
-
85
-
86
-
87
-
88
-
89
-
90
-
91
-
92
-
93
-
94
-
95
-
96
 |
 |
