2011 Yamaha Motorsports Grizzly 550 4x4 EPS Owners Manual - Page 138
2011 Yamaha Motorsports Grizzly 550 4x4 EPS Manual

Page 138 highlights
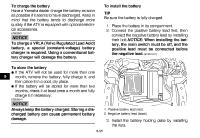
To charge the battery Have a Yamaha dealer charge the battery as soon as possible if it seems to have discharged. Keep in mind that the battery tends to discharge more quickly if the ATV is equipped with optional electrical accessories. ECB00931 To install the battery TIP Be sure the battery is fully charged. 1. Place the battery in its compartment. 2. Connect the positive battery lead first, then connect the negative battery lead by installing their bolt.NOTICE: When installing the battery, the main switch must be off, and the positive lead must be connected before the negative lead. [ECB01110] NOTICE To charge a VRLA (Valve Regulated Lead Acid) battery, a special (constant-voltage) battery charger is required. Using a conventional battery charger will damage the battery. To store the battery G If the ATV will not be used for more than one month, remove the battery, fully charge it, and then place it in a cool, dry place. G If the battery will be stored for more than two months, check it at least once a month and fully charge it if necessary. ECB00940 1 8 NOTICE Always keep the battery charged. Storing a discharged battery can cause permanent battery damage. 8-58 2 1. Positive battery lead (red) 2. Negative battery lead (black) 3. Install the battery holding plate by installing the nuts.
-
 1
1 -
2
-
3
-
4
-
5
-
6
-
7
-
8
-
9
-
10
-
11
-
12
-
13
-
14
-
15
-
16
-
17
-
18
-
19
-
20
-
21
-
22
-
23
-
24
-
25
-
26
-
27
-
28
-
29
-
30
-
31
-
32
-
33
-
34
-
35
-
36
-
37
-
38
-
39
-
40
-
41
-
42
-
43
-
44
-
45
-
46
-
47
-
48
-
49
-
50
-
51
-
52
-
53
-
54
-
55
-
56
-
57
-
58
-
59
-
60
-
61
-
62
-
63
-
64
-
65
-
66
-
67
-
68
-
69
-
70
-
71
-
72
-
73
-
74
-
75
-
76
-
77
-
78
-
79
-
80
-
81
-
82
-
83
-
84
-
85
-
86
-
87
-
88
-
89
-
90
-
91
-
92
-
93
-
94
-
95
-
96
-
97
-
98
-
99
-
100
-
101
-
102
-
103
-
104
-
105
-
106
-
107
-
108
-
109
-
110
-
111
-
112
-
113
-
114
-
115
-
116
-
117
-
118
-
119
-
120
-
121
-
122
-
123
-
124
-
125
-
126
-
127
-
128
-
129
-
130
-
131
-
132
-
 133
133 -
 134
134 -
 135
135 -
 136
136 -
 137
137 -
 138
138 -
 139
139 -
 140
140 -
 141
141 -
 142
142 -
 143
143 -
144
-
145
-
146
-
147
-
148
-
149
-
150
-
151
-
152
-
153
-
154
-
155
-
156
-
157
-
158
-
159
-
160
-
161
-
162
-
163
-
164
-
165
-
166
-
167
-
168
-
169
-
170
-
171
-
172
 |
 |
