2008 Yamaha Motorsports Rhino 450 Auto. 4x4 Special Edition Owners Manual - Page 126
2008 Yamaha Motorsports Rhino 450 Auto. 4x4 Special Edition Manual

Page 126 highlights
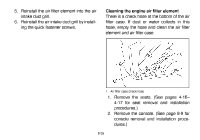
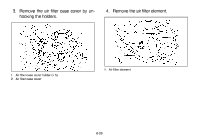
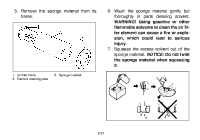
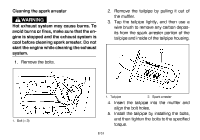
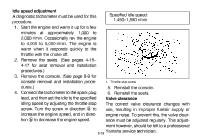
8. Wash the sponge material in warm soapy water to remove remaining solvent, then rinse thoroughly with plain warm water. 9. Squeeze excess water out of the sponge material. NOTICE: Do not twist the sponge material when squeezing it. 10. Allow the sponge material to dry thoroughly. Inspect the sponge material and replace it if damaged. 11. Thoroughly apply Yamaha foam air filter oil or other quality liquid foam air filter oil (not spray type) to the sponge material. The sponge material should be wet but not dripping. 12. Pull the sponge material over its frame. 13. Reinstall the air filter element. 14. Reinstall the air filter case cover by hooking the holders onto the air filter case. 15. Install the console. 16. Install the seats. The air filter element should be cleaned every 20-40 hours. It should be cleaned and lubricated more often if the vehicle is operated in extremely dusty areas. Each time air filter element maintenance is performed, check the air inlet to the air filter case for obstructions. Check the air filter element rubber joint to the carburetor and manifold fittings for an airtight seal. Tighten all fittings securely to avoid the possibility of unfiltered air entering the engine. NOTICE Never operate the engine with the air filter element removed. This will allow unfiltered air to enter, causing rapid engine wear and possible engine damage. Additionally, operation without the air filter element will affect carburetor jetting with subsequent poor performance and possible engine overheating. 8-28
-
 1
1 -
2
-
3
-
4
-
5
-
6
-
7
-
8
-
9
-
10
-
11
-
12
-
13
-
14
-
15
-
16
-
17
-
18
-
19
-
20
-
21
-
22
-
23
-
24
-
25
-
26
-
27
-
28
-
29
-
30
-
31
-
32
-
33
-
34
-
35
-
36
-
37
-
38
-
39
-
40
-
41
-
42
-
43
-
44
-
45
-
46
-
47
-
48
-
49
-
50
-
51
-
52
-
53
-
54
-
55
-
56
-
57
-
58
-
59
-
60
-
61
-
62
-
63
-
64
-
65
-
66
-
67
-
68
-
69
-
70
-
71
-
72
-
73
-
74
-
75
-
76
-
77
-
78
-
79
-
80
-
81
-
82
-
83
-
84
-
85
-
86
-
87
-
88
-
89
-
90
-
91
-
92
-
93
-
94
-
95
-
96
-
97
-
98
-
99
-
100
-
101
-
102
-
103
-
104
-
105
-
106
-
107
-
108
-
109
-
110
-
111
-
112
-
113
-
114
-
115
-
116
-
117
-
118
-
119
-
120
-
 121
121 -
 122
122 -
 123
123 -
 124
124 -
 125
125 -
 126
126 -
 127
127 -
 128
128 -
 129
129 -
 130
130 -
 131
131 -
132
-
133
-
134
-
135
-
136
-
137
-
138
-
139
-
140
-
141
-
142
-
143
-
144
-
145
-
146
-
147
-
148
-
149
-
150
-
151
-
152
-
153
-
154
-
155
-
156
-
157
-
158
-
159
-
160
-
161
-
162
-
163
-
164
-
165
-
166
-
167
-
168
-
169
-
170
-
171
-
172
-
173
-
174
-
175
-
176
 |
 |
