2007 Yamaha Motorsports Phazer GT Owners Manual - Page 74
2007 Yamaha Motorsports Phazer GT Manual

Page 74 highlights
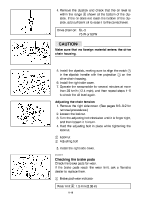
4. Remove the dipstick and check that the oil level is within the range a shown at the bottom of the dipstick. If the oil does not reach the bottom of the dipstick, add sufficient oil to raise it to the correct level. Drive chain oil: GL-3 75 W or 80 W CAUTION: @ Make sure that no foreign material enters the drive chain housing. @ 5. Install the dipstick, making sure to align the notch 2 in the dipstick handle with the projection 3 on the drive chain housing. 6. Install the right side cover. 7. Operate the snowmobile for several minutes at more than 20 km/h (12.4 mph), and then repeat steps 1-6 to check the oil level again. Adjusting the chain tension 1. Remove the right side cover. (See pages 8-6-8-9 for removal procedures.) 2. Loosen the locknut. 3. Turn the adjusting bolt clockwise until it is finger tight, and then loosen it 1/4 turn. 4. Hold the adjusting bolt in place while tightening the locknut. 1 Locknut 2 Adjusting bolt 5. Install the right side cover. ESU00174 Checking the brake pads Check the brake pads for wear. If the brake pads reach the wear limit, ask a Yamaha dealer to replace them. 1 Brake pad wear indicator Wear limit a: 1.5 mm (0.06 in) 8-19
-
 1
1 -
2
-
3
-
4
-
5
-
6
-
7
-
8
-
9
-
10
-
11
-
12
-
13
-
14
-
15
-
16
-
17
-
18
-
19
-
20
-
21
-
22
-
23
-
24
-
25
-
26
-
27
-
28
-
29
-
30
-
31
-
32
-
33
-
34
-
35
-
36
-
37
-
38
-
39
-
40
-
41
-
42
-
43
-
44
-
45
-
46
-
47
-
48
-
49
-
50
-
51
-
52
-
53
-
54
-
55
-
56
-
57
-
58
-
59
-
60
-
61
-
62
-
63
-
64
-
65
-
66
-
67
-
68
-
 69
69 -
 70
70 -
 71
71 -
 72
72 -
 73
73 -
 74
74 -
 75
75 -
 76
76 -
 77
77 -
 78
78 -
 79
79 -
80
-
81
-
82
-
83
-
84
-
85
-
86
-
87
-
88
-
89
-
90
-
91
-
92
-
93
-
94
-
95
-
96
-
97
-
98
-
99
-
100
-
101
-
102
-
103
-
104
 |
 |
