2007 Yamaha Motorsports Grizzly 400 Auto. 4x4 Owners Manual - Page 129
2007 Yamaha Motorsports Grizzly 400 Auto. 4x4 Manual

Page 129 highlights
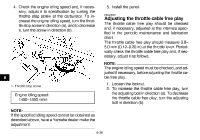
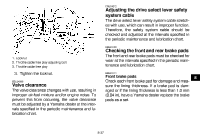
WHAT CAN HAPPEN You could lose braking ability, which could lead to an accident. HOW TO AVOID THE HAZARD After servicing: G Make sure the brakes operate smoothly and that the free play is correct. G Make sure the brakes do not drag. G Make sure the brakes are not spongy. All air must be bled from the brake system. Replacement of brake components requires professional knowledge. These procedures should be performed by a Yamaha dealer. EBU27130 G Before adjusting the brake lever free play and checking the brake pedal position, check the rear brake pads for wear. Adjusting the brake lever free play The brake lever free play should measure 0.5-2.0 mm (0.02-0.08 in) as shown. If the free play is incorrect, adjust it as follows. Adjusting the rear brake lever free play and checking the brake pedal position The brake lever free play must be adjusted and brake pedal position must be checked and, if necessary, adjusted at the intervals specified in the periodic maintenance and lubrication chart. NOTE: G Always perform this maintenance completely in the following order whenever adjusting the rear brake. 8-41 8 1. Brake lever free play 1. Loosen the locknut. 2. Turn the brake lever free play adjusting bolt in direction (a) to increase the free play, and in direction (b) to decrease it.
-
 1
1 -
2
-
3
-
4
-
5
-
6
-
7
-
8
-
9
-
10
-
11
-
12
-
13
-
14
-
15
-
16
-
17
-
18
-
19
-
20
-
21
-
22
-
23
-
24
-
25
-
26
-
27
-
28
-
29
-
30
-
31
-
32
-
33
-
34
-
35
-
36
-
37
-
38
-
39
-
40
-
41
-
42
-
43
-
44
-
45
-
46
-
47
-
48
-
49
-
50
-
51
-
52
-
53
-
54
-
55
-
56
-
57
-
58
-
59
-
60
-
61
-
62
-
63
-
64
-
65
-
66
-
67
-
68
-
69
-
70
-
71
-
72
-
73
-
74
-
75
-
76
-
77
-
78
-
79
-
80
-
81
-
82
-
83
-
84
-
85
-
86
-
87
-
88
-
89
-
90
-
91
-
92
-
93
-
94
-
95
-
96
-
97
-
98
-
99
-
100
-
101
-
102
-
103
-
104
-
105
-
106
-
107
-
108
-
109
-
110
-
111
-
112
-
113
-
114
-
115
-
116
-
117
-
118
-
119
-
120
-
121
-
122
-
123
-
 124
124 -
 125
125 -
 126
126 -
 127
127 -
 128
128 -
 129
129 -
 130
130 -
 131
131 -
 132
132 -
 133
133 -
 134
134 -
135
-
136
-
137
-
138
-
139
-
140
-
141
-
142
-
143
-
144
-
145
-
146
-
147
-
148
-
149
-
150
-
151
-
152
-
153
-
154
-
155
-
156
-
157
-
158
-
159
-
160
-
161
-
162
-
163
-
164
-
165
-
166
-
167
-
168
-
169
-
170
 |
 |
