2013 Ford Taurus Quick Reference Guide Printing 2 - Page 8
2013 Ford Taurus Manual

Page 8 highlights
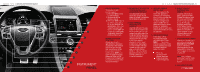
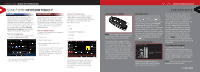
14/ 2013 TAURUS / QUICK REFERENCE GUIDE 2013 TAURUS / QUICK REFERENCE GUIDE / 15 FUNCTION REAR VIEW CAMERA* This system provides a visual image of the area behind the vehicle. The display automatically appears in the touch screen when the vehicle is in R (Reverse) and uses lines to alert you of your vehicle's path and proximity to objects behind you. For nontouch screen vehicles, the image will appear in the 4.2 inch center stack display. COMFORT SELECTSHIFT AUTOMATIC® TRANSMISSION* things like speed restrictions, limited volume levels and safety belt reminders. For complete information, refer to the MyKey chapter in your Owner's Manual. UNIVERSAL GARAGE DOOR OPENER* SECURICODE™ KEYLESS ENTRY KEYPAD* Gives you the ability to manually change gears if you'd like. To use, move the gearshift lever from D (Drive) to S (Sport). Then use the paddle shifters located on your steering wheel to make shifts quickly. Pull the right paddle (+) to upshift, pull the left paddle (-) to downshift. If your vehicle is equipped with +/- thumb switch on your gearshift lever; press (+) to upshift, press (-) to downshift. REVERSE SENSING SYSTEM* This system shows the area within the center stack display, using red, yellow and green highlights on top of the video image when an object is detected. The alert highlights the closest object detected. Note: Visibility aids do not replace the need to watch where the vehicle is moving. Refer to your Owner's Manual for safety information, more detail and limitations. MYKEY® (* if equipped) MyKey allows you to program certain driving restrictions in order to promote good driving habits. You can program Allows you to lock or unlock the doors, recall memory features and arm or disarm the anti-theft alarm. The keypad, located near the driver's window, is invisible until touched and then it lights up so you can see and touch the buttons. To get started, you will need your 5-digit factory code found on your owner's wallet card (located in the glove box). Entering this code unlocks the driver's door. To lock all of the doors, press and hold 7•8 and 9•0 at the same time. For complete information, refer to the SecuriCode Keyless Entry Keypad section in the Locks chapter of your Owner's Manual. Your driver's side visor has a built-in wireless transmitter that replaces the common hand-held garage door opener. This system can also be programmed to security systems, entry gates and home or office lighting. Refer to the Universal Garage Door Opener chapter in your Owner's Manual, or visit homelink.com for programming instructions and additional information. HEATED AND COOLED FRONT SEATS* To access, press the Climate corner on the touch screen. For heated front seats, press repeatedly to cycle through the various heat modes and off. For cooled front seats, press repeatedly to cycle through the various cooling modes HEATED STEERING WHEEL* Your vehicle may be equipped with a heated steering wheel. To access, press the Climate corner of the touchscreen. Press to turn on and off. Note: The wood trim will not heat between the 10 and 2 o'clock positions. Program position 1, press and hold until you hear a chime. To set a second position, press and hold until the same chime sounds. You can now use these controls to recall the set positions. MOONROOF* Your moonroof is equipped with an automatic, onetouch, express opening, closing and venting feature. HEATED REAR SEATS* FUEL-EFFICIENT TRANSMISSION Your vehicle has been designed to improve fuel economy by reducing fuel usage while coasting or decelerating. This may be perceived as a light to medium braking sensation when removing your foot from the accelerator pedal. and off. If your vehicle is not equipped with a touch screen, use the hard button controls (indicated by the same symbols) to cycle through the various heat or cooled modes and off. The controls are on the back of the center console. Press heated seat button to cycle through the various heat seattings and off. Warmer settings are indicated by more indicator lights. MEMORY FUNCTION* TILTING HEAD RESTRAINTS* Your vehicle's front head restraints can be tilted to suit your needs. First, adjust the seat back to an upright driving position. Then, tilt the head restraint forward by gently pulling the top of the head restraint. Once it is in the forward-most position, tilting it forward once more will release it to the original upright position. Note: Do not attempt to force the headrest backward after it is tilted. Instead, continue tilting it forward until the headrest releases to the upright position. To open, press and release the SLIDE control. Pull and release the SLIDE control to close. Vent the moonroof by pressing and releasing the TILT control. To close from a venting position, pull and hold the TILT control. Use the memory controls located on the side seat panel to program and then recall memory positions. Move the features to the desired positions. To (* if equipped)
-
 1
1 -
2
-
 3
3 -
 4
4 -
 5
5 -
 6
6 -
 7
7 -
 8
8
 |
 |
