2009 Ford Taurus Quick Reference Guide 1st Printing - Page 1
2009 Ford Taurus Manual
Page 1 highlights
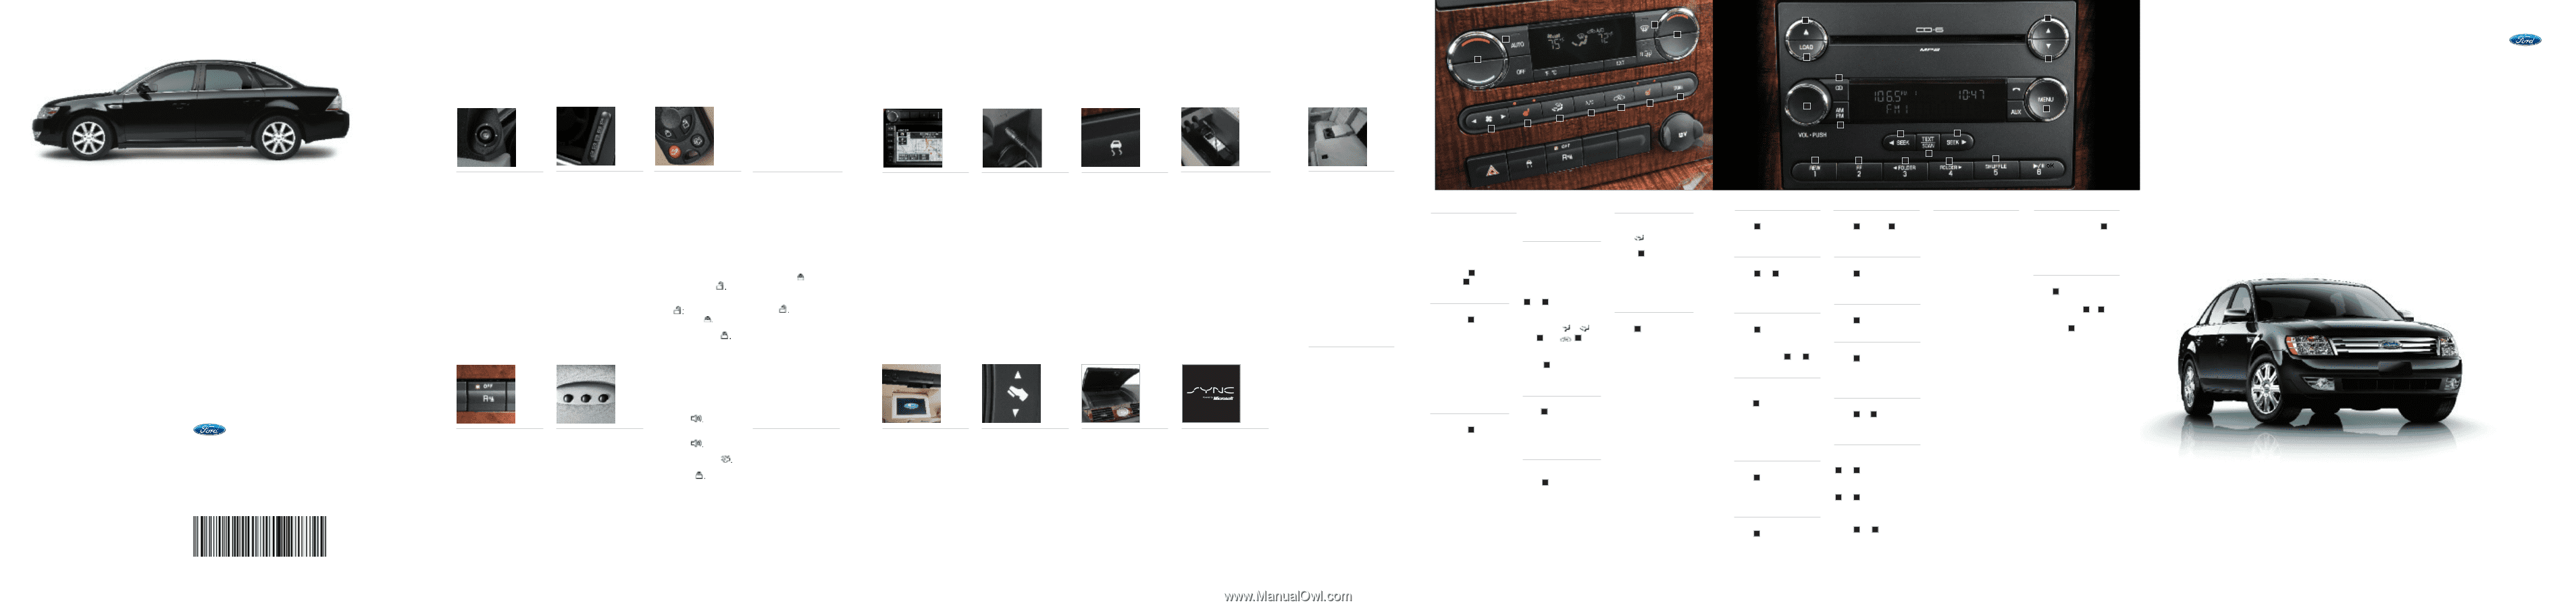
1 3 4 2 3 2009 FORD TAURUS 2009 FORD TAURUS 1 2 4 ADDITIONAL INFORMATION ADDITIONAL INFORMATION SEATING 10 6 9 8 7 6 5 5 6 8 7 9 11 10 12 13 14 15 16 This Quick Reference Guide is not intended to replace your vehicle Owner's Guide which contains more detailed information concerning the features of your vehicle, as well as important safety warnings designed to help reduce the risk of injury to you and your passengers. Please read your entire Owner's Guide carefully as you begin learning about your new vehicle and refer to the appropriate sections when questions arise. All information contained in this Quick Reference Guide was accurate at the time of duplication. We reserve the right to change features, operation and/or functionality of any vehicle specification at any time. Your Ford dealer is the best source for the most current information. For detailed operating and safety information, please consult your Owner's Guide. POWER MIRRORS Rotate the control clockwise to adjust the right mirror and counterclockwise to adjust the left mirror. Move the control in the direction you wish to tilt the mirror. Rotate the control to the center position to lock the mirrors in place. KEYLESS ENTRY KEYPAD The keyless entry keypad can be used to lock or unlock the doors or open the trunk without using a key. It can also recall the positions of the memory seat, power mirrors and adjustable pedals (if equipped), if the memory feature has been activated. For more information, please consult your Owner's Guide. INTEGRATED KEYHEAD TRANSMITTER (IKT) AND REMOTE ENTRY SYSTEM Your vehicle comes equipped with two programmed Integrated Keyhead Transmitters (IKTs) which are both a programmed ignition key and a remote keyless entry transmitter. Handle the IKT carefully when starting the car to avoid accidentally pressing any of the remote entry buttons. Press once to unlock the driver's door. The interior lamps will illuminate. Press twice to unlock all the doors. Press once to lock all the doors. The turn lamps will flash. Press twice to confirm all the doors and trunk are closed. The doors will lock again, the horn will chirp and the turn lamps will flash once if all the doors and trunk are closed. Note: If any door or the trunk is not closed, the horn will chirp twice and the lamps will not flash. Press to activate the panic alarm. The horn will sound and the turn lamps will flash. Press again or turn the ignition on to deactivate the panic alarm. Press to unlock the trunk. Car finder: Press twice within three seconds. The horn will chirp and the turn lamps will flash. It is recommended to use method to locate your vehicle, rather than using the panic alarm. Note: Ensure that you keep the adhesive security labels in a safe place for future reference. Replacements are only available through an authorized dealer. MEMORY FEATURE (IF EQUIPPED) NAVIGATION SYSTEM (IF EQUIPPED) AUXILIARY INPUT JACK Your vehicle is equipped with an Auxiliary Input Jack located inside the console bin. This allows you to plug and play auxiliary audio devices, including MP3 players. Press AUX repeatedly on your audio system to access. When LINE IN appears in the display, plug in your auxiliary audio device. For more information, please consult your Owner's Guide. ADVANCETRAC® Your vehicle is equipped with the AdvanceTrac stability enhancement system. This system consists of: Traction control, which helps avoid wheel spin and loss of traction, and Electronic Stability Control, which helps avoid skids or lateral slides. These features work together to help you to maintain stability and steerability of your vehicle during a variety of road conditions. If your vehicle becomes stuck in the snow, mud or sand, try turning off the AdvanceTrac system to allow wheel spin and help increase momentum to dig the vehicle out. The system defaults to on and the control will illuminate when turned off. CENTER CONSOLE STORAGE The utility compartment may have a clamshell tray for flexible storage of MP3 players, CDs or handbags. SPLIT-FOLDING REAR SEAT One or both of the rear seats can be folded down to provide additional cargo space. To lower the seat backs, pull the strap located on the outboard side of the seat back to release it, and then fold the seat back down. When raising the seat back(s), make sure to firmly lock them into place and tug forward to ensure that they are fully latched. Ford Motor Company Customer Relationship Center P.O. Box 6248 Dearborn, MI 48121 1-800-392-3673 (FORD) (TDD for the hearing impaired: 1-800-232-5952) The memory feature enables the vehicle to 'remember' your seat, mirror, and adjustable pedals position (if equipped). To set, position the seat, mirrors and adjustable pedals (if equipped) where you want them. Press and hold either the 1 or 2 control on the driver's door panel until you hear two tones. Within three seconds, press on the remote transmitter. Another tone will sound when the process is complete. Once set, pressing on the same IKT will automatically move the seat, mirrors and adjustable pedals to the chosen memory position. For more complete information, please refer to your Owner's Guide. Your vehicle may be equipped with a navigation system. For more information, please refer to the Navigation supplement (if equipped). DUAL ZONE AUTOMATIC TEMPERATURE CONTROL WITH HEATED SEATS (IF EQUIPPED) DRIVER AND PASSENGER TEMPERATURE PREMIUM / AUDIOPHILE IN-DASH 6-CD / MP3 SATELLITE COMPATIBLE SOUND SYSTEM (IF EQUIPPED) ON / OFF / VOLUME CONTROL CD FAST FORWARD / REVERSE SATELLITE RADIO (IF EQUIPPED) SETTING MEMORY PRESETS or cool the vehicle to reach the desired temperature. MAX A/C DEFOGGING/DEMISTING IN COLD WEATHER USB PORT (IF EQUIPPED) Your vehicle may be equipped with a USB port inside your center console. This feature allows you to plug in media playing devices among other options. For more detailed information, please refer to your SYNC or Navigation supplement (if equipped). Press the blue side of the control to decrease or the red side of the control to increase the temperature for the driver 1 or passenger 4 side of the vehicle. DUAL FRONT PASSENGER FOLD FLAT SEAT BACK The front passenger seat back can be folded down to a horizontal position to allow room for a long load. Ensure that the seat is in the rearmost position and the head restraint is fully down, prior to pulling the strap located on the back of the seat. Press DUAL 10 to activate dual zone where the driver and passenger can select their individual temperature settings. Press again to return to single zone where the driver side temperature control determines the temperature for the entire vehicle cabin. AUTO To reach maximum cooling performance when in automatic operation (AUTO), simply use the temperature controls 1 or 4 to set to the desired temperature. If you are not in AUTO mode, select or , 9 and A/C 8 and set the temperature to 60°F (16°C). Set the fan speed 5 to the highest setting initially, then adjust for comfort. DEFROST Select . Select A/C and adjust the temperature 1 control to main comfort. Set the fan to the highest speed and direct the outer instrument panel vents toward the side windows. HEATED SEATS Press 5 to turn the system on or off. Turn to increase or decrease volume. TUNER / DISC SELECTOR Press 12 REW or 13 FF to reverse or advance within a CD/MP3 track. CD EJECT Press 3 or 4 ▲/▼ to manually go up or down the radio frequency band or to select a desired disc. BASS / TREBLE / BALANCE / FADE Press 1 to eject a CD. Press and hold to auto eject all loaded CDs. AM / FM Press 6 to cycle through available settings of high heat (2 lights), low heat (1 light), and off (no lights). Press 8 MENU repeatedly until the desired setting appears in the display. Adjust using the 3 or 4 ▲/▼ controls. LOAD Press 7 to select AM or FM frequency bands. SCAN FUNCTION Press 10 SCAN for a brief sampling of radio stations or CD tracks. Press again to stop. SEEK FUNCTION REVERSE SENSING SYSTEM (IF EQUIPPED) MAY 2008 FIRST PRINTING QUICK REFERENCE GUIDE FORD TAURUS LITHO IN U.S.A. The Reverse Sensing System (RSS) sounds a tone to warn you of obstacles near the rear bumper when the vehicle is in Reverse (R) and is traveling less than 3 mph (5 km/h). The system is not effective at speeds above 3 mph (5 km/h) and may not detect certain angular or moving objects. Refer to your Owner's Guide for more information. HOMELINK® (IF EQUIPPED) MOON ROOF (IF EQUIPPED) The HomeLink Wireless Control System, located on the driver's visor, provides a convenient way to replace up to three handheld transmitters with a single device. This feature will operate most garage doors, entry gate operators, security systems, and home or office lighting. For programming, please consult your Owner's Guide. 9G1J 19G217 AA Your vehicle may be equipped with a moon roof which has an automatic, one-touch express opening and closing feature. To open the moon roof, press the SLIDE control. Press again to close. To stop motion at any time during the one-touch operation, press the control a second time. To vent the moon roof, press the TILT control. The moon roof has a built-in shade which can be manually opened or closed when the glass panel is closed. FAMILY ENTERTAINMENT SYSTEM (IF EQUIPPED) Your vehicle may be equipped with a Family Entertainment DVD System. Please refer to "Family Entertainment System" in your Owner's Guide for further information on the operation of your system. ADJUSTABLE PEDALS (IF EQUIPPED) Press the top of the control to move the pedals further away from you or press the bottom of the control to move the pedals closer to you. The pedals should only be adjusted when the vehicle is stopped and in Park (P). INSTRUMENT PANEL STORAGE COMPARTMENT The storage compartment may be used to secure sunglasses or similar sized objects. Press the control to open the storage compartment. SYNC (IF EQUIPPED) Your vehicle may be equipped with SYNC - a hands-free communications and entertainment system with special phone and media features. For more information, please refer to the SYNC supplement or to the SYNC section in the Navigation supplement. Please also feel free to visit www.SyncMyRide.com. Press AUTO 2 to engage automatic temperature control. Set the desired temperature. The system will then automatically determine fan speed, airflow location, A/C on or off as well as using outside or recirculated air to heat Press 3 distribute outside air through the windshield defroster and demister vents and to clear thin ice and fog from the windshield. AIRFLOW DIRECTION CONTROL (IF EQUIPPED) To load a CD into the system, press 2 LOAD. When prompted, select the desired slot (1-6) using the memory presets and insert the CD into the system. Press and hold to autoload up to six CDs. CD Press 9 or 11 SEEK to access the previous/next strong station or track. MP3 TRACK / FOLDER MODE Press 7 repeatedly to select the desired airflow direction. Press 6 to enter CD mode. If a CD is already loaded into the system, the CD will begin playing where it last ended. SHUFFLE In Track mode, press 9 or 11 SEEK to scroll through all tracks on the disc. In Folder mode, pressing 9 or 11 SEEK to scroll through tracks within a selected folder. Press 14 or 15 FOLDER to access next or previous folder on MP3 discs. Your vehicle may be equipped with SIRIUS satellite radio. Press AUX repeatedly to cycle through SAT1, SAT2 and SAT3. Press MENU repeatedly until SATELLITE RADIO MENU appears in the display. Press OK and then press ▲/▼ to cycle through Category, Save Song, Delete Song, Delete All Songs and Enable/Disable Alerts options. Refer to your Owner's Guide for more information. SIRIUS Satellite Radio is a subscription based satellite radio service that broadcasts music, sports, news and entertainment programming. For more information and a complete list of SIRIUS satellite radio channels, visit www.sirius.com in the United States, www.sirius-canada.ca in Canada, or call SIRIUS at 1-888-539-7474. To set a station: Press 7 to select AM or FM frequency band, tune to a station, then press and hold a preset button (1- 6) until the sound returns. SETTING THE CLOCK 2009 QUICK REFERENCE GUIDE FORD TAURUS Press 8 MENU until SELECT HOURS or SELECT MINS is displayed. Press 3 or 4 ▲/▼ to increase /decrease the time. Press 8 MENU again to disengage clock mode. Press 16 to play CD tracks in random order. CLIMATE CONTROL AUDIO SYSTEMS
-
 1
1 -
 2
2
 |
 |