Weber Summit Gold A Owner Manual
Weber Summit Gold A Manual
 |
View all Weber Summit Gold A manuals
Add to My Manuals
Save this manual to your list of manuals |
Weber Summit Gold A manual content summary:
- Weber Summit Gold A | Owner Manual - Page 1
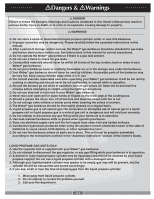
SUMMIT® & LP Gas Grill Owners Guide YOU MUST READ THIS OWNERS GUIDE # BEFORE OPERATING YOUR GAS GRILL 42090 ƽ DANGER If you smell gas: 1. Shut off gas to the appliance. 2. Extinguish any open flames. 3. Open lid 4. If odor continues, keep away from the appliance and immediately call your gas - Weber Summit Gold A | Owner Manual - Page 2
use. See instructions in this manual for correct procedures. ƽ Do not operate the Weber® gas barbecue if there is a gas leak present. ƽ Do not use a flame to check for gas leaks. ƽ Combustible materials should never be within 24 inches of the top, bottom, back or sides of your Weber® gas barbecue - Weber Summit Gold A | Owner Manual - Page 3
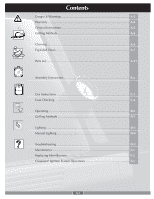
A-5 Grilling Methods A-6 Cleaning A-6 Exploded Views A-7 Parts List A-11 Assembly Instructions B-a Gas Instructions C-1 Leak Checking C-4 Operating D-1 Grilling Methods D-1 Lighting ...D-3 Manual Lighting D-4 Troubleshooting D-5 Maintenance E-1 Replacing Main Burners E-2 Crossover - Weber Summit Gold A | Owner Manual - Page 4
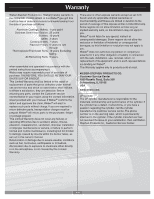
they are defective. Before returning any parts, contact the Customer service representative in your region using the contact information sheet provided with your manual. If Weber® confirms the defect and approves the claim, Weber® will elect to replace such parts without charge. If you are required - Weber Summit Gold A | Owner Manual - Page 5
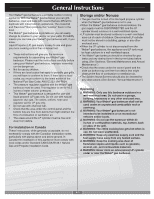
its location in your yard or on your patio. Portability means you can take your Weber® gas barbecue with, if you move. Liquid Propane (LP) gas supply is easy to use and gives you more cooking control than charcoal fuel. • These instructions will give you the minimum requirements for assembling your - Weber Summit Gold A | Owner Manual - Page 6
Instructions Grilling Methods NOTE: If grill looses heat while cooking refer to the troubleshooting section of this manual. ƽ WARNING: Do not move the Weber® gas contact the Customer Service Representative in your region using the contact information sheet provided with your manual. Outside surfaces - Weber Summit Gold A | Owner Manual - Page 7
Summit® Silver A Exploded View 1 Summit® Silver A LP 032103 2 3 38 4 39 5 40 6 41 42 7 8 9 43 10 11 12 13 14 44 15 45 16 46 17 18 47 19 48 20 21 49 - Weber Summit Gold A | Owner Manual - Page 8
Summit® Silver A Exploded View List 1. Hinge Pin 2. Thermometer Hardware 3. Thermometer Bezel 4. Warm-Up™ Shield Assembly 47. Manifold Assembly 48. Main Gas Line 49. Hose and QCC1 Regulator 50. Bottom Tray 51. Summit Catch Pan Holder 52. Summit Catch Pan 53. Summit Drip Pan 54. Rear Frame Rail 55. - Weber Summit Gold A | Owner Manual - Page 9
Summit® Gold A Exploded View 1 Summit® Gold A LP 032103 2 3 39 4 40 5 41 6 42 7 43 8 9 10 11 44 12 13 14 15 45 16 46 17 47 18 19 48 20 49 21 50 - Weber Summit Gold A | Owner Manual - Page 10
45. Electrode Assembly 46. Electrode Assembly 47. Battery Shield Assembly 48. Manifold Assembly 49. Main Gas Line 50. Hose and QCC1 Regulator 51. Bottom Tray 52. Summit Catch Pan Holder 53. Summit Catch Pan 54. Summit Drip Pan 55. Rear Frame Rail 56. Rear Panel 57. 1/4 - 20 Hex Nut 58. Wheel - Weber Summit Gold A | Owner Manual - Page 11
Summit® Silver A Parts List Lid - 1 Bottom Shelf - 1 Cookbox - 1 Left Door - 1 Front Frame Rail - 1 Rear Frame Rail - 1 Left Frame Assembly - 1 Right Frame Assembly - 1 Right Door - 1 Side Table - 2 Warming Rack - 1 Warm-Up™ Rack - 1 Rear Panel - 1 A-11 - Weber Summit Gold A | Owner Manual - Page 12
Summit® Silver A Parts List Flavorizor® Bars - 2 Sets Hinge Pin- 2 Hair Pin Cotter- 2 1-1/4 inch Bolts (1/4 x 20 x 1-1/4 inch Bolt) - 2 Stainless Steel Cooking 1 Wing Nut (10-24) - 2 Catch-Pan - 1 Plastic Washer - 1 Disposable Drip Pans - 2 Wrench - 1 7/16 inch Wrench - 1 LP Tank - 1 A-12 - Weber Summit Gold A | Owner Manual - Page 13
Lid - 1 Cookbox - 1 Summit® Gold A Parts List Bottom Shelf - 1 Left Door - 1 Front Frame Rail - 1 Rear Frame Rail - 1 Right Door - 1 Side Table - 2 Left Frame Assembly - 1 Right Frame Assembly - 1 Warming Rack - 1 Warm-Up™ Rack - 1 Rear Panel - 1 A-13 - Weber Summit Gold A | Owner Manual - Page 14
Summit® Gold A Parts List Flavorizor® Bars - 2 Sets Hinge Pin- 2 Hair Pin Cotter- 2 1-1/4 inch Bolts (1/4 x 20 x 1-1/4 inch Bolt) - 2 Stainless Steel Cooking - 1 Wing Nut (10-24) - 2 Catch-Pan - 1 Plastic Washer - 1 Disposable Drip Pans - 2 Wrench - 1 7/16 inch Wrench - 1 LP Tank - 1 A-14 - Weber Summit Gold A | Owner Manual - Page 15
Frame Assembly to level the frames for Frame Rail Assembly. b c (1) (3) Ba401.d (3) (2) B-a ƽCAUTION: Before proceeding to the next step check that frame rail (2) is on the side with the swing tables (3). The tab on frame rail (2) must be facing toward the wheels. - Weber Summit Gold A | Owner Manual - Page 16
2 a b ƽ ATTENTION! Only start these bolts. Do not tighten yet. B-b - Weber Summit Gold A | Owner Manual - Page 17
3 B-c - Weber Summit Gold A | Owner Manual - Page 18
4 a b ƽ ATTENTION! Completely remove both partially started bolts from top rear frame rail c 1 2 ƽ ATTENTION! Reinstall both bolts through rear panel and into rear frame rail. B-d - Weber Summit Gold A | Owner Manual - Page 19
5 ƽ ATTENTION! Remove packing tape holding the gas line and bracket(1). When installing cookbox route the gas line and bracket(1) inside the frame rails(2). a (1) (2) (2) (1) (2) (2) B-e - Weber Summit Gold A | Owner Manual - Page 20
6 b (1) (2) (3) B-f - Weber Summit Gold A | Owner Manual - Page 21
7 c (1) (2) (1) (2) B-g - Weber Summit Gold A | Owner Manual - Page 22
8 a b Matchlight Holder B-h - Weber Summit Gold A | Owner Manual - Page 23
9 a b (1) (2) (3) B-i - Weber Summit Gold A | Owner Manual - Page 24
10 a b a b B-j - Weber Summit Gold A | Owner Manual - Page 25
11 12 b a B402_LP.c B-1 - Weber Summit Gold A | Owner Manual - Page 26
13 14 B-2 - Weber Summit Gold A | Owner Manual - Page 27
15 16 B-3 - Weber Summit Gold A | Owner Manual - Page 28
A B-4 - Weber Summit Gold A | Owner Manual - Page 29
A B-5 - Weber Summit Gold A | Owner Manual - Page 30
then contact the Customer Service Representative in your region using the contact information sheet provided with your manual. To fill, take ƽDANGER ƽNEVER store a spare LP Cylinder under or near this barbecue. ƽNEVER fill the tank beyond 80% full. Your Weber® gas grill is equipped with a cylinder - Weber Summit Gold A | Owner Manual - Page 31
. These types of tanks are illustrated below. You will need: LP cylinder, a soap and water solution and a rag or brush to apply it. 1) Turn the LP cylinder so the opening of the valve is either to the front, side or rear of the Weber® gas barbecue. Lift and hook the cylinder onto the fuel gauge - Weber Summit Gold A | Owner Manual - Page 32
Gas Instructions ƽWARNING : The gas connections of your Summit® gas grill have been factory tested. We do however recommend that you leak check all gas connections before operating your Summit® gas grill. Remove control panel Put your fingers under the front edge of the control panel and lift off. - Weber Summit Gold A | Owner Manual - Page 33
Gas Instructions Remove the Front Panel by sliding the panel up and out of the slots. Check for gas leaks ƽ DANGER Do not use an open flame to check for gas your Weber Gas Barbecue. Shipping and handling may loosen or damage a gas fitting checking for leaks. Make sure side burner is OFF. To perform - Weber Summit Gold A | Owner Manual - Page 34
If a leak persists after re-tightening the fitting, turn OFF the gas. DO NOT OPERATE THE GRILL. Contact the Customer Service Representative in your region using the contact information sheet provided with your manual. 3) Regulator to cylinder connection. 4) Hose to regulator connection. 5) Valves to - Weber Summit Gold A | Owner Manual - Page 35
Gas Instructions Reinstall control panel Parts required: control panel, screws, and burner control knobs. Place the control panel back onto the control panel brackets on either side of the front of the cooking box. (1) Line up screws with screw holes on both the control panel and control panel - Weber Summit Gold A | Owner Manual - Page 36
Gas Instructions Liquid Propane Cylinder The liquid propane cylinder manufacturer is responsible for the materials, workmanship and performance of the tank. If the tank has a defect malfunctions, or you have a question regarding the tank, call the tank manufacturer's customer service center. The - Weber Summit Gold A | Owner Manual - Page 37
date tested(2) is within five years. Your LP gas supplier can do this for you. If you have questions about spare LP cylinders contact the Customer Service Representative in your region using the contact information sheet provided with your manual. s All LP tank supply systems must include a collar - Weber Summit Gold A | Owner Manual - Page 38
Instructions Grilling Methods NOTE: If grill looses heat while cooking refer to the troubleshooting section of this manual . Light your Summit® gas grill according to the instructions in this Owner's Manual. Turn both heat for 2 to 5 minutes per side. Smaller pieces require less searing time. - Weber Summit Gold A | Owner Manual - Page 39
Instructions Indirect cooking The Indirect Method is similar to roasting, but with the added benefits of that grilled texture, flavor, and appearance you can't get from an oven. To set up for Indirect cooking, gas burners are lit on either side temperature of your Summit® gas grill may run hotter - Weber Summit Gold A | Owner Manual - Page 40
to be damaged in any way, do not use the barbecue. Replace using only Weber® authorized replacement hose. Contact the Customer Service Representative in your region using the contact information sheet provided with your manual. 1) Open the lid. 2) Make sure all burner control knobs are turned OFF - Weber Summit Gold A | Owner Manual - Page 41
Instructions Manual Lighting ƽ DANGER Failure to open the lid while igniting the barbecue's burners, or not waiting 5 minutes to allow the gas LP cylinder valve, the "excess gas flow control" feature will activate, limiting the flow of gas from the LP cylinder. If this should occur, turn OFF the LP - Weber Summit Gold A | Owner Manual - Page 42
Main Burner Troubleshooting Problem Check Burners burn with a yellow or Inspect Weber® Insect / Spider orange flame, in conjunction with screens for possible instructions. the smell of gas. (Blockage of holes.) Cure Clean Weber® Insect / Spider screens. (See Section "Annual Maintenance") - Weber Summit Gold A | Owner Manual - Page 43
the spider/insect screen becomes damaged or cannot be cleaned, call Weber-Stephen Products Customer Service for replacement parts. Main Burner Flame Pattern The Weber® gas barbecue burners have been factory set for the correct air and gas mixture. The correct flame pattern is shown. 1) Burner tube - Weber Summit Gold A | Owner Manual - Page 44
Main Burners 1. Your Summit® gas grill must be OFF and cool. 2. Turn gas OFF at source. 3. Disconnect regulator. 4. Remove cooking grates. 5. Remove Smoker box. 6. Remove Flavorizer® bars. 7. To remove control panel refer to "Remove the control panel" under "Check for Gas Leaks." 8. Disconnect all - Weber Summit Gold A | Owner Manual - Page 45
Maintenance 9. Remove screws from the manifold assembly: (a) Locate the screws on both sides of the manifold frame. (b) Remove the screws from manifold frame. 10. Pull manifold assembly out from the manifold frame. (a) (b) (a) (b) (a) (b) (a) (b) E-3 - Weber Summit Gold A | Owner Manual - Page 46
the selected burner(s) tube(s) from manifold frame and replace with a new burner tube. Check proper assembly before fastening manifold in place. ƽWARNING: After reinstalling the gas lines, they should be leak checked with a soap and water solution before using the grill. (See, "Check for - Weber Summit Gold A | Owner Manual - Page 47
. If the Crossover® ignition system still fails to light, contact the Customer Service Representative in your region using the contact information sheet provided with your manual. (1) (2) Replace Igniter Batteries Parts required: 1 AA alkaline battery per igniter. Unscrew igniter button from top of
-
 1
1 -
 2
2 -
 3
3 -
 4
4 -
 5
5 -
 6
6 -
 7
7 -
8
-
9
-
10
-
11
-
12
-
13
-
14
-
15
-
16
-
17
-
18
-
19
-
20
-
21
-
22
-
23
-
24
-
25
-
26
-
27
-
28
-
29
-
30
-
31
-
32
-
33
-
34
-
35
-
36
-
37
-
38
-
39
-
40
-
41
-
42
-
43
-
44
-
45
-
46
-
47
 |
 |
SUMMIT
®
±
WARNING: Follow all leak-check
procedures carefully in this manual prior to
barbecue operation. Do this even if the
barbecue was dealer-assembled.
NOTICE TO INSTALLER: These instructions
must be left with the owner and the owner
should keep them for future use.
THIS GAS APPLIANCE IS DESIGNED FOR
OUTDOOR USE ONLY.
±
WARNING
1.
Do not store spare liquid propane
cylinder within 10 feet (3m) of this
appliance.
2.
Do not store or use gasoline or other
flammable liquids or vapors within 25
feet (8m) of this appliance.
±
DANGER
If you smell gas:
1.
Shut off gas to the appliance.
2.
Extinguish any open flames.
3.
Open lid
4.
If odor continues, keep away from the
appliance and immediately call your gas
supplier or your fire department.
Leaking gas may cause a fire or explosion
which can cause serious bodily injury or
death, or damage to property.
Y
OU
MUST
READ
THIS
O
WNERS
G
UIDE
BEFORE
OPERATING
YOUR
GAS
GRILL
LP Gas Grill Owners Guide
±
WARNING: Do not try to light this
appliance without reading the “Lighting”
Instructions section of this manual
A402_LP.g
Ba401.d
B402_LP.c
C403_LP.d
D403_LP.e
E402.c
#
42090 US 05/09/03
LP
42090
&