Singer 1234 Instruction Manual and Troubleshooting Guide
Singer 1234 Manual
 |
View all Singer 1234 manuals
Add to My Manuals
Save this manual to your list of manuals |
Singer 1234 manual content summary:
- Singer 1234 | Instruction Manual and Troubleshooting Guide - Page 1
Instruction Manual 1234 Manual de Instrucciones Manuel d'Instruction - Singer 1234 | Instruction Manual and Troubleshooting Guide - Page 2
- Singer 1234 | Instruction Manual and Troubleshooting Guide - Page 3
left unattended when plugged in. Always unplug this sewing machine from the electric outlet immediately after using and before cleaning, removing covers, lubricating or when making any other user servicing adjustments mentioned in the instruction manual. WARNING - To reduce the risk of burns, fire - Singer 1234 | Instruction Manual and Troubleshooting Guide - Page 4
- Do not pull or push fabric while stitching. It may deflect the needle causing it to break. - Wear safety glasses. - Switch the sewing machine off ("O") when making any adjustment in the needle area, such as threading needle, changing needle, threading bobbin, or changing presser foot, etc. - Never - Singer 1234 | Instruction Manual and Troubleshooting Guide - Page 5
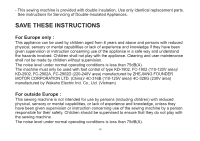
- This sewing machine is provided with double insulation. Use only identical replacement parts. See instructions for Servicing of Double-Insulated Appliances. SAVE THESE INSTRUCTIONS For Europe only : This appliance can be used by children aged from 8 years and above and persons with reduced - Singer 1234 | Instruction Manual and Troubleshooting Guide - Page 6
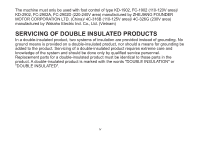
The machine must only be used with foot control of type KD-1902, FC-1902 (110 110-125V area)/ 4C-326G (230V area) manufactured by Wakaho Electric Ind. Co., Ltd. (Vietnam) SERVICING OF DOUBLE INSULATED PRODUCTS In a double-insulated product, two systems of insulation are provided instead of grounding. - Singer 1234 | Instruction Manual and Troubleshooting Guide - Page 7
inmediatamente después de utilizarla y antes de limpiarla, quitar las tapas, lubricarla o realizar cualquier otro ajuste o mantenimiento mencionado en el manual de instrucciones. ADVERTENCIA - PARA REDUCIR EL RIESGO DE QUEMADURAS, INCENDIO, DESCARGA ELÉCTRICA O DAÑOS PERSONALES: - No permita que - Singer 1234 | Instruction Manual and Troubleshooting Guide - Page 8
- No utilice nunca la máquina de coser si el cable o el enchufe están dañados, si no funciona adecuadamente, si se ha caído o se ha dañado, o si ha caído al agua. Envíe la máquina de coser al distribuidor autorizado o centro de servicio más cercano para su examen, reparación y ajuste eléctrico o mec - Singer 1234 | Instruction Manual and Troubleshooting Guide - Page 9
- El pedal sirve para manejar la máquina. Evite colocar otros objetos en el pedal. - No utilice la máquina si está mojada. - Si la bombilla LED está dañada o rota, debe ser reemplazada por el fabricante o su agente de servicio o una persona igualmente calificada, para evitar riesgos. - Si el cable - Singer 1234 | Instruction Manual and Troubleshooting Guide - Page 10
FUERA DE EUROPA: Esta máquina de coser no ha sido diseñada para ser utilizada por personas (incluyendo niños) con alguna discapacidad física, sensorial o mental o sin la experiencia y los conocimientos necesarios, salvo que hayan sido supervisados o recibido instrucciones sobre el uso de la máquina - Singer 1234 | Instruction Manual and Troubleshooting Guide - Page 11
ées, y compris les suivantes : Lisez attentivement toutes les instructions avant d'utiliser cette machine à coudre à usage domestique. Conservez les instructions dans un lieu approprié près de la machine. Veillez à les transmettre avec la machine si celle-ci est donnée à une autre personne. DANGER - Singer 1234 | Instruction Manual and Troubleshooting Guide - Page 12
sont endommagés, si elle ne fonctionne pas correctement ou si elle est tombée par terre ou a été endommagée ou plongée dans l'eau. Retournez la machine au distributeur ou au centre technique le plus proche de chez vous pour toute révision, réparation ou réglage mécanique ou électrique. - Ne faites - Singer 1234 | Instruction Manual and Troubleshooting Guide - Page 13
é par le fabricant ou son agent de service, ou toute autre personne qualifiée, afin d'éviter les risques. - Cette machine est équipée d'une double isolation. N'utilisez que des pièces détachées d'origine. Voir les instructions relatives à l'entretien des appareils à double isolation. CONSERVEZ - Singer 1234 | Instruction Manual and Troubleshooting Guide - Page 14
)/ 4C-316B (110-125V)/ 4C-326G (230V) fabriquée par Wakaho Electric Ind. Co., Ltd. (Vietnam) ENTRETIEN DES PRODUITS ÉQUIPÉS D'UNE DOUBLE ISOLATION Une machine à double isolation est équipée de deux systèmes d'isolation au lieu d'une mise à la terre. Aucun branchement à la terre n'est livré avec un - Singer 1234 | Instruction Manual and Troubleshooting Guide - Page 15
instruction book, step by step, seated at your machine. To ensure that you are always provided with the most modern sewing capabilities, the manufacturer reserves the right to change the appearance, design or accessories of this sewing machine when considered necessary. Singer este manual de - Singer 1234 | Instruction Manual and Troubleshooting Guide - Page 16
the Machine Winding the Bobbin ...11 Inserting the Bobbin ...13 Threading the Upper Thread ...15 Raising the Bobbin Thread...17 Thread Tension ...19 Sewing How to Choose Your Pattern...21 Sewing Straight Stitch ...23 Reverse Sewing/ Removing the Work/ Cutting the Thread 25 Blind Hem...27 Sew 4-step - Singer 1234 | Instruction Manual and Troubleshooting Guide - Page 17
E Indice Partes de la máquina Partes de la máquina ...3/5 Conexión de la máquina a la fuente de alimentación eléctrica 7 Elevador del prensatelas de dos tiempos ...8 Accesorios ...10 Enhebrando la máquina Devanado de la bobina ...12 Insertando la bobina...14 Enhebrado del hilo superior ...16 - Singer 1234 | Instruction Manual and Troubleshooting Guide - Page 18
machine Les composantes principales de la machine à coudre...3/5 Branchement de la machine à une source d'alimentation...7 Levier du pied presseur à deux niveaux...8 Accessoires ...10 Enfilage de la machine Installation du bras amovible...38 Fixez le support du pied presseur ...40 Table de - Singer 1234 | Instruction Manual and Troubleshooting Guide - Page 19
the Machine 1. Thread take-up lever 2. Thread tension dial 3. Face plate 8 1 4. Thread cutter 9 5. Presser foot 2 6. Needle plate 3 10 7. Removable extension table/ accessory box 4 8. Thread guide 11 9. Bobbin winder stopper 5 10. Pattern selector dial 6 11. Reverse sewing lever - Singer 1234 | Instruction Manual and Troubleshooting Guide - Page 20
Puntadas 11. Palanca de retroceso frontal F Les composantes principales de la machine à coudre 1. Releveur du fil 2. Cadran de réglage de la 5. Pied presseur 6. Plaque aiguille 7. Bras amovible/ rangement des accessoires 8. Guide-fil du bobineur 9. Axe butoir de la canette 10. Cadran de sélection - Singer 1234 | Instruction Manual and Troubleshooting Guide - Page 21
EN Principal Parts of the Machine 12. Handle 13. Bobbin winder spindle 14. Spool pins 12 15. Handwheel 13 18 16. Power switch 17. Main plug socket 14 18. Bobbin thread guide 15 19. Presser foot lifter 20. Foot control 19 21. Power cord 16 17 20 21 4 - Singer 1234 | Instruction Manual and Troubleshooting Guide - Page 22
18. Guía del hilo superior 19. Palanca del prensatelas 20. Control de la velocidad 21. Cable de alimentación F Les composantes principales de la machine à coudre 12. Poignée de transport 13. Axe pour remplir la canette 14. Tiges de la bobine 15. Volant 16. Interrupteur d'alimentation et d'éclairage - Singer 1234 | Instruction Manual and Troubleshooting Guide - Page 23
in use. Foot control The foot control pedal regulates the sewing speed. (3) Attention: Consult a qualified electrician if in doubt of how to connect machine to power source. Unplug power cord when machine is not in use. Sewing light Press main switch (A) to " l " for power and light. IMPORTANT - Singer 1234 | Instruction Manual and Troubleshooting Guide - Page 24
pas utilisée. Rhéostat Le rhéostat contrôle la vitesse de fonctionnement de la machine. (3) Attention: Consulter un électricien qualifié en cas de doute pour brancher la machine. Débrancher la machine quand celle-ci n'est pas utilisée. Le rhéostat doit être obligatoirement utilisé avec l'appareil - Singer 1234 | Instruction Manual and Troubleshooting Guide - Page 25
EN Two Step Presser Foot Lifter When sewing several layers or thick fabrics, the presser foot can be raised to a higher position for easy positioning of the work (A). E Elevador del prensatelas de dos - Singer 1234 | Instruction Manual and Troubleshooting Guide - Page 26
are not supplied with this machine; they are however available as special accessories from your local dealer.) j. Quilting foot k. Overcasting foot l. Hemmer foot m. Blind hem foot n. Satin stitch foot o. Darning/ embroidery foot p. Button sewing foot q. Edge/ quilting guide r. Soft cover - Singer 1234 | Instruction Manual and Troubleshooting Guide - Page 27
fournis avec la machine. Cependant, ils sont disponibles dans votre magasin SINGER®) j. Pied pour matelassage k. Pied pour surfilage l. Pied ourleur à semelle étroite m. Pied pour ourlet invisible n. Pied bourdon o. Pied reprisage/ broderie p. Pied pour pose de bouton q. Guide - Singer 1234 | Instruction Manual and Troubleshooting Guide - Page 28
slowly. Release the pedal and cut thread. (8) - Push bobbin spindle to left (9) and remove. 1 Please Note: When the bobbin winder spindle is in "bobbin winding" 3 position, the machine will not sew and the hand wheel will not turn. To start sewing, push the bobbin winder spindle to the left - Singer 1234 | Instruction Manual and Troubleshooting Guide - Page 29
le feutre (a) sur la tige de la bobine. (1) - Passez le fil dans le guide-fil. (2) - Enroulez le fil, dans le sens des aiguilles d'une montre, entre les - Tenez l'extrémité du fil. (6) - Appuyez sur le rhéostat de la machine. (7) - Relâchez le rhéostat après quelques tours. Relâchez le fil et - Singer 1234 | Instruction Manual and Troubleshooting Guide - Page 30
or removing the bobbin, the needle must be fully raised, to the highest position. a - Remove the extension table, then open the hinged cover. (1) - Pull the bobbin case tab (a) and remove the bobbin case. (2) - Hold the bobbin case with one hand. Insert the bobbin so that the thread runs in - Singer 1234 | Instruction Manual and Troubleshooting Guide - Page 31
E Insertando la bobina Cuando se inserta o se remueva la bobina, la aguja debe estar completamente elevada a su altura máxima. - Remueva la mesa extensora, después abra la cubierta. (1) - Tome la caja bobina de la pestaña (a) y retírela. (2) - Sostenga la caja bobina con una mano. Inserte la bobina - Singer 1234 | Instruction Manual and Troubleshooting Guide - Page 32
EN Threading the Upper Thread This is a simple operation but it is important to carry out correctly as by not doing so several sewing problems could result. - Start by raising the needle to its highest point (1), and continue turning the handwheel counterclockwise until the needle just slightly - Singer 1234 | Instruction Manual and Troubleshooting Guide - Page 33
cours de cette opération, il est utile de tenir le fil entre la bobine et le guide-fil (4) et de le tirer doucement vers le haut. - Lorsque vous avez atteint le dessus de la machine, enfilez l'oeillet du releveur de fil en faisant passer le fil de droite à gauche et ensuite - Singer 1234 | Instruction Manual and Troubleshooting Guide - Page 34
: If it is difficult to raise the bobbin thread, check to make sure the thread is not trapped by the hinged cover or the Removable Extension Table. 1 Gently pull on the upper thread to bring the bobbin thread up through the needle plate hole. (2) Lay both threads to the back under the presser foot - Singer 1234 | Instruction Manual and Troubleshooting Guide - Page 35
E Elevación del hilo de la bobina Sujete el hilo superior con la mano izquierda. Gire el volante (1) hacia usted hasta que baje totalmente la aguja, siga girando hasta volver a subir la aguja. F Pour remonter le fil de la canette Tenir le fil supérieur avec la main gauche. Tourner le volant (1) - Singer 1234 | Instruction Manual and Troubleshooting Guide - Page 36
stitch sewing. Turn dial to lower number. 3 D. Normal thread tension for zig zag and decorative sewing. Correct thread tension is when a small amount of the 2 upper thread appears on the bottom side of fabric. Lower thread tension (2) To test the bobbin thread tension, remove the bobbin case - Singer 1234 | Instruction Manual and Troubleshooting Guide - Page 37
E Tensión del hilo Tensión del hilo superior Ajuste básico de la tensión del hilo: "4" (1) Para aumentar la tensión, girar el disco al siguiente número más alto. Para reducir la tensión, girar el disco al siguiente número más bajo. A. Tensión normal del hilo para cosido de puntos rectos. B. Tensión - Singer 1234 | Instruction Manual and Troubleshooting Guide - Page 38
EN How to Choose Your Pattern To select a stitch, simply turn the pattern selector dial. (a) The pattern selector dial may be turned in either direction. a. Pattern Selector Dial b. Reverse Sewing Lever a b 2 3 1 4 21
-
 1
1 -
 2
2 -
 3
3 -
 4
4 -
 5
5 -
 6
6 -
 7
7 -
8
-
9
-
10
-
11
-
12
-
13
-
14
-
15
-
16
-
17
-
18
-
19
-
20
-
21
-
22
-
23
-
24
-
25
-
26
-
27
-
28
-
29
-
30
-
31
-
32
-
33
-
34
-
35
-
36
-
37
-
38
 |
 |

Manuel d'Instruction
Instruction Manual
Manual de Instrucciones
1234